How to Customize Emails in WordPress: Step-by-Step


A generic WordPress email has little to zero impact on your customers. Because you’re not the only one who uses these default email templates. Thousands of websites rely on these same generic templates, making it easy for you to get lost in the crowd.
So, if you want to grab attention and drive action, customizing WordPress emails is a must. And the good news? It’s easier than you think with the right WordPress email customizer.
In this blog, we’ll learn how to customize emails in WordPress to convert dull and plain messages into powerful ones that stand out in any inbox.
Why Customize Emails in WordPress?
WordPress default emails look plain and generic, which means customers are likely not to engage with and convert. Customizing WordPress emails is important, especially if you’re running a business, building a brand, or establishing client trust.
Apart from these, many more reasons push you to consider customized emails rather than plain emails. Here are the key reasons why they matter so much for a brand:
- Boost engagement: Custom WordPress emails with clear CTAs, personalization, and responsive designs will boost email open rates and click rates.
- Reflects brand identity: Customized emails hold a strong brand identity that is not only good for brand recognition but also appropriate for building credibility.
- Personalized message: These emails leave a long-term impact on your customers by establishing a better user experience with proper communication.
- Better conversion rate: High engagement leads to an increasing conversion rate which is mostly possible with customized WordPress emails.
- Enhanced email deliverability: Customized emails can also avoid spam filtering, which is crucial to delivering emails to the right destination.
Steps to Customize Emails in WordPress
Default WordPress and WooCommerce emails are always boring as there is no personalized touch. These uncustomized emails leave almost zero impact on your customers. Sadly, there is no default option to create custom emails in WordPress.
So, in this case, you need to look for another option, such as customizing email with WordPress plugins or coding. Since using a WordPress plugin is the easiest and friendliest option, here we’ll demonstrate the whole process of how to customize emails in WordPress using a plugin:
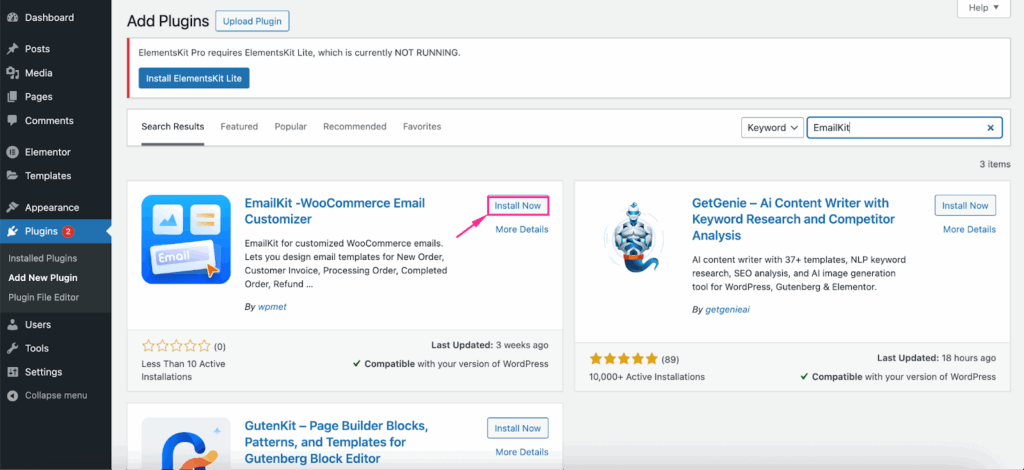
Step 1: Pick an Email Customizer Plugin.
The primary step to create branded or custom emails is to adopt a WordPress Email Customizer plugin. Here, EmailKit is an absolute option since it allows you to seamlessly create WordPress and WooCommerce custom emails with 25+ elements and shortcode support.
So, install and activate EmailKit from the WordPress plugin repository. To do that, navigate Plugins > Add New and search for EmailKit. Then, Install and Activate the plugin.
Step 2: Select a Template
The next step is selecting and adding an email template by visiting EmailKit > All Emails. After that, click the ‘Add New Email Template’ button to navigate all template options for WordPress and WooCommerce.
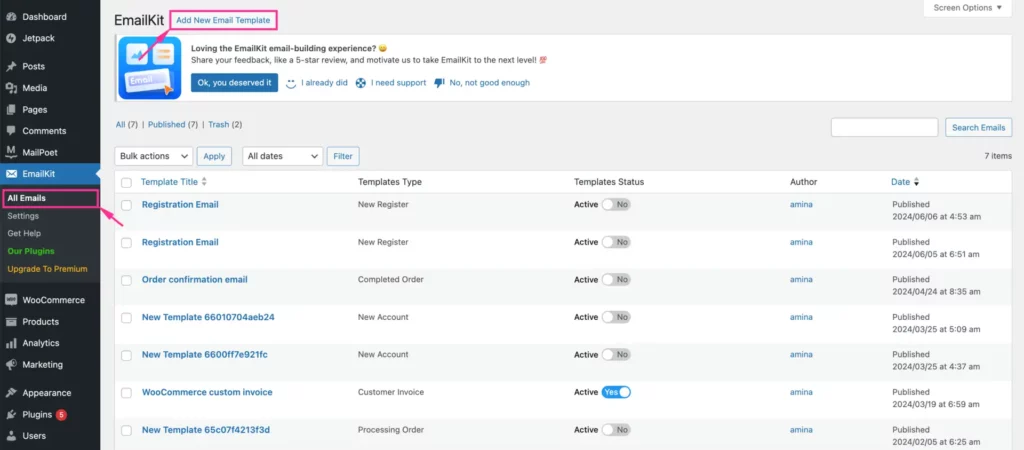
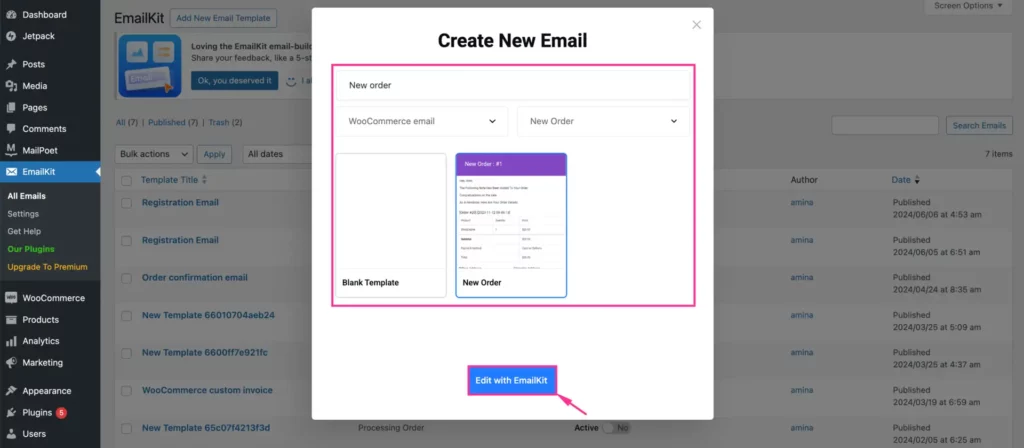
This will open up a popup from where you need to take the following actions to create WordPress custom email templates:
- Template Name: Enter a name for your email template.
- Select Email Type: Select WordPress email from the dropdown menu.
- Select Template: Pick a template from the dropdown menu. Here, you can select a blank or pre-built template. Go for the blank one if you want to do everything from scratch. Or else, opt for a built-in template and hit the ‘Edit with EmailKit’ button.
After clicking the ‘Edit with EmailKit’ button, you will be taken to the plugin editor for further customization.
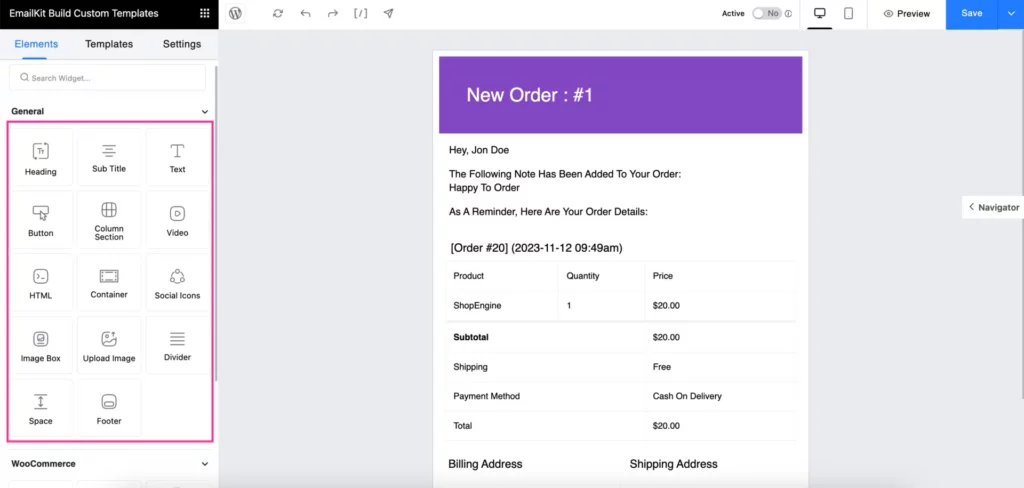
Step 3: Create a Custom Email Template
After picking an email template, you need to customize the templates with 25+ WooCommerce and WordPress elements. You have to add necessary elements to the email template by dragging and dropping.
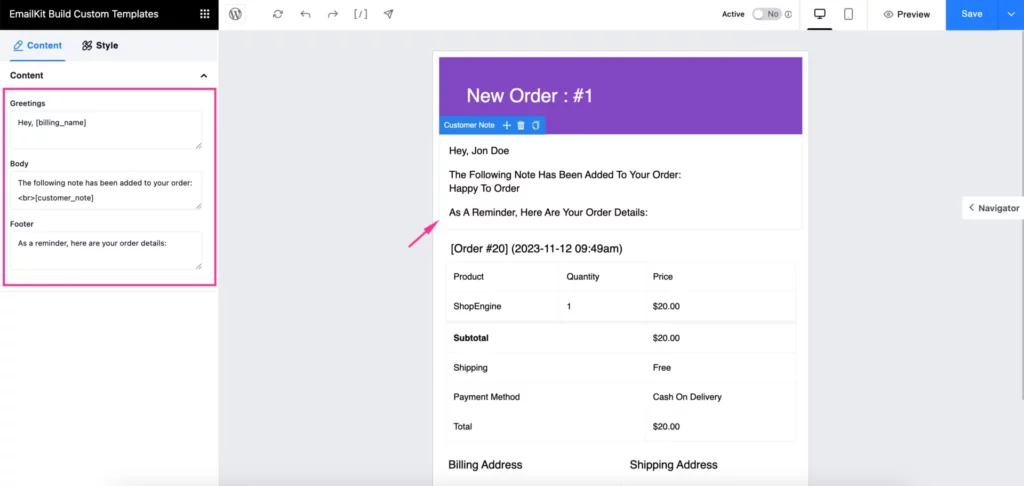
After adding all the required elements to your email template, you can customize the default text of your templates. For that, click the section you want to customize and then edit the content part from the left side.
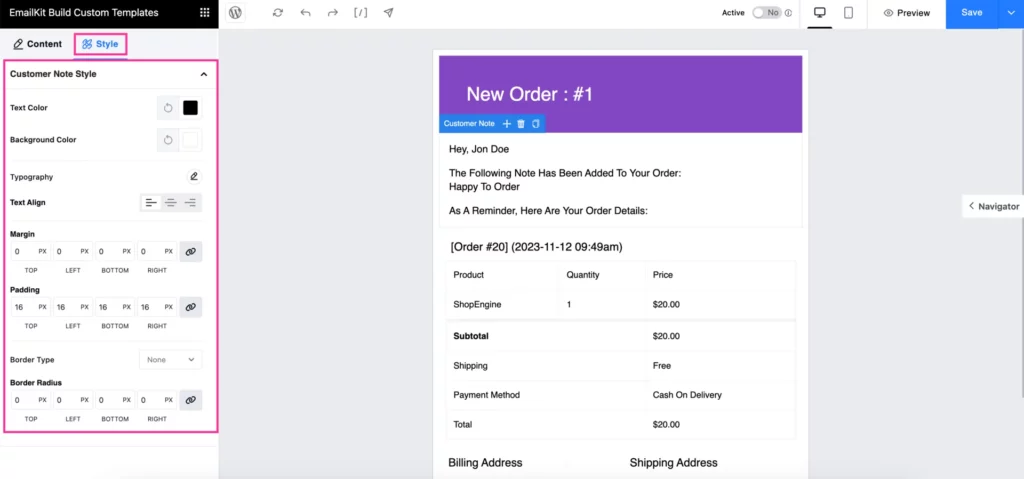
After editing the content, click the ‘Style’ tab and adjust the Text Color, Background Color, Typography, Text Align, Margin, Padding, Border Type, Border Radius, etc. of your email. Following a similar process, customize all the sections of your email template.
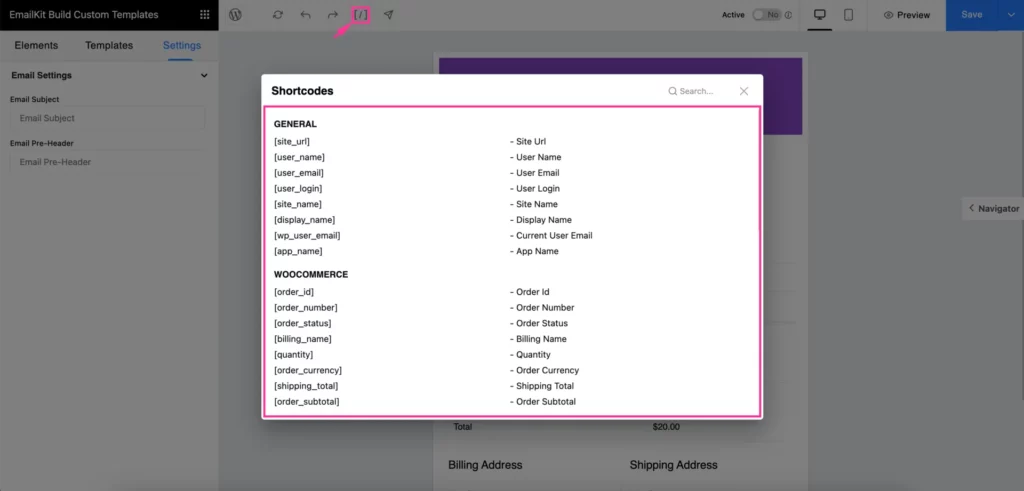
Besides, since this is a shortcode-supported WordPress email customizer, you can add fields with shortcodes. All you need to do is hit the ‘[l]’ shortcode sign. A tab for shortcodes will pop up where you can view shortcodes for all elements. Now, add any elements with respective shortcodes.
Additionally, you can also set the Subject and Pre-Header for your WordPress custom emails.

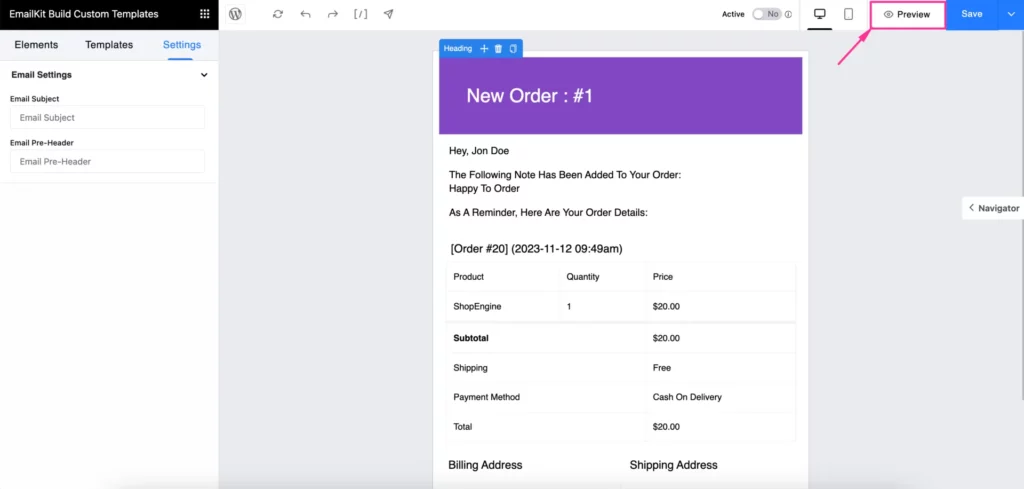
Step 4: Preview and Send Test Email
In this fourth step, you need to preview and send a test email for a final check before delivering them to your clients’ inboxes. Now, click the ‘Preview’ button to see how it looks on the front end.
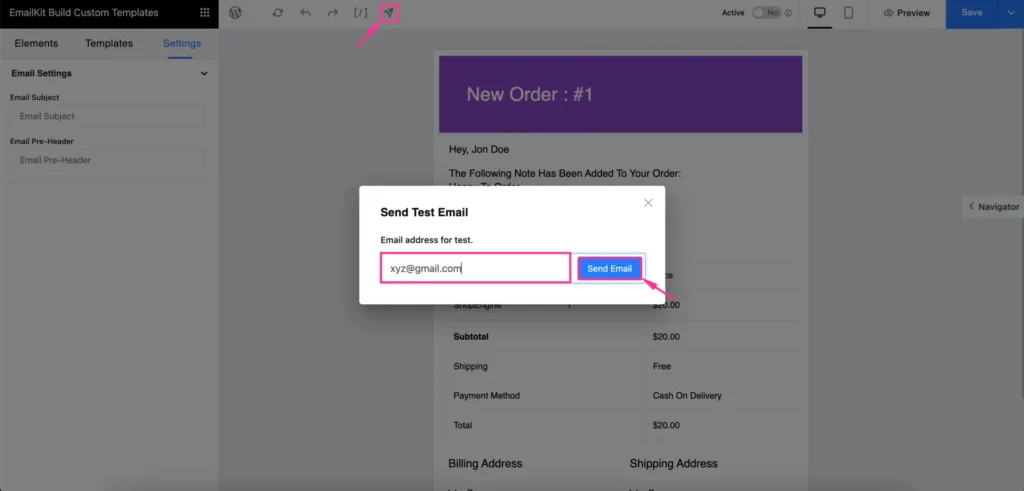
You can also send a test email by hitting the arrow button, which will pop up a tab to insert an email address. Then, insert an email in the blank field and press the ‘Send Email’ button. And the test email will be delivered to that email address.
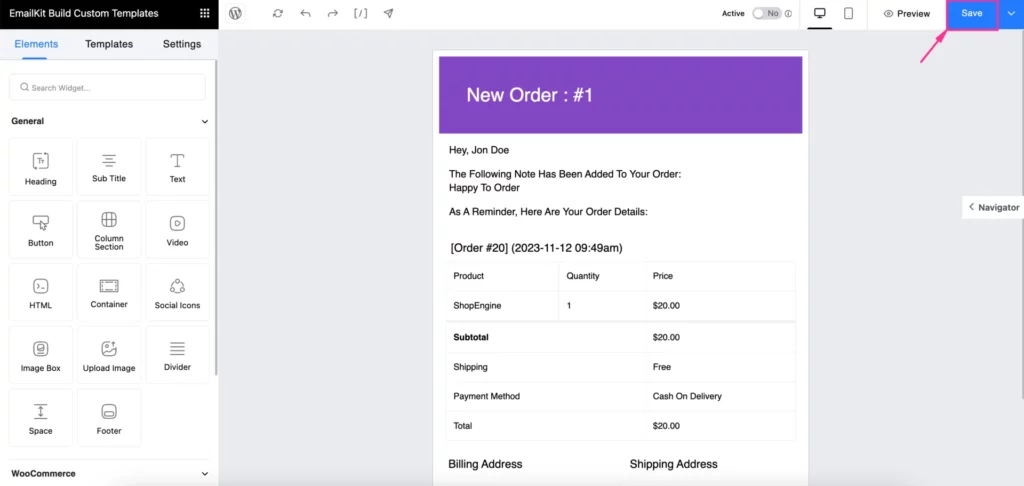
Step 5: Save to Store WordPress Custom Email Template
In this final step, you need to save the WordPress custom email template to store it for future use. To do so, press the ‘Save’ button like the following image.
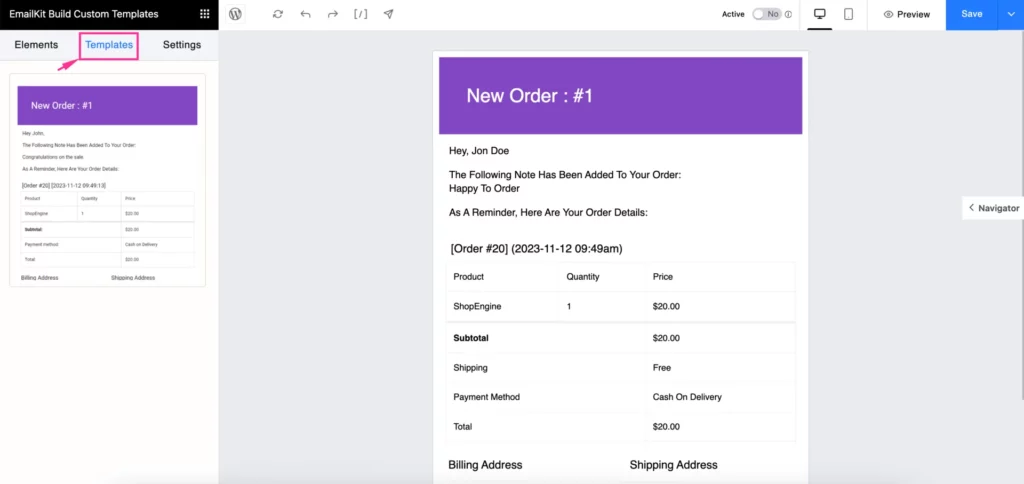
Now, this saved template will be stored in the ‘Templates’ tab. By visiting this tab, you can check all the recent and previously saved custom email templates for WordPress and WooCommerce.
Troubleshooting Common Email Issues
Email is a crucial marketing channel for individuals and businesses alike. However, when it doesn’t deliver to the correct destination, it can be frustrating. Here, we’ll show you ways to troubleshoot common email issues so that you can hit your clients’ inboxes in the right way at the right time. Let’s check out all those common errors with proper fixes:
- Emails not being sent from WordPress: The main reasons for this problem are incorrect server settings and internet issues. Double-check whether your internet connection is okay, verify outgoing SMTP and incoming IMAP/POP server settings, and ensure the email client is up-to-date.
- Emails dropping in spam folder: Your emails can be dropped in the spam folder due to using spammy words, not ensuring valid SPF and DKIM records, having high bounce and spam rates, using URL shortening services, etc. Avoid these to ensure emails hit your clients’ inboxes.
- Delay in email delivery: Large attachments, server errors, and internet issues can delay your email delivery. So, you need to resolve server and internet errors to speed up email delivery.
- Email with formatting issues: This is another major email issue that should be avoided by not copying and pasting from Word or other editors and using a WordPress email customizer plugin like EmailKit.
Wrapping Up
So, creating customized WordPress emails takes less than a few minutes, Yes, it is that simple! With an efficient WordPress and WooCommerce email template customizer like EmailKit, you can design branded and professional emails that actually get noticed and drive results.
Instead of sending the same old messages, craft an email now that connects, converts, and leaves a lasting impression on your brand or business.
Subscribe to Our Newsletter
Get the latest WordPress tutorials, trends, and resources right in your inbox. No Spamming, Unsubscribe Anytime.

Thank you for subscribing to our newsletter!

Table of Content
- Why Customize Emails in WordPress?
- Steps to Customize Emails in WordPress
- Step 1: Pick an Email Customizer Plugin.
- Step 2: Select a Template
- Step 3: Create a Custom Email Template
- Step 4: Preview and Send Test Email
- Step 5: Save to Store WordPress Custom Email Template
- Troubleshooting Common Email Issues
- Wrapping Up