How to Increase WordPress Memory Limit: 5 Easy Methods


Ever tried installing a plugin or them in your WordPress, only to be met with a frustrating ‘Allowed memory size exhausted’ error? Yeah, it’s one of those annoying roadblocks that hits you out of nowhere, especially when you’re in the middle of something important.
This issue usually means your WordPress site doesn’t have enough memory to handle the upload you want to make happen. It can slow things down, break pages, or crash your site completely.
The good news is, you don’t need to be a developer to fix it. In this post, we will guide you through five easy methods to increase WordPress memory limit, Let’s get your site running smoothly again!
Definition of WordPress Memory Limit
The WordPress Memory Limit refers to the maximum amount of PHP memory the server allocates. These settings define how much memory a WordPress site can use to execute scripts and processes. Such as loading plugins, processing large database queries, rendering themes, or running background tasks like cron jobs.
Many hosting providers set this limit relatively low (often 32MB or 64MB) by default, which can lead to ‘Allowed memory size exhausted‘ errors when resource-intensive operations exceed the cap.
Increasing the WordPress memory limit typically via wp-config.php, php.ini, or .htaccess ensures better performance and stability, specifically on dynamic or plugin-heavy sites.
However, aligning this value with your hosting provider’s constraints is essential to avoid conflicts or server resource overuse.
How Much Memory Does WordPress Need?
The amount of memory WordPress needs depends on your site’s size, complexity, and the number of plugins or themes in use.
- Minimum Requirement: WordPress itself can run on as little as 32MB of PHP memory, which is often the default on shared hosting.
- Recommended for Most Sites: For standard websites with a few plugins and a modern theme, 128MB is sufficient.
- For Ecommerce Sites: If you are running an ecommerce plugin with membership systems, multilingual plugins, or large media libraries in your site, you will likely need 256MB or more to ensure smooth performance.
- For Complex Sites: Advanced setups with page builders, staging environments, or custom post types sites require 512MB or higher, especially during imports, backups, or cron jobs.
Note: It’s always best to allocate only what you need and increase WordPress’ memory limit periodically to avoid unnecessary loads.
How to Check the WordPress Memory Limit?
There are multiple ways you can check your WordPress site’s PHP Memory Limit. Here are a couple of easy ways to check it:
Step 1: Use a Plugin (Easy for Beginners)
- Install a plugin like Health Check & Troubleshooting or WP Site Health.
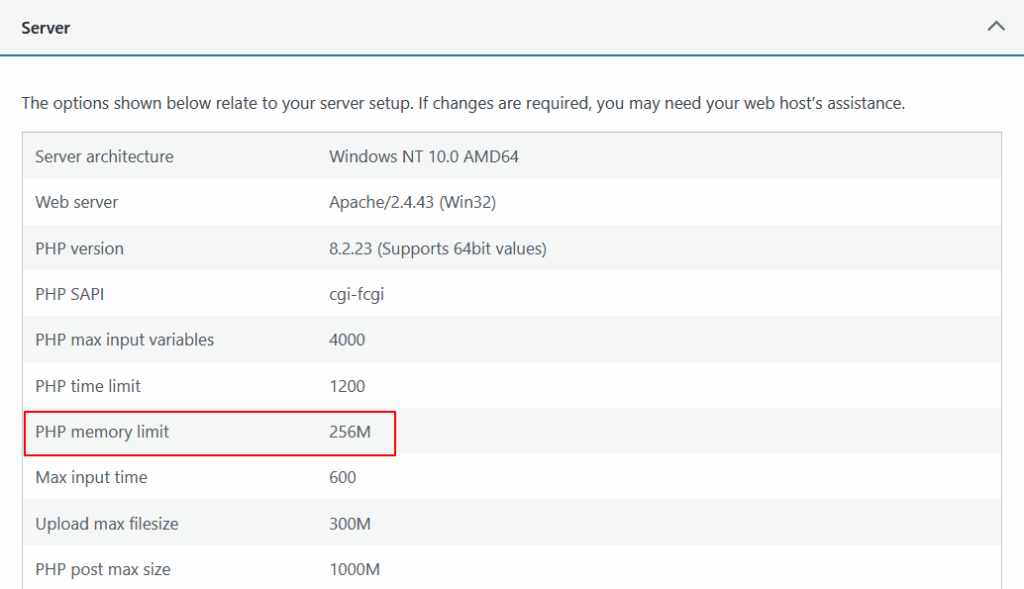
- Go to your WordPress Dashboard > Tools > Site Health. Click the Info tab and look under Server or PHP. You’ll see the current memory limit (e.g., WP Memory Limit: 128M).
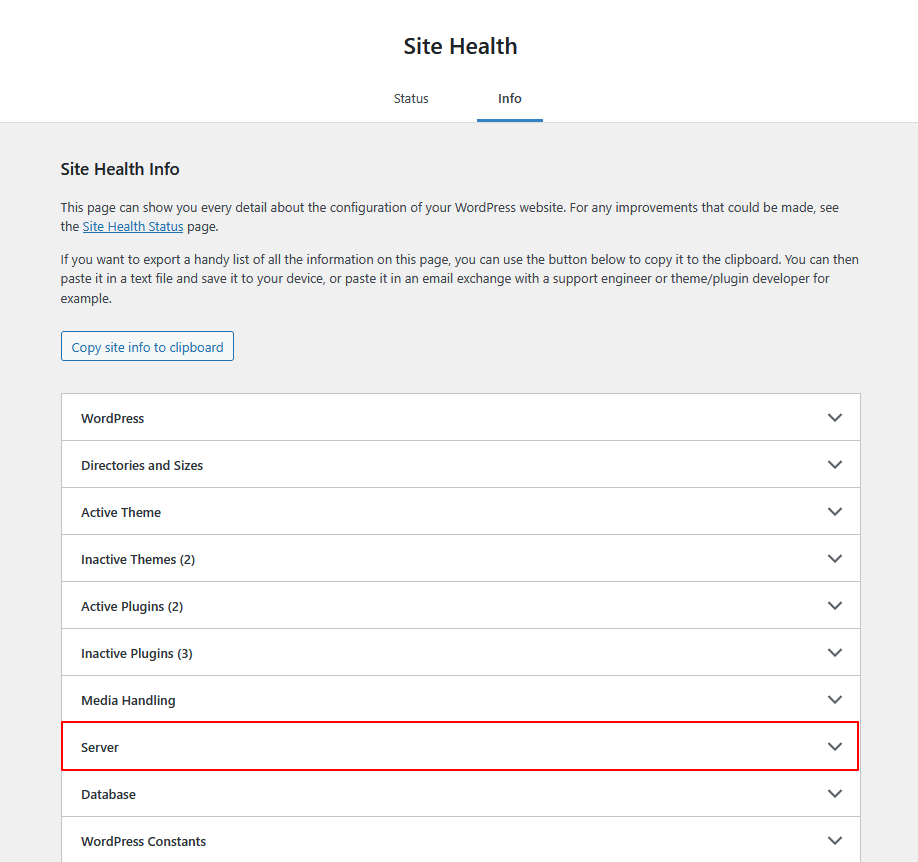
- Keep scrolling through the server settings until you see the PHP memory limit.
Step 2: Check wp-config.php (For Intermediate Users)
- Access your site files via FTP or File Manager in your hosting dashboard.
- Open the wp-config.php file (in your root WordPress folder).
- Look for this line define(‘WP_MEMORY_LIMIT’, ‘128M’). That’s your memory limit. If it’s not there, WordPress is using the default set by your server.
Next, we will explore the detail overview on how to increase WordPress PHP memory limit.
How to Increase PHP Memory Limit in WordPress: Methods and Steps
In this section, we will show you how you can increase WordPress Memory Limit using five simple and easy methods.
1. Edit your wp-config.php
2. Edit your PHP.ini file
3. Edit your .htaccess file
4. Using an FTP/SFTP
5. Using File Manager
Below we will explore each method in a step-by-step format. Let’s get into it!
Method 1: Edit your wp-config.php WordPress Memory Limit File
The wp-config.php file is one of the most important files in your WordPress site. It holds your site’s basic settings, including how much memory WordPress can use.
To increase WordPress memory limit:
- Find the wp-config.php file – it’s located in the main (root) folder of your WordPress installation.
- Open the file using a code editor or through your hosting file manager. Look for the line below (or add it if it’s not there):
define('WP_MEMORY_LIMIT', '64M');- Change the number to a higher value, like:
define('WP_MEMORY_LIMIT', '128M');Or even:
define('WP_MEMORY_LIMIT', '256M');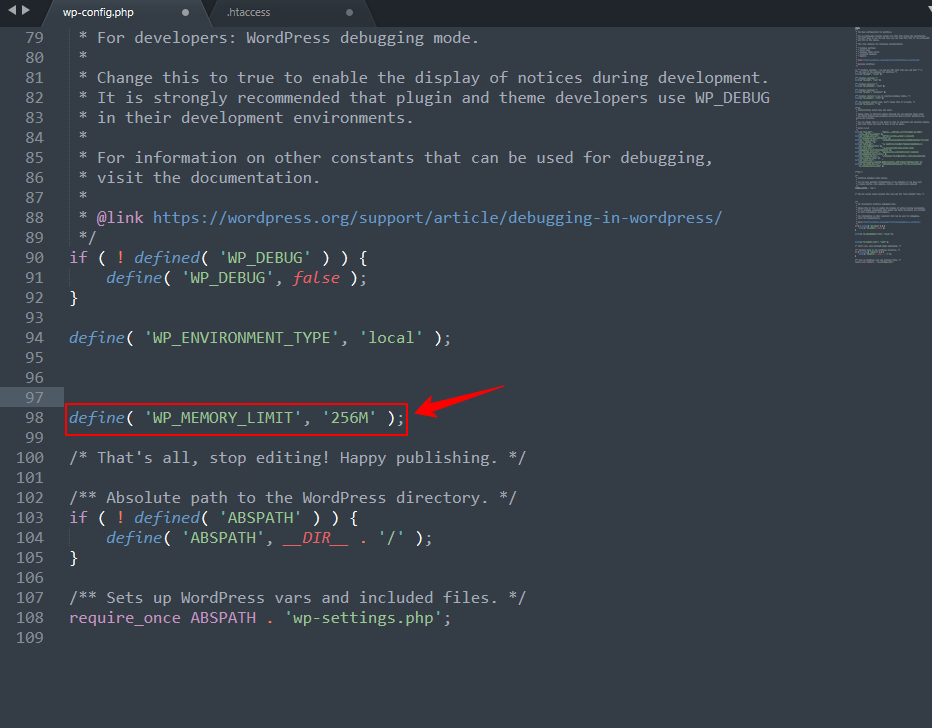
- Save the file and reload your website to see if the error is fixed.
Note: Some hosting providers limit how much memory you can use. If your changes don’t work, you may need to contact your hosting support for help.
Start with 128M, and increase if needed, but don’t go too high, as it could cause server issues. If you’re still getting a memory error, your host should be able to assist further.
Method 2: Edit your PHP.ini file to increase the WP memory limit
If editing the wp-config.php file didn’t fix the memory issue, the problem might be with your server’s PHP settings. This means you’ll need to adjust the memory limit from the php.ini file, which controls how much memory PHP (the language WordPress is built on) can use.
Remember, if you’re on shared hosting, you probably won’t have access to the php.ini file. But if you do have access, here’s what to do:
- Find your php.ini file. It’s usually located in the root folder of your WordPress installation.
- If you can’t find it, no worries, just create a new file named php.ini and place it in your WordPress root directory.
- Open the file using a text editor. Look for this line (or add it if it doesn’t exist): memory_limit = 32M. Change it to a higher value, like: memory_limit = 256M or memory_limit = 512M
- Save the file, and restart your server or localhost if needed.
In some cases, when you’re adjusting PHP settings, the values should follow a logical order. upload_max_filesize should be the smallest, post_max_size a bit higher, and memory_limit should be the largest. This helps avoid conflicts and ensures everything runs smoothly.
After making your changes, clear your browser’s cookies and cache, then refresh your site to see if the memory limit error is resolved.
Method 3: Edit your .htaccess file
If you don’t have access to the php.ini file, you can try increasing WordPress memory limit using the .htaccess file. This is usually a last resort, but it can work.
The .htaccess file is a hidden system file located in the root directory of your WordPress site. If you don’t see it, your file manager (or SFTP client) might be hiding hidden files. Make sure you enable the option to view hidden files so you can access it.
Add these lines to your .htaccess File:
php_value memory_limit 256M
php_value upload_max_filesize 12M
php_value post_max_size 13M
This will help you increase your WordPress PHP memory and upload limits for your site.
Note: If memory hasn’t been set anywhere else, this can help WordPress use more resources and prevent errors.
Optional: Use ini_set() (Limited Use)
If you’re editing a specific PHP file and want to increase memory just for that file, you can add this line:
ini_set('memory_limit', '512M');Keep in mind: this only affects the file where you place the code; it won’t apply site-wide.
Method 4: Increase the WordPress Memory Limit Using an FTP/SFTP
If you need to increase WordPress memory limit, one way to do that is by editing your site’s .htaccess or wp-config.php file through an FTP client like FileZilla.
First, make sure you’re connected to your website via FTP using your credentials. Once you’re connected, follow one of the options below depending on which file you want to update.
Option 1: Editing the .htaccess File
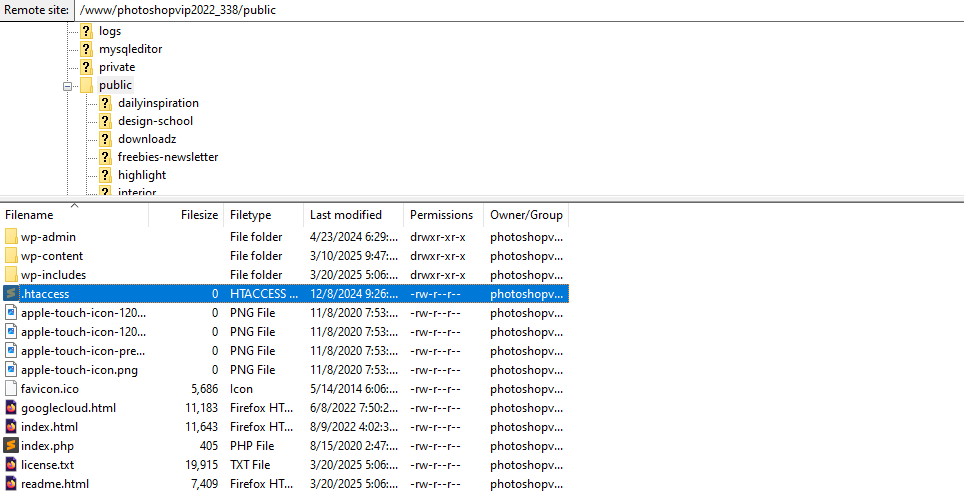
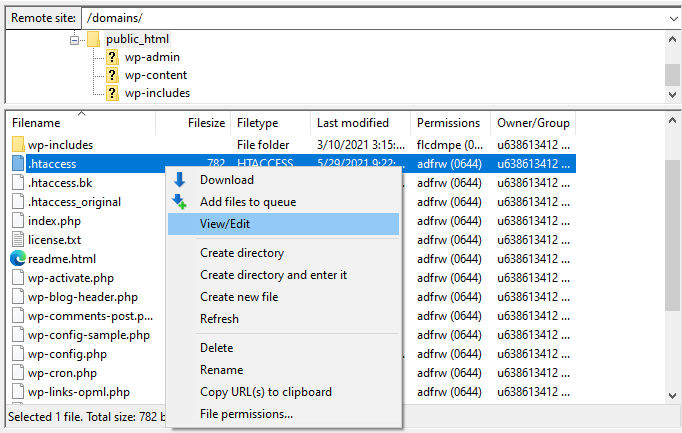
- In FileZilla, navigate to your site’s root directory, public_html. Look for a file named .htaccess. If you don’t see it, make sure hidden files are enabled.
- Right-click on .htaccess and choose View/Edit to open it in your default text editor.
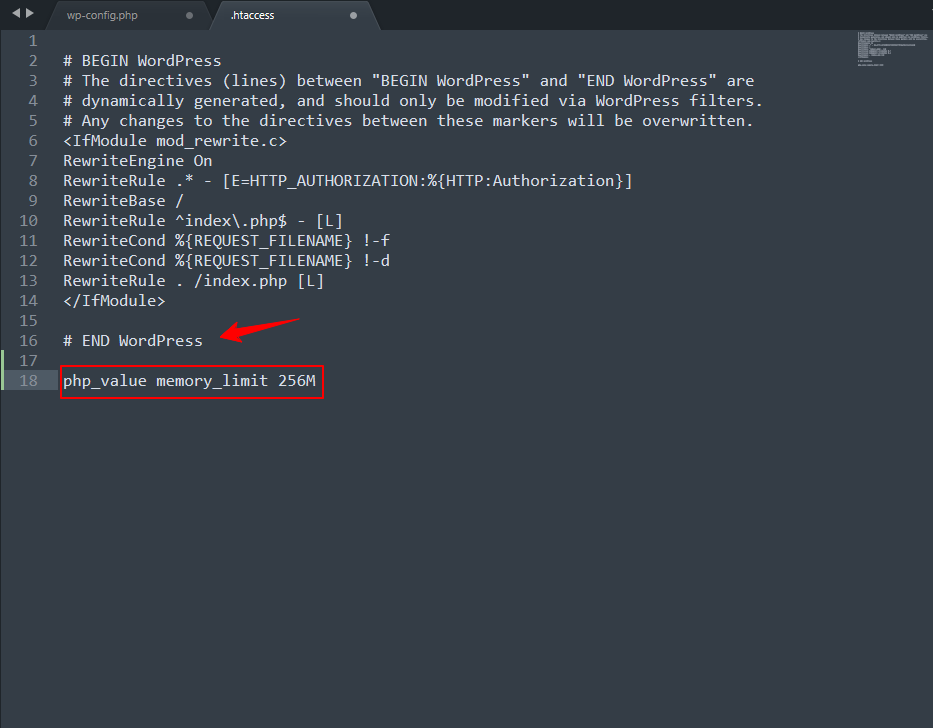
- In the file, scroll down to find the line that says:
# END WordPress
Right below that line, add the following:
php_value memory_limit 256M- Save the file and close the editor. FileZilla will prompt you to upload the changes, and click Yes. Refresh your site to make sure everything works as expected.
Option 2: Editing the wp-config.php File
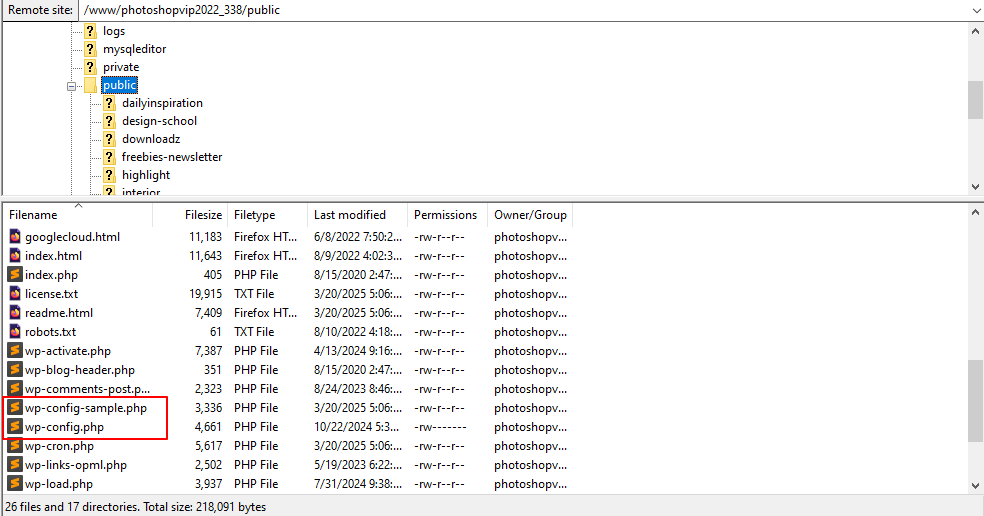
- In the same root directory, locate the wp-config.php file. Right-click it and select View/Edit.
- Look for a line that mentions WP_MEMORY_LIMIT. If it’s there, change the value to:
define('WP_MEMORY_LIMIT', '256M');- If you don’t see that line, just add it above this line:
/* That’s all, stop editing! Happy publishing. */
- Save the file and close the editor. When FileZilla asks if you want to upload the updated file, click Yes.
After making these changes, your site should no longer show the ‘memory limit exhausted‘ error.
Method 5: Use a Free WordPress Memory Using File Manager
An easier way to update the .htaccess file is by using the File Manager in your hosting control panel. In this example, we’ll use Hostinger hPanel to complete this process:
- Log in to your hPanel, go to the Files section, and click on File Manager.

- Open the public_html folder (this is your site’s root directory), then double-click on the wp-config.php file to edit it.
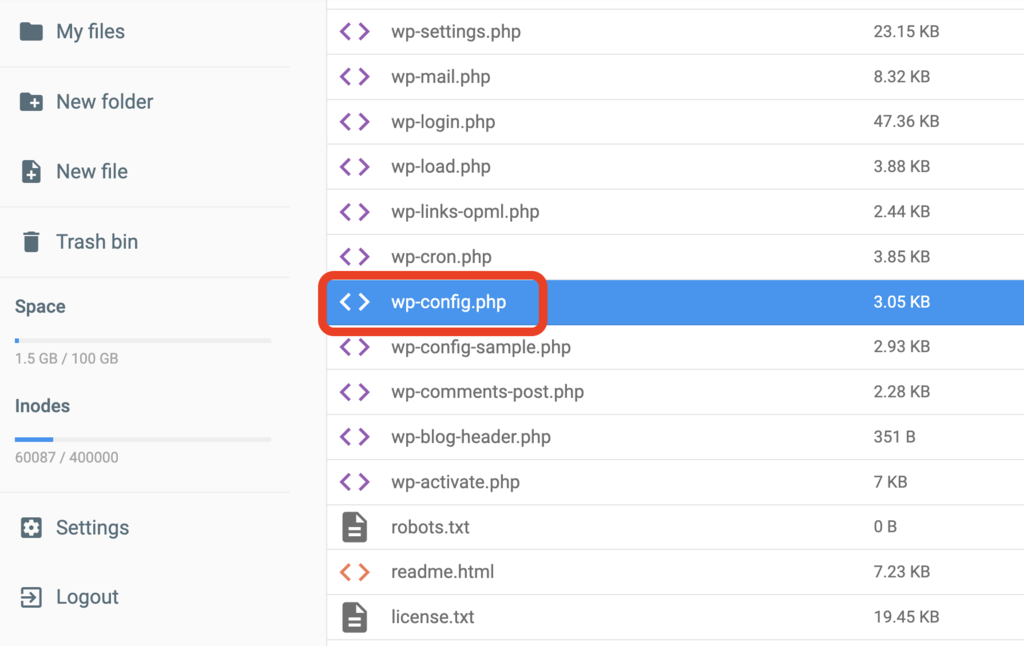
- Add the same code mentioned in the FTP method, depending on which file you’re working with. Once done, click Save & Close.
Even though this method is pretty simple, it’s always a good idea to back up your site first, just in case something doesn’t go as planned.
Final Words
Running into the “memory exhausted” error can be annoying, but now you know how to fix it. If you’re editing through FTP, your hosting panel, or directly in WordPress, you’ve got easy ways to increase your memory limit and get things back to normal.
Just remember to make small changes and back up your site before you start. If you’re still having trouble, don’t hesitate to ask your hosting provider for help. With this issue fixed, you can focus on what matters, like growing your site and others daily activity.
Frequently Asked Questions (FAQs)
Q. How do I increase the memory limit in WordPress?
To increase WordPress memory limit, you can manually add the following line to your wp-config.php file, just before the line that says ‘That’s all, stop editing!‘:
define('WP_MEMORY_LIMIT', '256M');If that doesn’t work, you may also need to adjust your php.ini or .htaccess file, depending on your hosting setup. Some hosts allow you to increase memory through their control panel or support team as well.
Q. What is the highest memory limit for WordPress?
Technically, there’s no fixed upper limit set by WordPress itself. The maximum memory limit depends on your server’s PHP configuration and what your hosting provider allows.
Most shared hosts cap it between 256MB to 512MB, while VPS or dedicated servers can go higher, even 1GB+ if needed. However, allocating more than necessary isn’t always better, it should match your site’s actual resource needs.
Q. Where can I find my WP memory limit?
You can check your current WordPress memory limit in a few easy ways:
- Use the Site Health tool under Tools > Site Health > Info > Server in your WordPress dashboard.
- Install a plugin like WP-ServerInfo or Health Check & Troubleshooting.
- Look in the wp-config.php file for a line like:
define('WP_MEMORY_LIMIT', '128M');If it’s not defined there, WordPress defaults to what your server allows.
Q. What is the Maximum Upload Limit in WordPress?
The maximum upload limit in WordPress controls the largest file size you can upload through the Media Library. This limit is set by your server configuration, not WordPress itself. Typical values range from 2MB to 256MB.
To check it:
- Go to Media > Add New in your dashboard. You’ll see the limit displayed under the upload box.
- To increase it, you need to edit your php.ini, .htaccess, or contact your hosting provider for help.
Q. How to fix the WordPress memory exhausted error?
The ‘Allowed memory size exhausted‘ error means your site ran out of allocated PHP memory. To fix it:
- Open your wp-config.php file via FTP or File Manager.
- Add or edit this line:
define('WP_MEMORY_LIMIT', '256M');Save the file and refresh your site. If the error persists, your server may be capping the memory. You need to contact your hosting support to request an increase. You can also try deactivating heavy plugins or themes that could be consuming too many resources.
Subscribe to Our Newsletter
Get the latest WordPress tutorials, trends, and resources right in your inbox. No Spamming, Unsubscribe Anytime.

Thank you for subscribing to our newsletter!

A seasoned Business Developer & Support Engineer who is deeply passionate about resolving WordPress-related issues and contributing to WordPress. His expertise lies in enhancing user experiences and driving success within the WordPress ecosystem.
Table of Content
- Definition of WordPress Memory Limit
- How Much Memory Does WordPress Need?
- How to Check the WordPress Memory Limit?
- Step 1: Use a Plugin (Easy for Beginners)
- Step 2: Check wp-config.php (For Intermediate Users)
- How to Increase PHP Memory Limit in WordPress: Methods and Steps
- Method 1: Edit your wp-config.php WordPress Memory Limit File
- Method 2: Edit your PHP.ini file to increase the WP memory limit
- Method 3: Edit your .htaccess file
- Method 4: Increase the WordPress Memory Limit Using an FTP/SFTP
- Method 5: Use a Free WordPress Memory Using File Manager
- Final Words
- Frequently Asked Questions (FAQs)
- Q. How do I increase the memory limit in WordPress?
- Q. What is the highest memory limit for WordPress?
- Q. Where can I find my WP memory limit?
- Q. What is the Maximum Upload Limit in WordPress?
- Q. How to fix the WordPress memory exhausted error?