How to Make a WordPress Website Private
When you create a WordPress website, the default setting makes your content publicly accessible to anyone on the internet. However, there may be instances when you want to restrict access to your site.
Whether you simply want to create a private members-only area or develop a website behind the back-end, WordPress offers several ways to make your website private. This blog will guide you through different methods to make your WordPress site private.
Why should you make your WordPress website private?

According to data from the University of Maryland, hackers attack computers every 39 seconds. Given this, creating a private WordPress site can be highly beneficial.
Depending on your needs, a private site is essential in several common scenarios –
- Personal or Family Blog: For keeping personal content, such as family updates, private and accessible only to invited guests.
- Membership Sites: Offer exclusive content to members, restricting access to paid subscribers or registered users.
- Internal Company Website: Using the site as an intranet for team collaboration, sharing confidential information, or internal documentation.
- Portfolio Development: To build and refine a portfolio in a private setting before making it public.
- Client Work: Sharing projects with clients privately during development before going live.
- Event Planning: Coordinate private events or share information with selected individuals.
- Educational Content: Creating an online course or learning material accessible only to enrolled students.
What does a private website mean on WordPress?
A private WordPress website is a platform where access to content is limited to specific individuals. This feature is essential for various purposes requiring privacy and security.
When private website terms are implemented, it signifies that the content is personal and intended for a select audience. This allows you to control who can view or interact with the site to keep sensitive information confidential.
3 Easy Methods to Make WordPress Website Private
Making your WordPress website private is rather straightforward, if you know which methods to use. Below we’ll detail three easy methods to make your website private.
Method 1: Make WordPress Website Private Using Plugin
There are several free and premium plugins you can use to help simplify this process. We’ll detail the process for one of the most popular plugins in the market below –
Step 1: Install and Activate Plugin
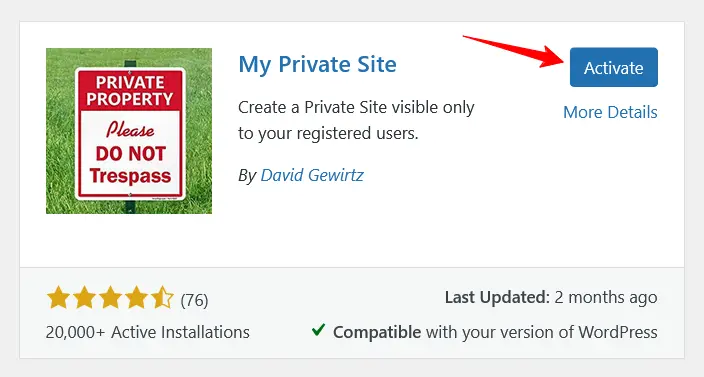
Go to your WordPress site Dashboard Plugins > Add New and search for the My Private Site plugin. Activate the plugin on your website.
Step 2: Configure Settings to Make Website Private
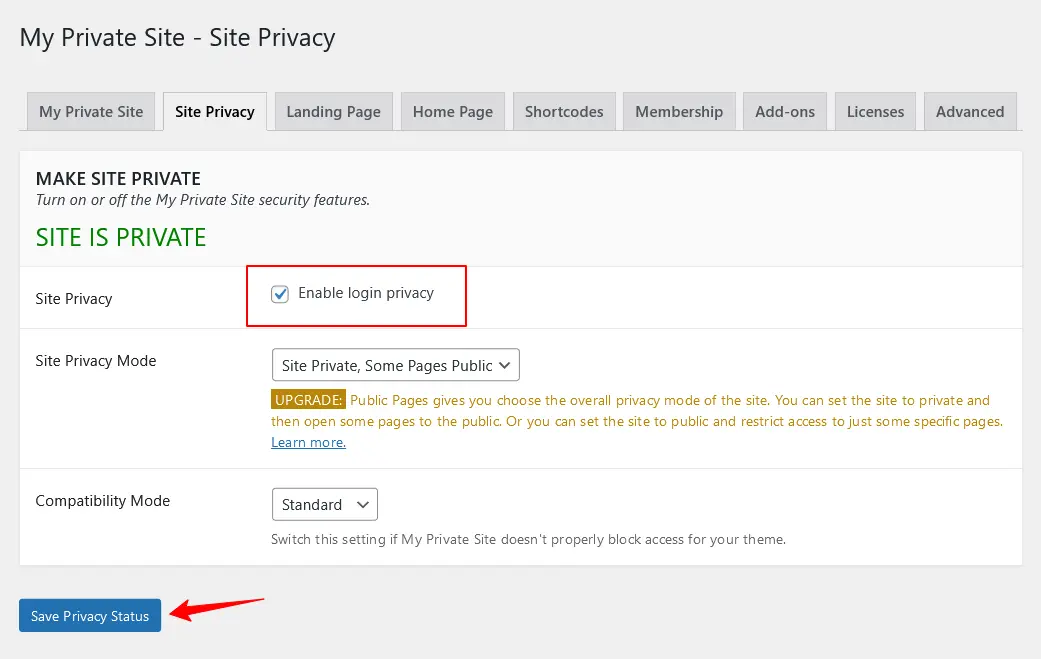
When the plugin is activated, navigate to My Private Site tab from your site dashboard. And from that page, click the Site Privacy tab.
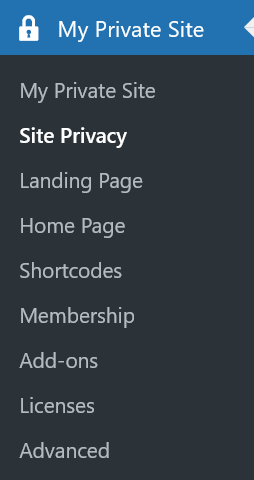
From Site Privacy page, enable the privacy for your WordPress site. After that click the Save Privacy Status button.
Step 3: Set Destination Landing Page After Login
You can set a destination landing page for your website login. Head to the Landing Page tab from your site My Private Site page and click on your preferred landing page radio button.
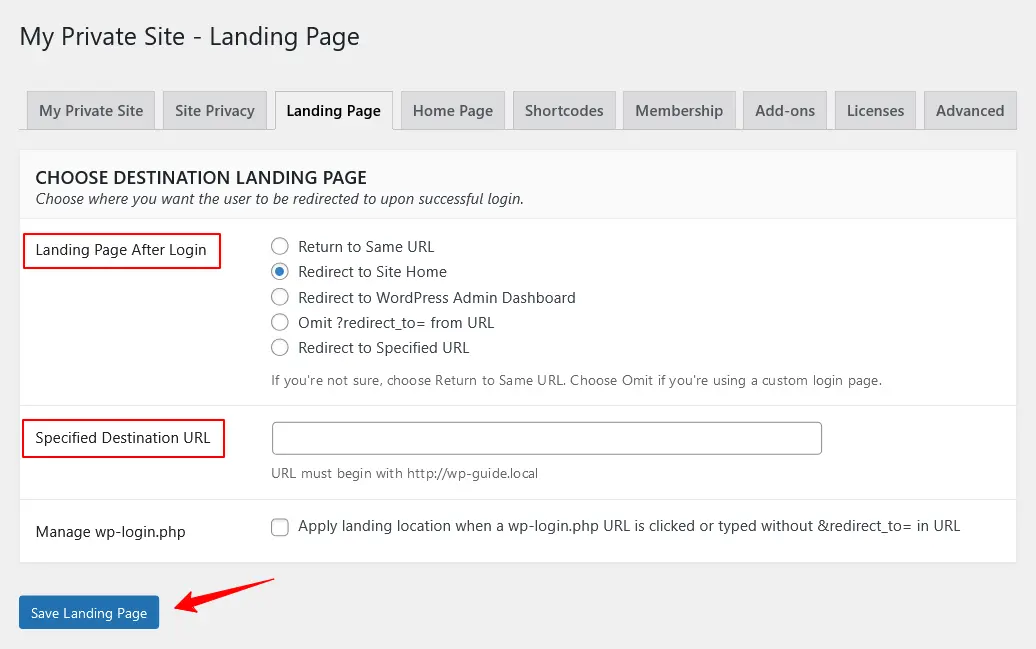
After that, Click on the Save Landing Page button.
Step 4: Advanced Options
If you want to create a custom login page for your users to make your website more protected, you can do this by using this plugin’s Advanced option. Select the Advanced tab from the My Private Site page and fill out the custom login page options.
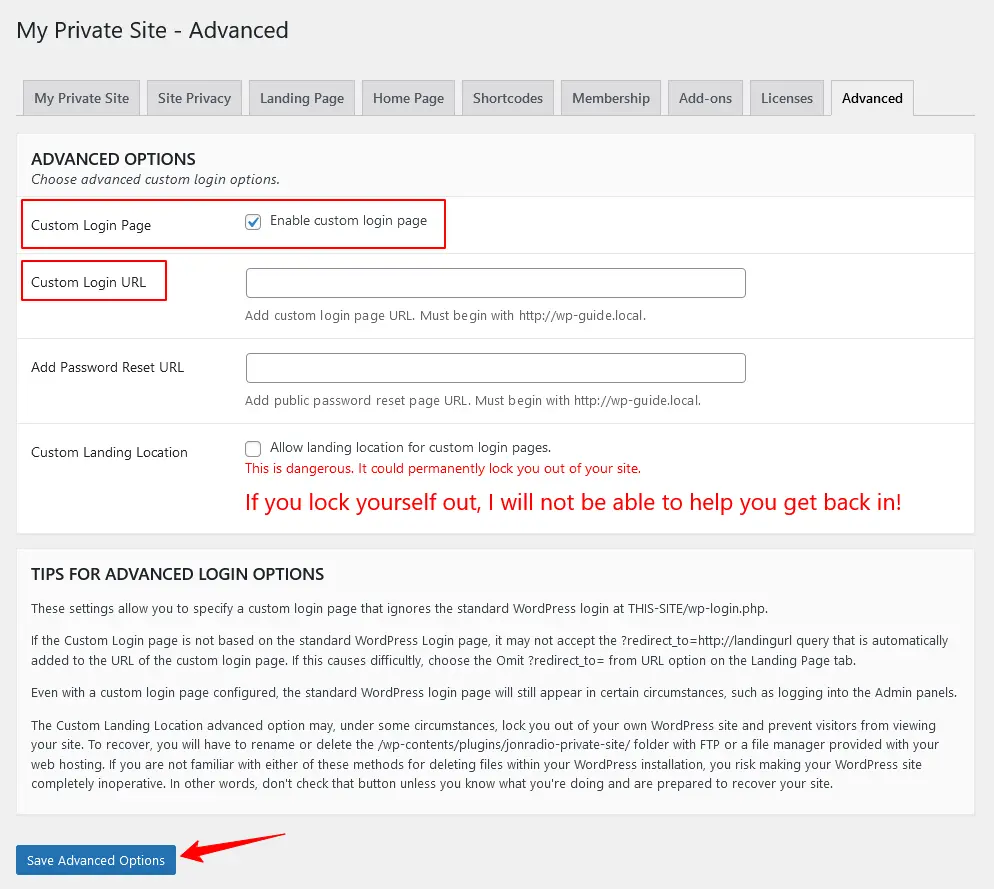
When the configurations are done, click on the Save Advanced Options button.
Method 2: Make the Website Private Manually
This method is primarily designed for developers, but anyone can follow it. You can restrict access to your website with a login page by using the method, meaning visitors will need to provide valid credentials before they can view the content.
Step 1: Create a Child Theme
You can use a popular child theme generator plugin. If you already have the child theme enabled, you can simply skip this step.
Step 2: Navigate to functions.php
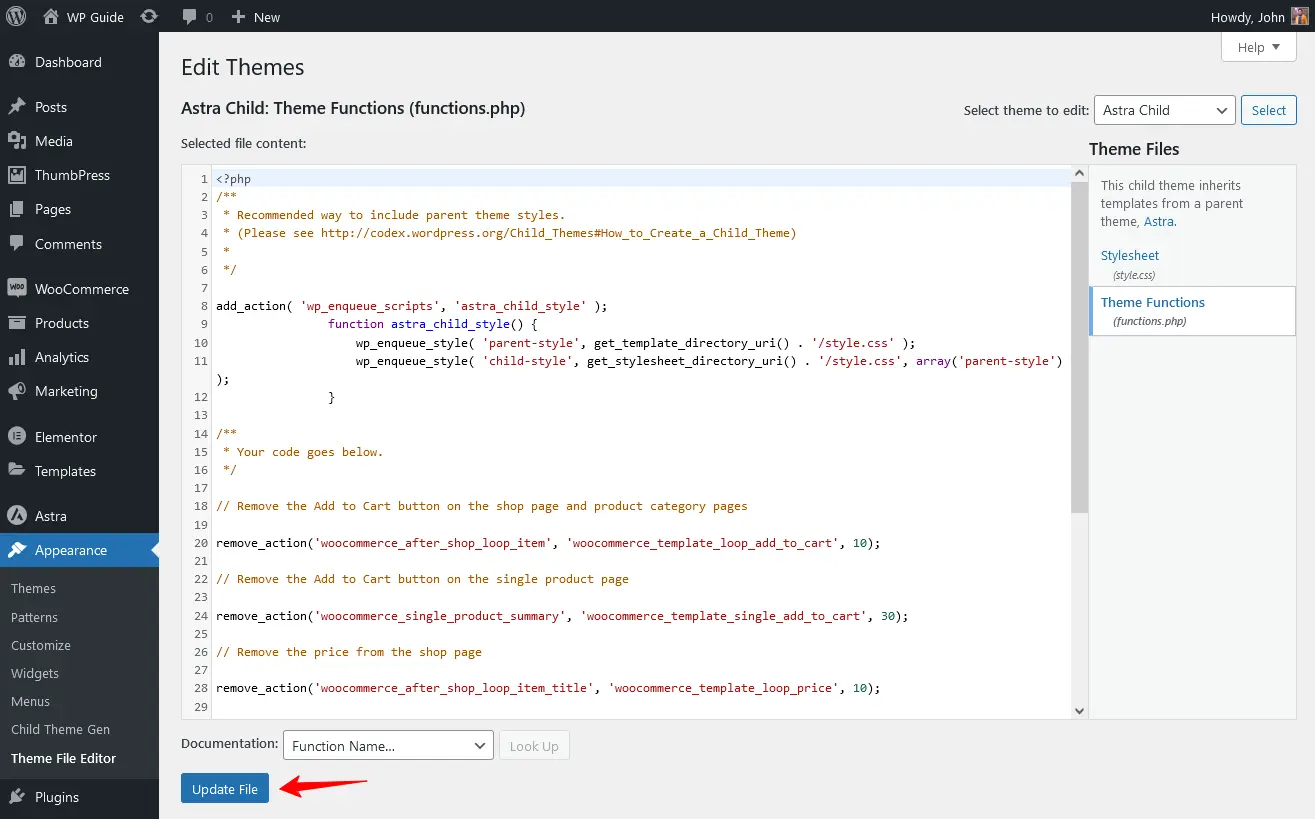
Go to your site Appearance > Theme File Editor. Add the following code to your site child theme’s functions.php file.
function my_private_website() {

if (!is_user_logged_in() && !is_page('login')) {

     auth_redirect();
}

}
add_action('template_redirect', 'my_private_website');
Copy and paste the code at the bottom of the existing code. And click the Update File button.
Step 3: Install and Activate the Plugin
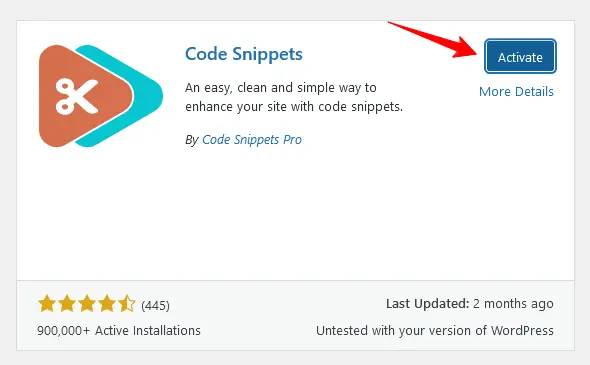
To streamline the process, consider installing a snippet plugin from your preferred code editor. This plugin allows you to store and easily insert frequently used code snippets.
To do this, go to Plugin > Add New Plugin and search for Code Snippets. Install and Activate the plugin on your website.
Method 3: Using WordPress Built in Settings
Make your website private using the WordPress built-in settings, which can help you limit the visibility for certain users. To make your website private follow the steps:
Step 1: Edit Your Website Page
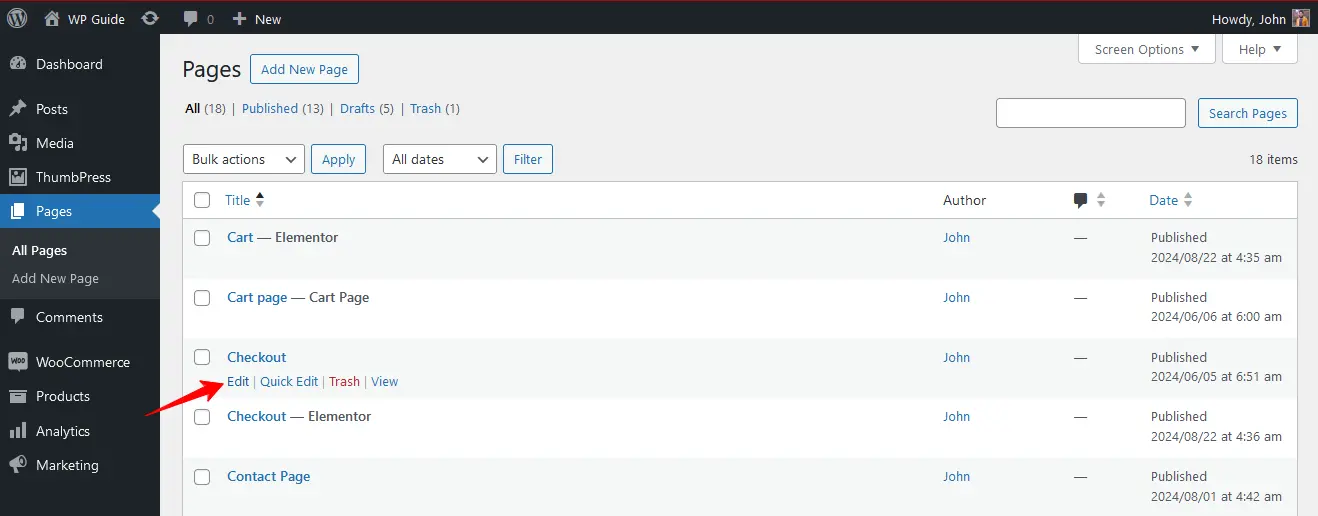
Navigate to your WordPress Dashboard > Pages. Hover over the page you want to make private and click the Edit button.
Step 2: Configure Settings
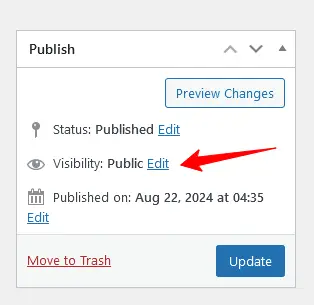
From the editor page, check the Summary section on your right and click the Privacy options under the Visibility settings. Click Edit to expand the options for the settings.
Step 3: Enable Settings for Private and Password Protection
If you want to make the selected page visible for site admins and editors, simply enable the Private option from the Publish section.
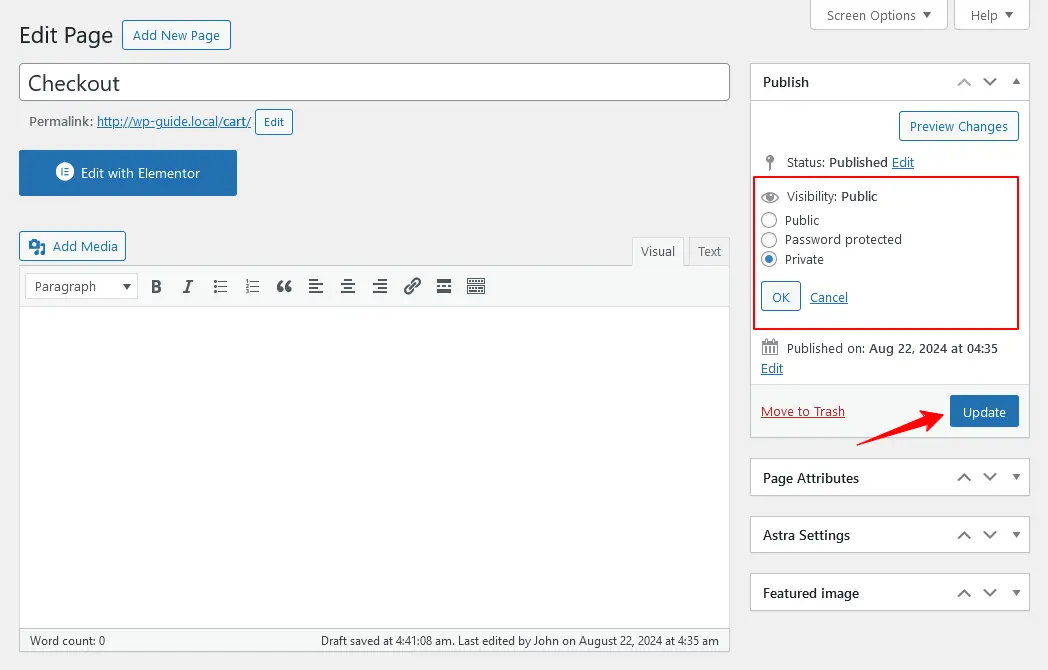
To make it private for only specific people, enable the Password Protected option under the Private option. Only users with the password will be able to access that page.
Step 4: Publish the Page
Once you’re done with the configurations, click the Publish button and verify the pages to see if they’re working properly.
Want to hide WordPress website from Google Search Engine?
Once you’ve made your WordPress site public, you need to hide your site’s content from showing up on Google searches. Follow the steps below to do this –
Step 1: Navigate to the Reading Page
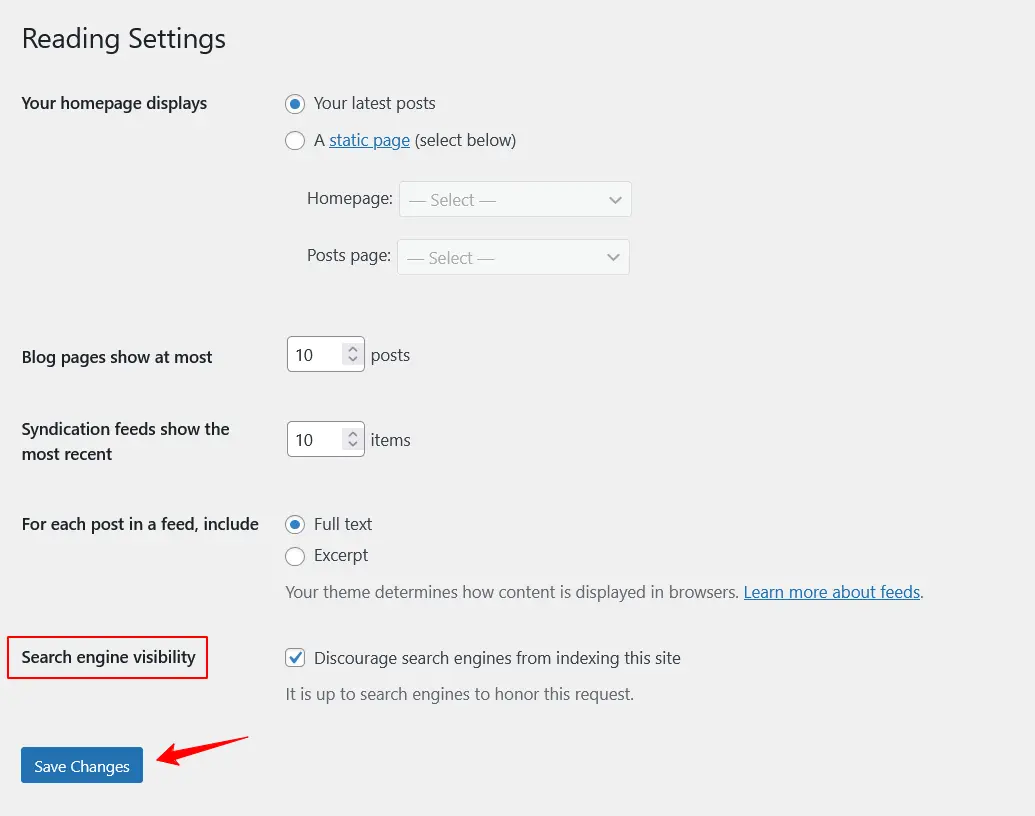
With this method, you have to disable Search Engine Visibility. Go to site’s Dashboard Settings > Reading.
Step 2: Disable Search Engine Visibility
Locate the Search Engine Visibility section and enable the Discourage search engines from indexing the site option.
Step 3: Save Changes
Once you’re done, click the Save Changes button.
Note: The last two methods mentioned here will not make your entire website private.
Wrapping Up
Choosing the right methods to make your WordPress site private depends on your specific needs. If you require full controls and ease of use, the three methods shown above offer the best approach.
By making your website private, you protect sensitive information and create a secure environment for collaboration. Implementing privacy controls ensures your WordPress site meets your privacy goals while providing a better experience for authorized users.
Frequently Asked Questions (FAQs)
Q. How do I make a WordPress site private before launch?
You can make your WordPress website private before its launch. Here’s how you can do this:
- Login to your website.
- From the dashboard, go to Settings > Reading.
- Locate the option Disable Search Engine Visibility.
- Enable the checkbox to disable search engine visibility.
- Finally click the Save Changes button.
Q. Can I restrict my website using a WordPress plugin?
Yes. You can do this by using the popular WordPress plugin My Private Site. This will help you restrict our site with a login page screen.
Q. How to stop Google from indexing my website?
You have to enable the WordPress default settings to stop Google from indexing your website. For this, Go to Settings > Reading and disable the Search Engine Visibility. This will stop Google from indexing your site.
Subscribe to Our Newsletter
Get the latest WordPress tutorials, trends, and resources right in your inbox. No Spamming, Unsubscribe Anytime.

Thank you for subscribing to our newsletter!
Table of Content
- Why should you make your WordPress website private?
- What does a private website mean on WordPress?
- 3 Easy Methods to Make WordPress Website Private
- Method 1: Make WordPress Website Private Using Plugin
- Method 2: Make the Website Private Manually
- Method 3: Using WordPress Built in Settings
- Want to hide WordPress website from Google Search Engine?
- Wrapping Up
- Frequently Asked Questions (FAQs)
- Q. How do I make a WordPress site private before launch?
- Q. Can I restrict my website using a WordPress plugin?
- Q. How to stop Google from indexing my website?


