How to Add Local Business Schema in WordPress: Best Methods


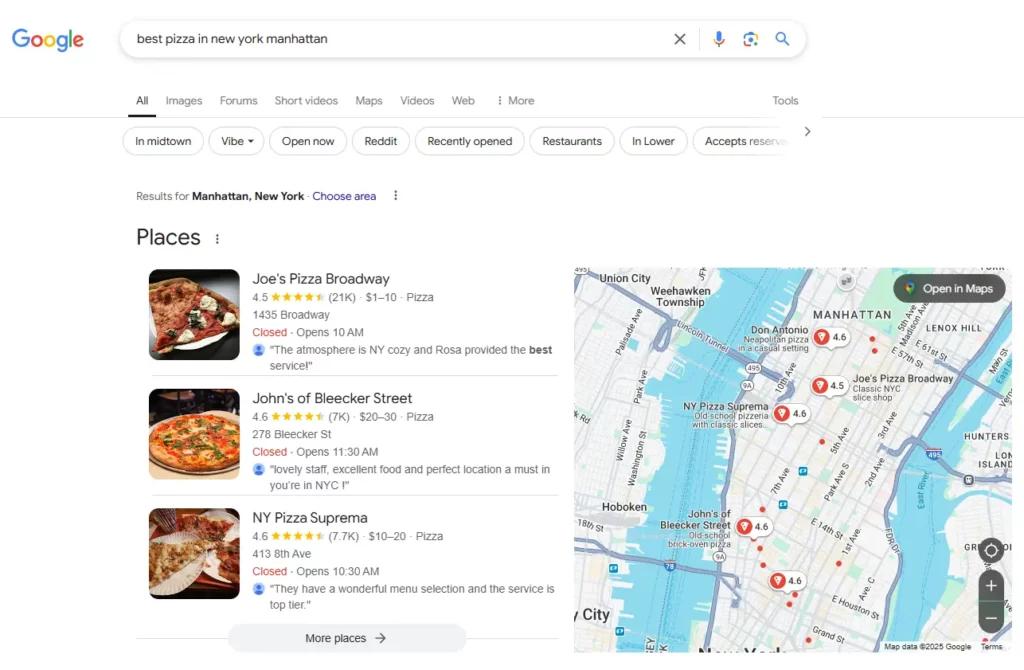
46% of Google searches are specifically looking for local information. That means nearly half of all users are actively searching for businesses like yours. So if your site isn’t optimized with local schema, you could be missing out on valuable traffic and customers.
Adding Local Business schema to your WordPress website informs search engines about vital information for your business, such as where you are, what you do, and what times you’re open. This formatted data pays you back with increased visibility via local packs and rich snippets, making your business front of mind.
In this article, we’ll break down what Local Business Schema is, why it is a game-changer for local SEO, and how you can implement it easily even if you don’t have any coding knowledge.
What is Local Business Schema Markup?
Local Business Schema Markup, or Structured Data, is a type of code you add to your website to help search engines better understand important details about your local business. This includes essential information such as your business name, address, phone number, operating hours, and the types of services or products you offer.
Search engines like Google, Bing, and Yahoo use this markup to display rich results (also called rich snippets) such as maps, ratings, and business hours in search listings. This improves visibility and helps potential customers find accurate information quickly.
Why Local Business Schema is Important
Local Business Schema plays a crucial role in enhancing your website’s local SEO. Here’s why it’s so important:
1. Better Search Engine Visibility
Schema helps search engines understand key details about your business like name, location, hours, and contact info, so they can show accurate information in search results.
2. Increased Local Presence
With proper schema, your business is more likely to appear in local search results and Google Maps when people in your area search for the services you offer.
3. Rich Snippets and Knowledge Graph
Schema enables search features like ratings, reviews, business hours, and contact info to appear directly in results, making your listing more visible and helpful to potential customers.
4. Competitive Advantage
Many small businesses still don’t use schema. By adding it, your listing looks more professional and can grab more attention, giving you a strong edge over competitors.
5. Voice Search Optimization
Schema helps smart assistants like Google, Siri, and Alexa understand your business, making it easier for them to include you in voice search results for local queries.
Types of Information to Include in Your Local Business Schema
When setting up Local Business Schema, it’s important to include the right details so search engines can understand your business and display accurate, helpful information in search results. Here are the key types of information you should include:
| Fields | What They Mean |
| Business Name* | Your official business name, exactly as it appears in the real world. This helps ensure consistency across all platforms. |
| Business Type | Use a specific schema type like `Restaurant`, `Dentist`, `AutoRepair`, or just `LocalBusiness` if none fit exactly. This tells search engines what kind of services you provide. |
| Address | Include your full physical address: – Street address – City – State or region – Postal/ZIP code – Country This helps you show up in local map listings and search results. |
| Phone Number | List a phone number where customers can reach you directly. Use the full international format (e.g., +1-555-555-1234). |
| Website URL | Include your business’s main website URL so Google knows where to direct users. |
| Opening Hours | Clearly state your operating hours, including variations like weekends or holidays. This helps Google show whether your business is currently open. |
| GeoCoordinates (Latitude & Longitude) | While optional, adding geocoordinates can help search engines accurately place your business on maps. |
| Images (Logo or Business Photos) | A business logo or storefront photo helps Google display a richer snippet in search results. |
| Menu / Services Page | If relevant, include a link to your menu (for restaurants) or list of services. |
| Social Media Links (SameAs) | Link to your verified social profiles such as Facebook, Instagram, LinkedIn, or Twitter to boost credibility. |
Including this information in your Local Business Schema helps improve your visibility in local search, builds trust with customers, and increases the chances of appearing in rich results like knowledge panels and map packs.
Add Local Business Schema in WordPress (2 Easy Methods)
WordPress makes it relatively easy to add Local Business Schema, whether you choose to use a plugin or manually add the code. Both methods help improve your local SEO and increase your chances of appearing in rich search results. It is always a best practice to apply the Local Business schema to a single key page, such as the Home, Contact, or About page.
Method 1 : Adding Local Business Schema Markup Using Plugins
Adding Local Business Schema to your WordPress site is simple with the help of plugins. You don’t need to write any code, just install and configure a plugin that supports structured data.
To make things easier, we’ve highlighted four of the best options: Yoast SEO, Schema Pro, Rank Math, and AIOSEO. These plugins are user-friendly, reliable, and packed with features to help improve your local SEO.
Here’s how each one can help you implement Local Business Schema effectively:
1. Yoast SEO

Step 1: Install Yoast SEO and Yoast Local SEO
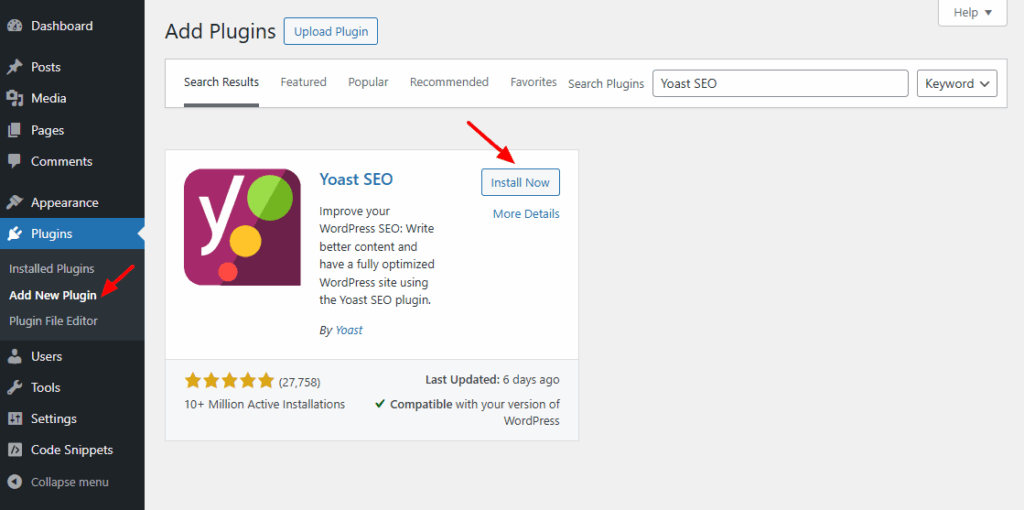
Install Yoast SEO (if not already installed). Go to WordPress Dashboard > Plugins > Add New. Search for “Yoast SEO”, click Install, then Activate.
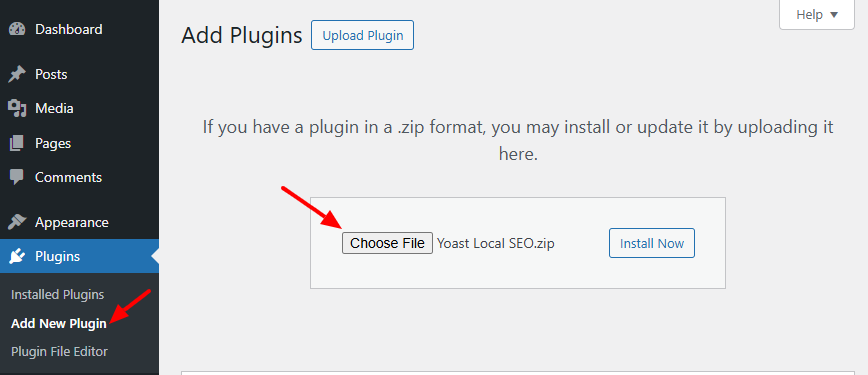
Install the Yoast Local SEO Add-on: This is a premium add-on, available from the Yoast website. After purchasing, download the plugin, then go to Plugins > Add New > Upload Plugin. Upload the ZIP file, install, and activate it.
Step 2: Access Local SEO Settings
In your dashboard, go to Yoast SEO > Local SEO. This section allows you to configure your business information and schema settings.
Step 3: Enter Business Details
Fill in the following fields: Business Name, Business Type Logo, Address, Phone Number, Email Address, Opening Hours, Geo Coordinates (optional but helpful). You can also embed a Google Map, indicate whether the business has multiple locations (for single-location businesses, this should be set to “No”).
Step 4: Display Business Information
Choose how and where to display your business info on your site:
- Widget
- Shortcode
- Block Editor (Gutenberg Block)
You can place your contact/location info on key pages like Home, Contact, About.
Step 5: Save Your Changes
After entering all the details, click “Save Changes.” Yoast will now automatically generate and insert the Local Business Schema on your website pages.
Using Yoast SEO + Local SEO addon, you can easily implement structured Local Business Schema for your WordPress site. This improves your visibility in local search results, making it easier for nearby customers to find your business.
2. Rank Math
Rank Math is a powerful and user-friendly SEO plugin for WordPress that includes built-in support for Local Business Schema—no need for extra add-ons. It’s a great choice if you want a comprehensive, free solution to improve your local SEO. Here’s how to add Local Business Schema with Rank Match:
Step 1: Install and Activate Rank Math
From your WordPress dashboard, go to Plugins > Add New, search for Rank Math, install, and activate the plugin.
Step 2: Enable the Local SEO Module
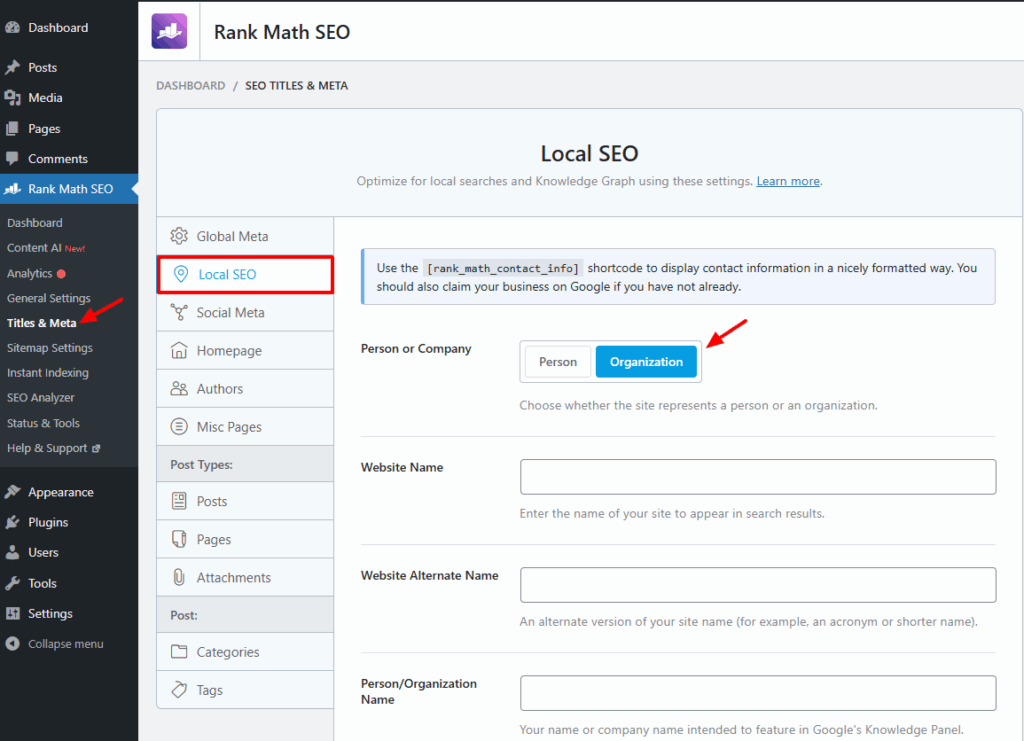
Once Rank Math is activated, go to Rank Math > Dashboard and enable the Local SEO module.
Step 3: Enter Your Business Information
Navigate to Rank Math > Titles & Meta > Local SEO and fill in the following details:
- Business Type (select from a list of Schema-supported types)
- Business Name
- Address (NAP: Name, Address, Phone)
- Geo-coordinates (latitude and longitude)
- Opening Hours
- Business Logo and Website URL
Step 4: Customize Schema Output (Optional)
Rank Math allows you to fine-tune your schema settings, including adding custom fields like price range, menu URLs (for restaurants), and more.
Rank Math is ideal for small to medium businesses looking for a robust, all-in-one SEO plugin that includes strong Local Business Schema support out of the box..
3. Schema Pro
Schema Pro is a premium WordPress plugin designed specifically for adding advanced schema markup, including Local Business Schema, without touching a single line of code. It’s perfect for users who want more control and flexibility over their structured data setup. Here’s how to add Local Business Schema with Schema Pro:
Step 1: Upload and Activate Schema Pro
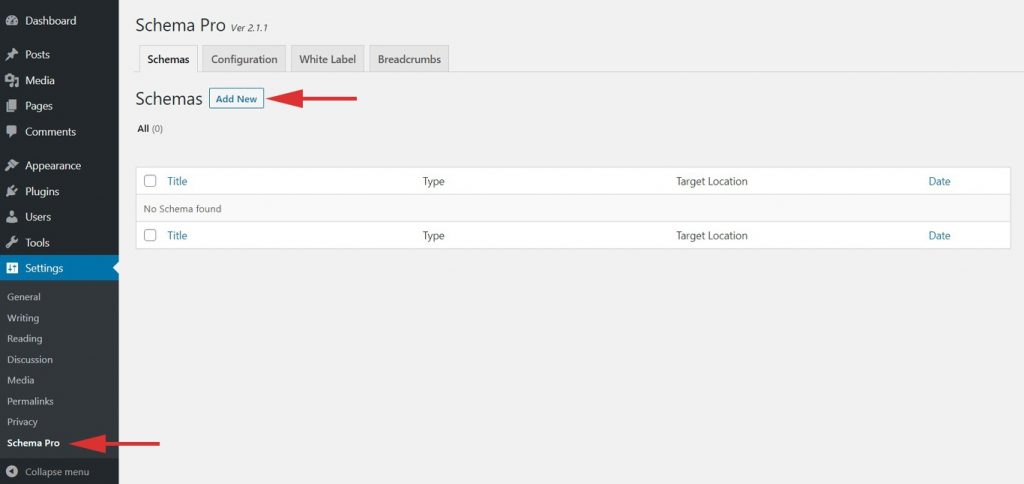
To begin setting up Local Business Schema using Schema Pro, you’ll first need to upload and activate the Schema Pro plugin. Log into your WordPress dashboard, then navigate to Plugins > Add New > Upload Plugin. Here, upload the .zip file for Schema Pro that you received upon purchasing the plugin. Once uploaded, click Install Now, and then activate the plugin once the installation is complete.
Step 2: Create a New Schema Markup
Navigate to WordPress Dashboard > Settings > Schema Pro.
Click on “Add New” to begin setting up a new schema.
Source: Schema Pro
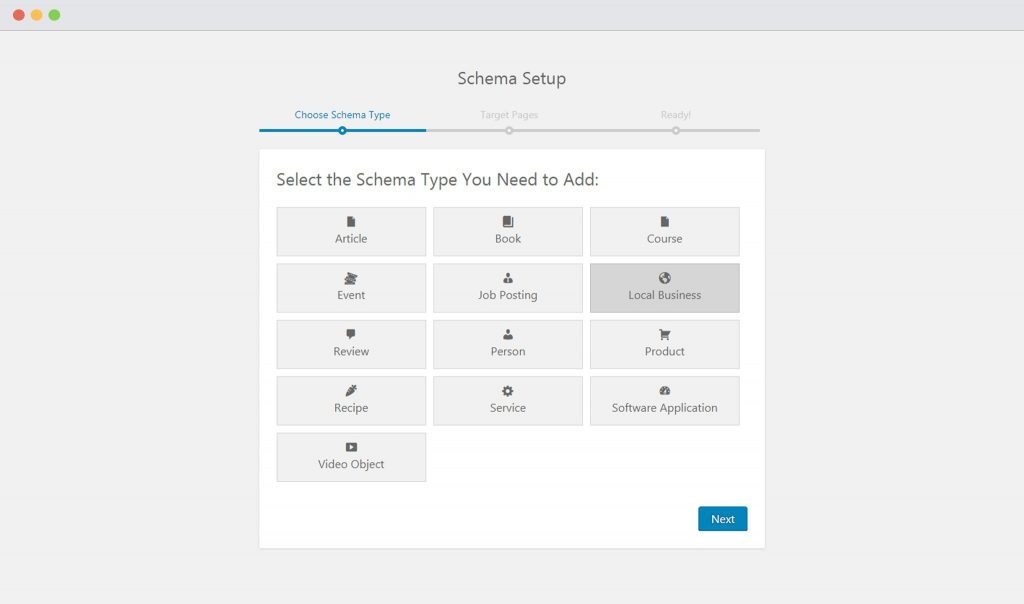
Step 3: Select Schema Type
Choose “Local Business” as the schema type.
Source: Schema Pro
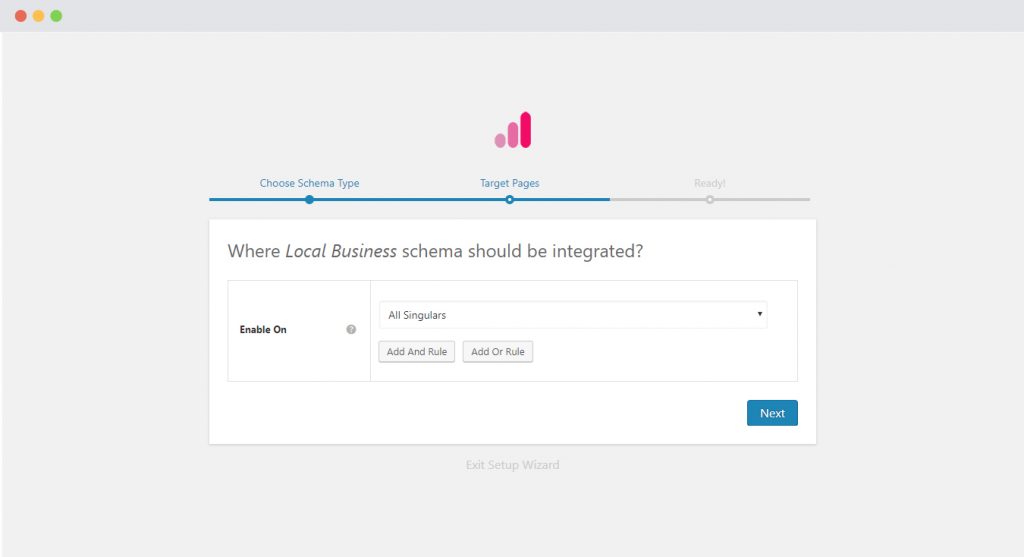
Step 4: Set Display Rules
Decide which pages or posts the schema should apply to. Use Display Rules to include/exclude specific pages/posts.
Source: Schema Pro
Step 4: Map Schema Fields
Complete the setup and map the required properties. These fields can pull data from your existing website content (pages, posts, custom fields, etc.).
By following these steps, you can effectively implement Local Business Schema on your WordPress site using Schema Pro. features with flexibility and control, especially those managing multiple schema types or looking to enhance existing SEO tools.
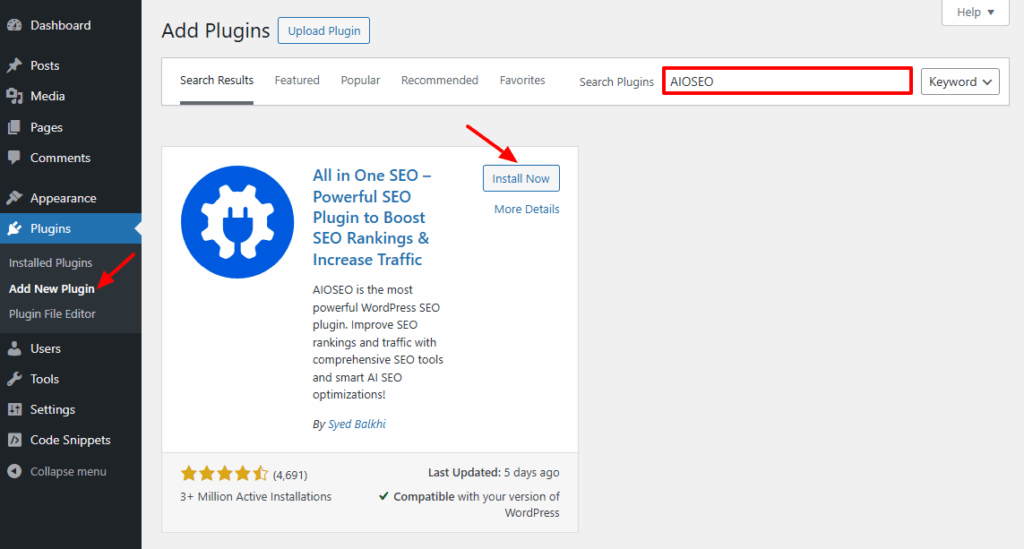
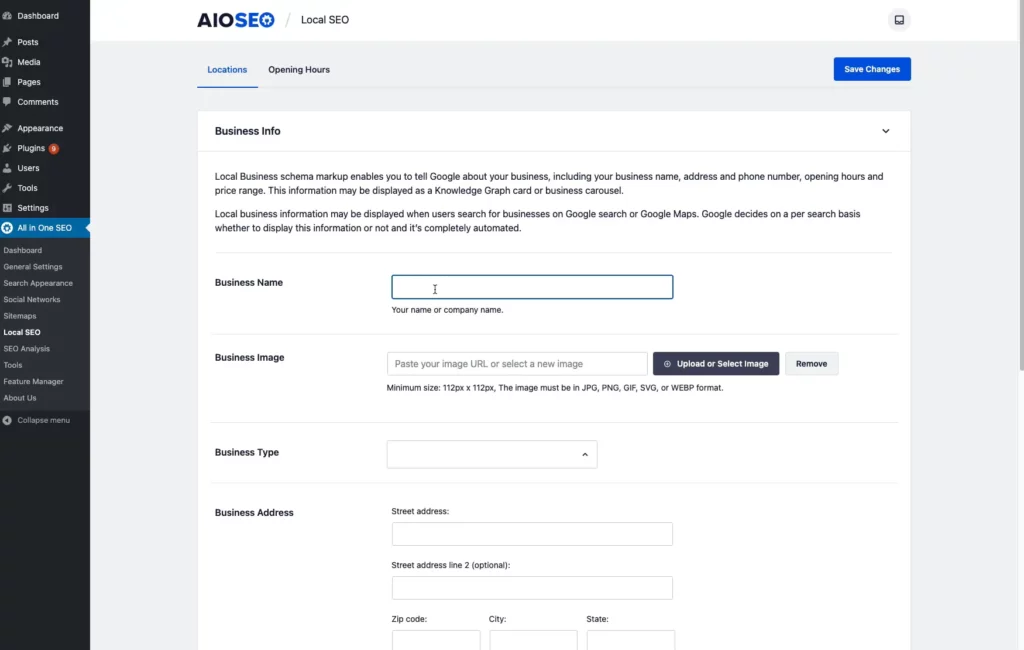
4. AIOSEO (All in One SEO)
AIOSEO is a powerful and beginner-friendly SEO plugin that also includes built-in support for Local Business Schema. It’s perfect for users who want a simple, all-in-one solution to optimize their site for both search engines and local visibility. Here’s how to add Local Business Schema with AIOSEO:
If you’re running a single-location business and want to boost your local SEO, adding Local Business Schema using All in One SEO (AIOSEO) is a smart move. Here’s how to do it step-by-step:
Step 1: Install and Activate AIOSEO Plugin
To get started with installing the AIOSEO, first log in to your WordPress Dashboard. From the left-hand menu, go to Plugins > Add New. In the search bar at the top right, type in “All in One SEO” and wait for the plugin to appear in the results. Once you see the AIOSEO plugin, click the “Install Now” button. After the installation is complete, simply click “Activate” to start using the plugin on your website.
For full Local Business schema functionality, you may need the AIOSEO Pro version.
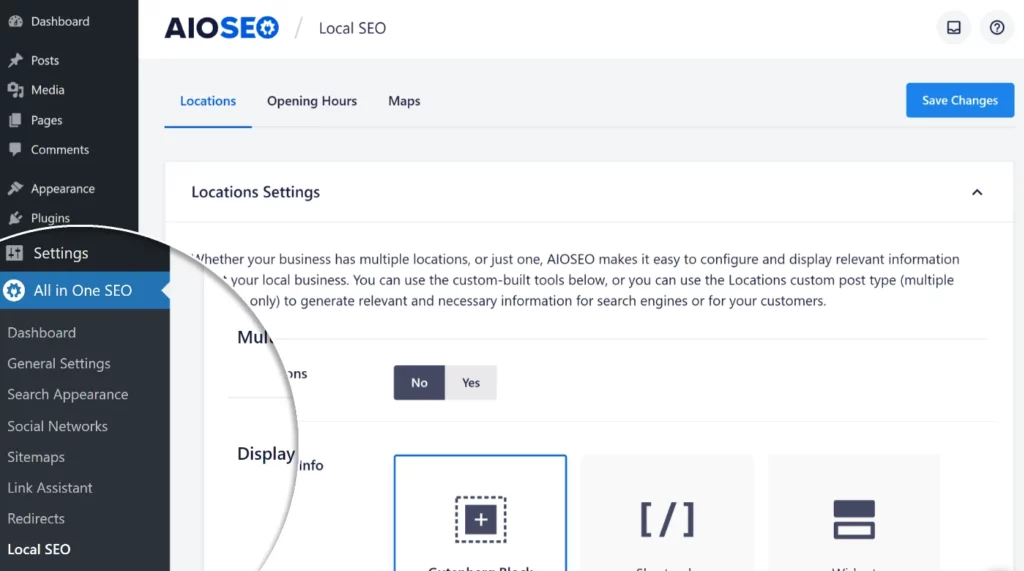
Step 2: Access Local SEO Settings
After activation, go to AIOSEO > Local SEO in your WordPress menu.
Source: AIOSEO
Step 3: Set Business Type
Under Business Info, you’ll see a toggle for Multiple Locations. Since this is a single-location business, leave the toggle set to “No”.
Source: AIOSEO
Step 4: Enter Business Details
Fill out your business information Business Name, Logo (image, Business Type, Physical Address, Phone Number, Business Hours. You can also add: Map (Google Maps Embed), Contact Info, Tax/VAT IDs, Payment Methods, Areas Served.
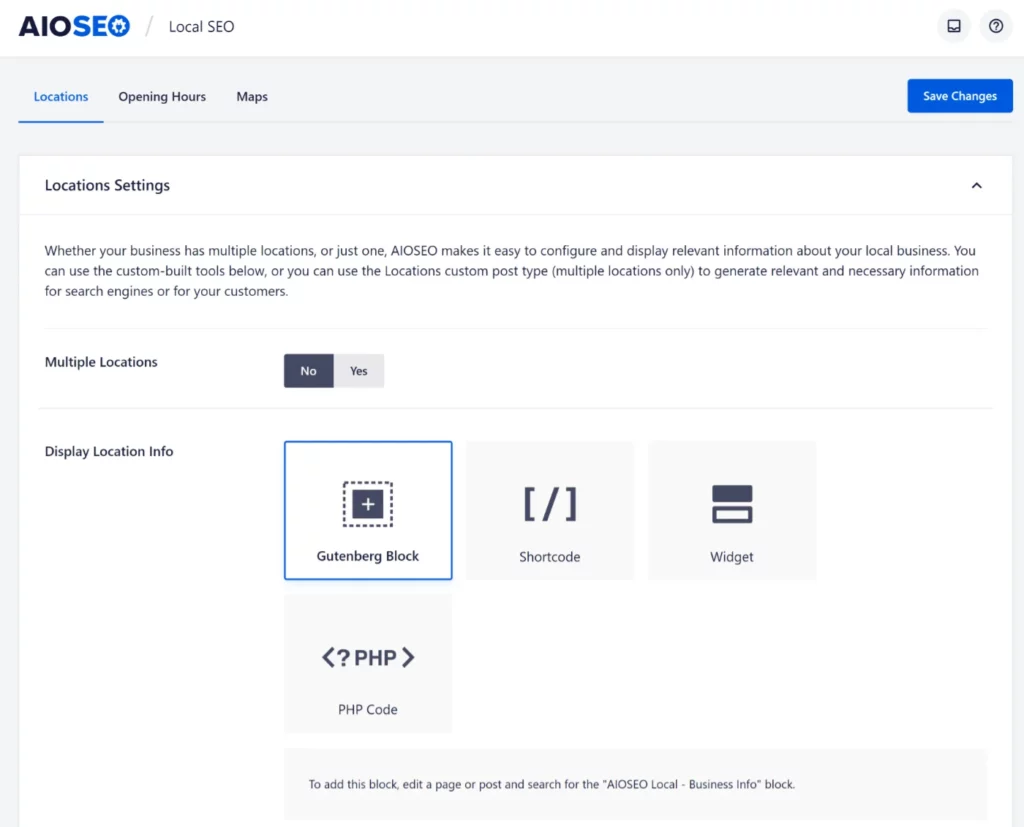
Step 5: Choose How to Display Your Location Info
You can display your location details on your site using:
- A Gutenberg Block
- A Shortcode
- A Widget
- PHP Code (for custom templates)
Step 6: Save Your Changes
Once all your information is entered, click “Save Changes.” AIOSEO will now generate the proper Local Business Schema markup and automatically include it on your site.
Method 2 : Adding Local Business Schema Manually (Coding)
If you like having more control over your website’s SEO setup or just want to avoid using extra plugins then adding Local Business Schema manually is a great option. This requires some technical skill, but once you get the hang of it, it’s pretty simple.
Here’s a step-by-step guide to help you implement it the right way.
Step 1: Generate Your Schema Markup (JSON-LD)
Before you add Local Business Schema to your WordPress website, you will first need to create the structured data code that search engines can read. Google supports three main formats for structured data (JSON-LD, Microdata, and RDFa). Among these, Google recommends using JSON-LD format because it is clean, easy to manage, and works independently of your website’s HTML.
To generate the code:
- Visit Google’s Structured Data Markup Helper
- Choose “Local Business” as your schema type
- Enter your site URL or paste your page’s HTML
- Use the tool to tag important info like name, address, phone number, hours, etc.
- Click “Create HTML” and copy the generated JSON-LD script
You can also write it manually if you’re comfortable. Here’s a simple example:
<script type="application/ld+json">
{
  "@context": "https://schema.org",
  "@type": "LocalBusiness",
  "name": "Your Business Name",
  "image": "https://yourwebsite.com/logo.jpg",
  "address": {
    "@type": "PostalAddress",
    "streetAddress": "123 Main St",
    "addressLocality": "Your City",
    "addressRegion": "Your State",
    "postalCode": "12345",
    "addressCountry": "US"
  },
  "telephone": "+1-555-555-5555",
  "url": "https://yourwebsite.com",
  "openingHours": "Mo-Fr 09:00-17:00"
}
</script>
Step 2: Add the Script to Your Site
Once your schema is ready, it’s time to place it on your site. There are a few ways to do this:
Option A: Use a Code Snippet Plugin (Recommended)
Plugins like WPCode (formerly Insert Headers and Footers) make it easy:
- Install and activate WPCode
- Go to Code Snippets > Header & Footer
- Paste your JSON-LD code into the Header section
- Save your changes
This method is safe and won’t be affected by theme updates.
Option B: Edit `header.php` Manually
If you’re comfortable editing theme files:
- Go to Appearance > Theme File Editor
- Open `header.php`
- Paste your JSON-LD script just before the `</head>` tag
- Click Update File
Tip: Always back up your site before editing core theme files.
Manual schema gives you full control over what information search engines see, but it also requires careful setup. It’s best to go with JSON-LD format, verify your information, and test your implementation to ensure everything is spot on.
Best Tools to Test Your Local Business Schema
After you have added Local Business Schema to your WordPress site either with a plugin or manually. It is important to check if working properly. Validating your schema helps ensure search engines can read your structured data correctly and display rich results like business info, maps, and reviews.
Here are two reliable tools you can use:
1. Use Google’s Rich Results Test
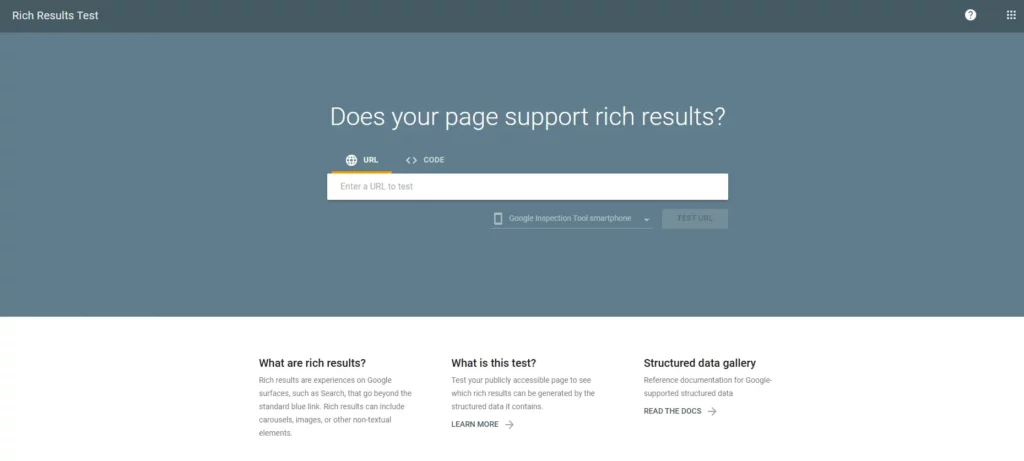
Google offers a handy tool called the Rich Results Test. Just enter the URL of your web page (or paste your schema code directly), and the tool will analyze it to see if it is eligible for rich search features.
- Confirm if your schema is valid.
- Show any errors or warnings.
- Highlight which rich result types your page may qualify for.
Tip: Even if there are no errors, look out for warnings. These won’t necessarily break your schema, but they might mean you’re missing opportunities for more detailed results (like adding a logo or opening hours).
2. Try the Schema Markup Validator
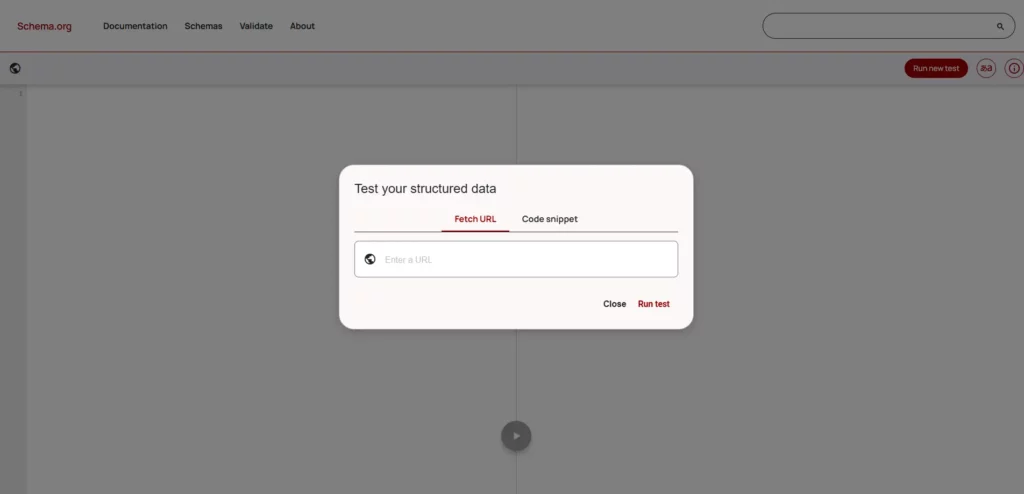
Another great option is the Schema.org Markup Validator run by Schema.org itself. It’s perfect if you want to double-check your syntax or if you’re using a custom setup.
While it doesn’t test for rich result eligibility, it’s great for:
- Verifying correct Schema.org syntax
- Spotting formatting errors
- Reviewing custom or advanced markup
Always test after making changes to your schema. Even small typos or formatting issues can prevent your data from being picked up by search engines.
Final thoughts
Adding Local Business Schema to your WordPress site is one of the simplest yet most effective ways to improve your local SEO and help your business stand out in search results. Whether you choose a plugin or opt for manual coding, the process is straightforward and can have a significant impact on your business’s online presence.
Take the time to implement schema on your site, test it with the tools we discussed, and watch as your business stands out in search results. Driving more customers your way.
Frequently Asked Questions (FAQs)
Q. Do I need to know how to code to add Local Business Schema?
Nope! You can use plugins like Yoast SEO, Rank Math, Schema Pro or AIOSEO to add schema without touching any code. If you’re comfortable with a little technical work, manual coding gives you more control.
Q. Will schema improve my rankings on Google?
Schema doesn’t directly boost your rankings, but it improves how your site appears in search results. This can lead to higher click-through rates, better local visibility, and more qualified traffic.
Q. What happens if I make a mistake in the schema code?
If there’s an error in your schema markup, search engines may ignore it completely. That’s why it’s important to validate your code using tools like the Rich Results Test before publishing.
Q. Can service-area businesses use Local Business Schema?
Yes! Even if you don’t serve customers at a physical storefront (like a plumber or mobile pet groomer), you can still use Local Business Schema. Be sure to define your service area and not just your business address.
Q. What’s the difference between LocalBusiness and Organization schema?
- Organization is broader and used for brands, nonprofits, or global companies. LocalBusiness is a subtype of Organization and includes specific local details like opening hours, location, and phone number—perfect for brick-and-mortar businesses or local services.
Subscribe to Our Newsletter
Get the latest WordPress tutorials, trends, and resources right in your inbox. No Spamming, Unsubscribe Anytime.

Thank you for subscribing to our newsletter!

Table of Content
- What is Local Business Schema Markup?
- Why Local Business Schema is Important
- Types of Information to Include in Your Local Business Schema
- Add Local Business Schema in WordPress (2 Easy Methods)
- Method 1 : Adding Local Business Schema Markup Using Plugins
- Method 2 : Adding Local Business Schema Manually (Coding)
- Best Tools to Test Your Local Business Schema
- 1. Use Google’s Rich Results Test
- 2. Try the Schema Markup Validator
- Final thoughts
- Frequently Asked Questions (FAQs)
- Q. Do I need to know how to code to add Local Business Schema?
- Q. Will schema improve my rankings on Google?
- Q. What happens if I make a mistake in the schema code?
- Q. Can service-area businesses use Local Business Schema?
- Q. What’s the difference between LocalBusiness and Organization schema?