How to Add Variable Products on WooCommerce
Starting a WooCommerce business with clothing, furniture, bags, smartphone means dealing with different sizes, colors and materials. But knowing how to add these variable product can be tricky, if you don’t have the right plugins at your disposal.
If you’re new to starting your online business, you need to understand what variable products are and how to add variable products in WooCommerce. This blog will explore some tips and hacks to set variation products and determine the best variation swatches for WooCommerce.
Let’s dive in.
WooCommerce Products and Variable Products
Despite some drawbacks, WooCommerce remains a powerful all-in-one solution for eCommerce entrepreneurs. Users can create and manage their online stores, adding products with details like titles, images, prices, and inventory.
WooCommerce even allows for categorization, tagging, attributes, and variations, giving you full control over your product listings.
- WooCommerce Variable Products
Within the WooCommerce products sections, there are four types of products available: Simple, Grouped, Affiliate, and Variable products.
To help you understand how variables work, imagine you run a smartphone store offering various colors and memory capacities. To give customers the flexibility to choose their perfect phone, WooCommerce’s product variations come in handy.
By creating these variations, you can enhance the user experience, and allow them to easily customize their purchase, which can potentially lead to increased conversions.
- Examples of WooCommerce Variable Products
There are no limitations for WooCommerce variable products and it mostly depends on what you’re selling. Some common examples are: clothing, furniture, accessories and smartphones; these categories often have different variations like sizes and colors.
Create and Add Variable Products in WooCommerce
Step 1: Create and Set up Attributes for Your Products
The variation feature is dependent on product attributes. To set up any particular variation, you first need to create an attribute.
Here are the two easiest methods to do it. While you could add attributes directly to individual products, it’s more efficient to create the attributes beforehand and then assign them.
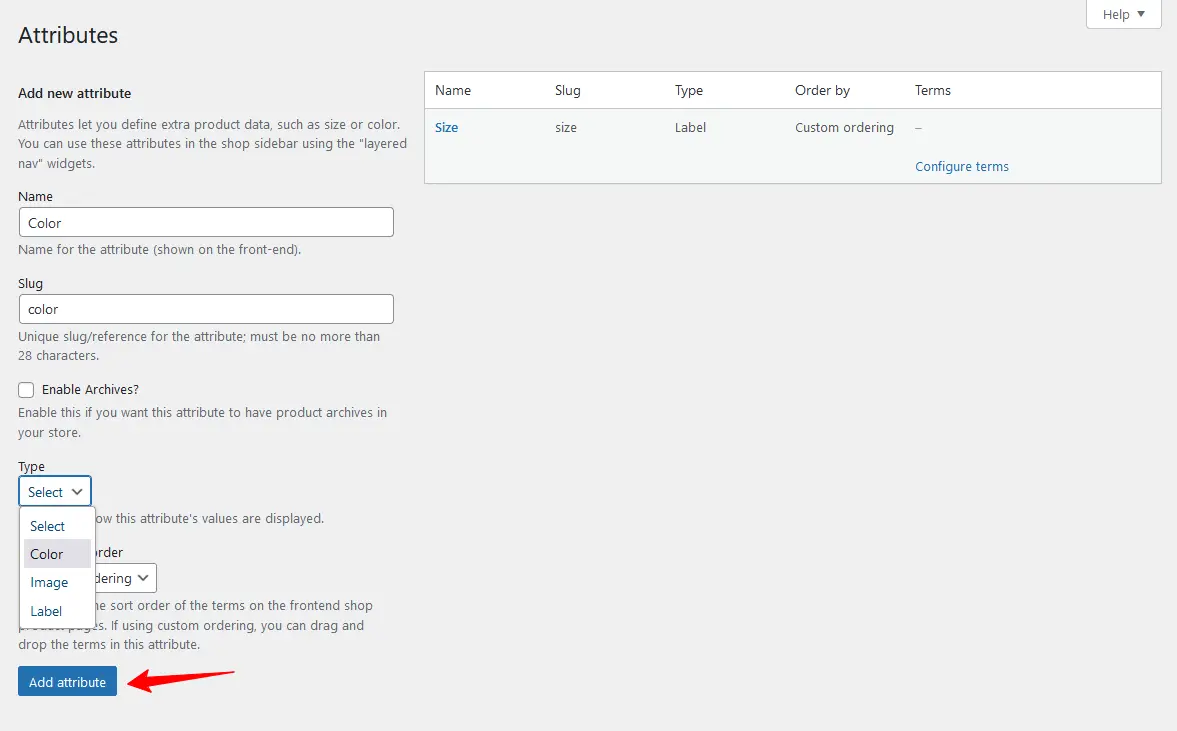
First, head over to the Products > Attributes section.
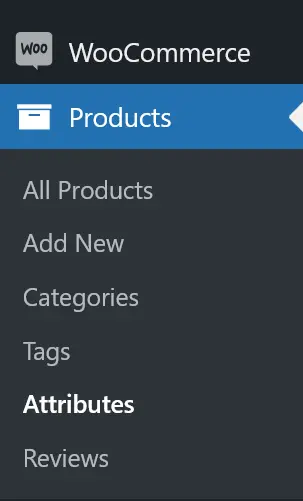
Add new attributes from the Attributes page. For this, you have to provide an attribute name and a slug. Remember, your attribute name and slug name should be the same.
There are no exact rules to set the attribute name and slug. If there are two words in any attributes, make sure you connect the slug with a dash and the slug is lowercase. For example, for a popular brand name is Louis Vuitton, you have to add the slug as louis-vuitton.
Once you’re done with assigning the name, slug, and type for attributes, hit the Add Attribute button. The new attribute will appear in the menu to your right.
Here is another way to directly add attributes to any product. Go to Product Page > Attributes. Click on Add New and finally after filling in the empty fields click on Save Attributes.
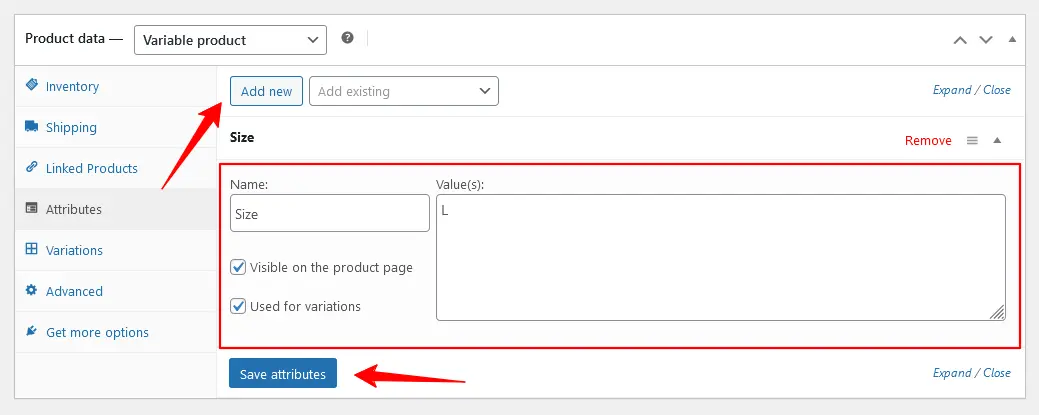
Note: This process applies to a specific product. It can not be reused for other products.
You have successfully created an attribute for your WooCommerce variable product. Now you need to assign value to the attribute.
Click on the Configure Terms button. Provide value for the attribute you want. If you want to add a new size for your Nike shoes, provide name, slug, and label for the attribute values.

Step 2: Assign Attributes to Single Product
Now that you created attributes for your products, you need to assign them.
To assign these attributes, open the product by clicking on the Edit button and head over to the Product Data Section > Attributes tab.
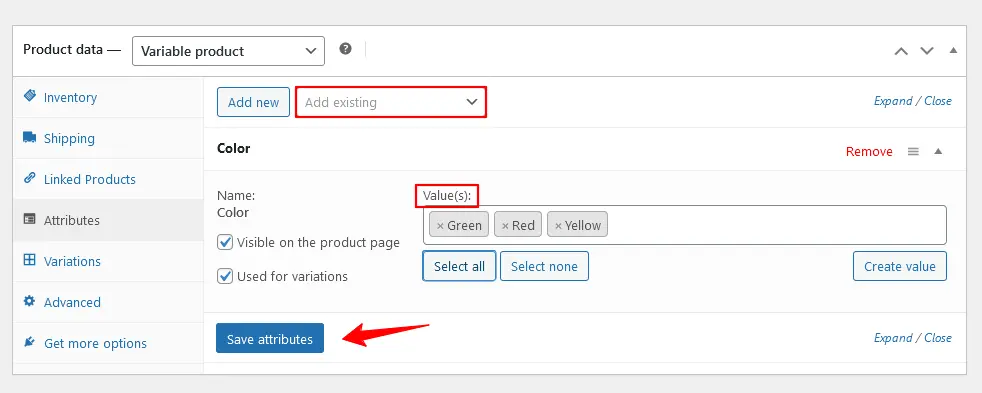
You can assign the values after selecting any attributes. If you don’t need any values you can exclude them or assign them while creating any new product. There are no limits to adding attributes and values to each product. Click on Select All to add all the attribute values at once.
Step 3: Add Variations to the WooCommerce Products
Next, select the Variation tab from the product data section. On that tab, you’ll discover the Generate Variations and Add Manually button.
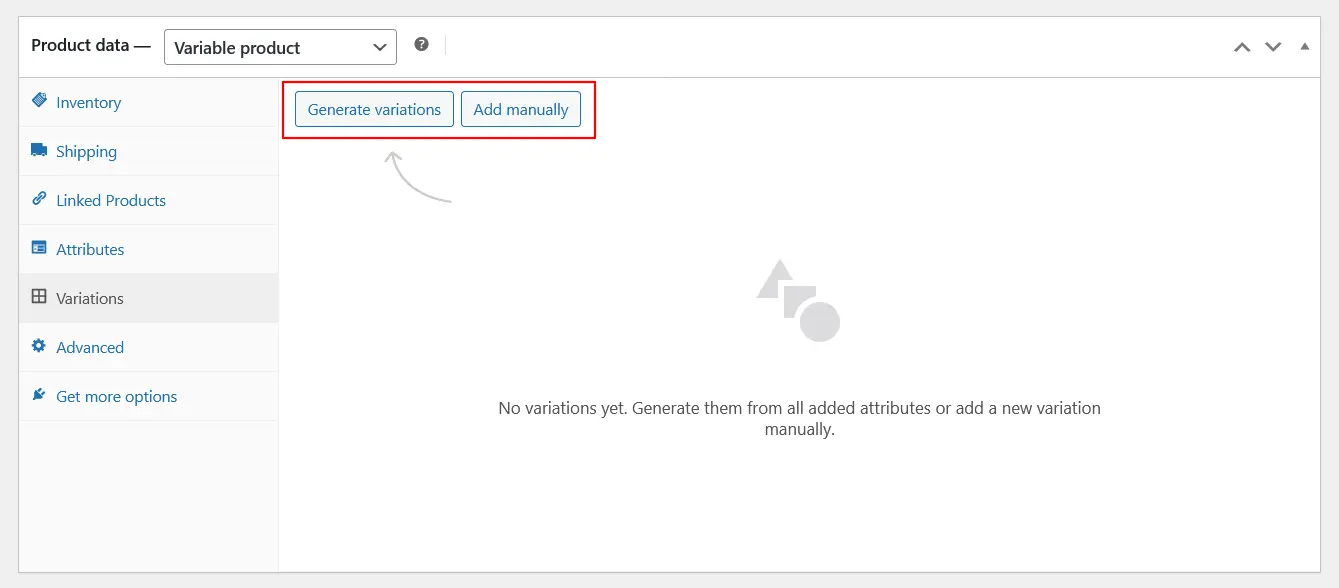
You must click on any of these buttons to add variations to your WooCommerce products.
After that, you must add the price to the variation you created. You can customize the Variation details by clicking on the Expand button.
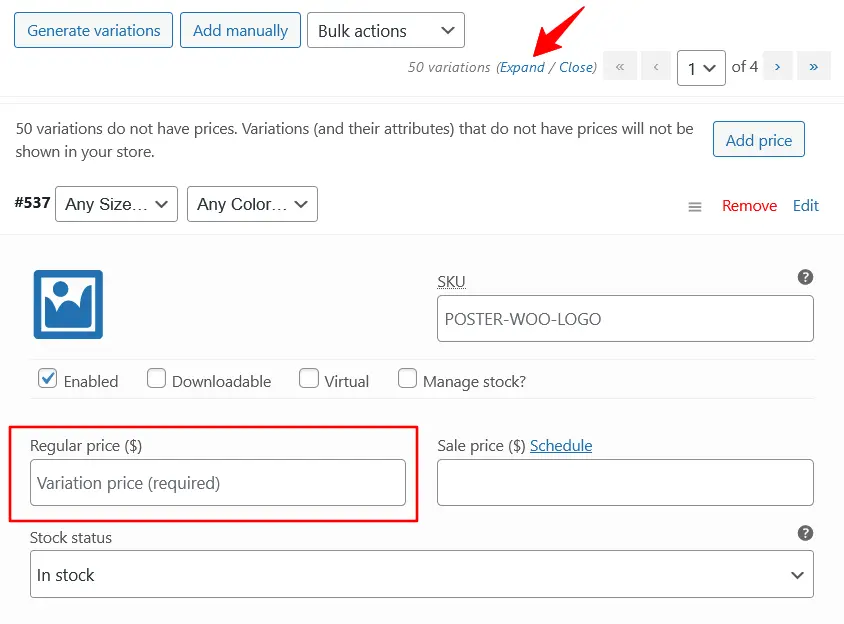
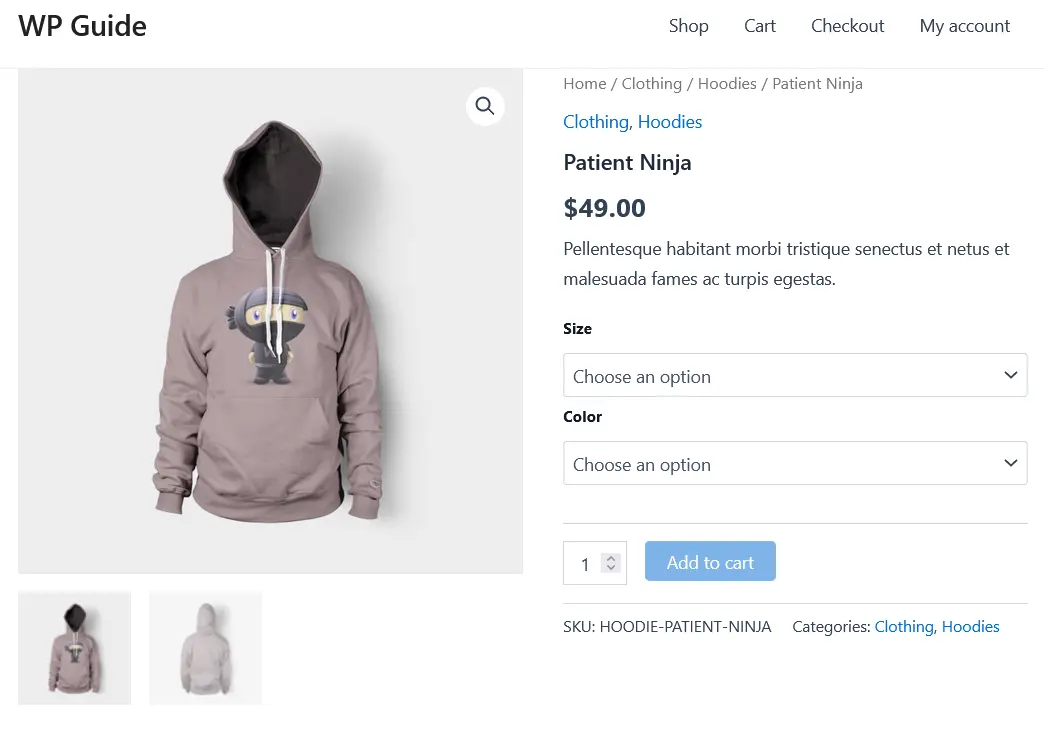
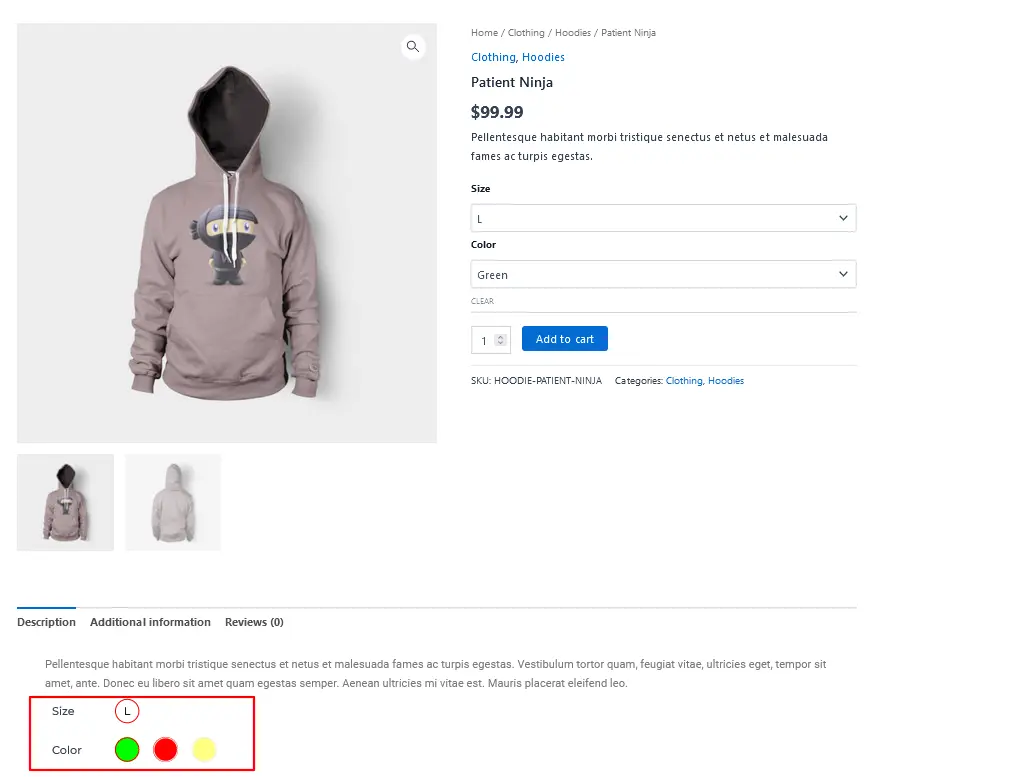
If you don’t see any option, make sure you have created the attributes properly. Here is how the product variations look like on the WooCommerce single product page –
Best Product Variations Swatches for WooCommerce (Free Plugin Option)
You can use variation swatches to improve the visual appeal of your WooCommerce product and let your customers choose products independently.
You can install a free WordPress plugin to enable the variation swatches feature in your WooCommerce store. Let’s go through the process –
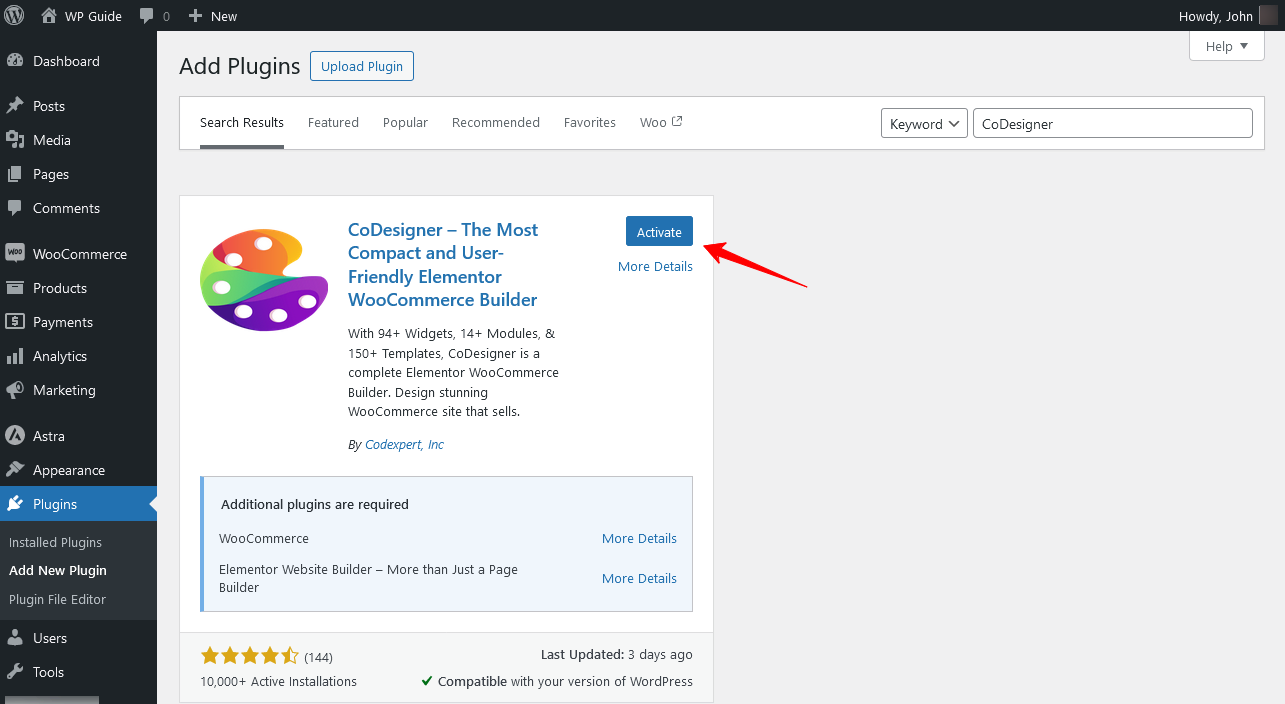
Install and Activate the CoDesigner plugin in your WooCommerce store.
Navigate to CoDesigner > Modules and enable the Variation Swatches Module.
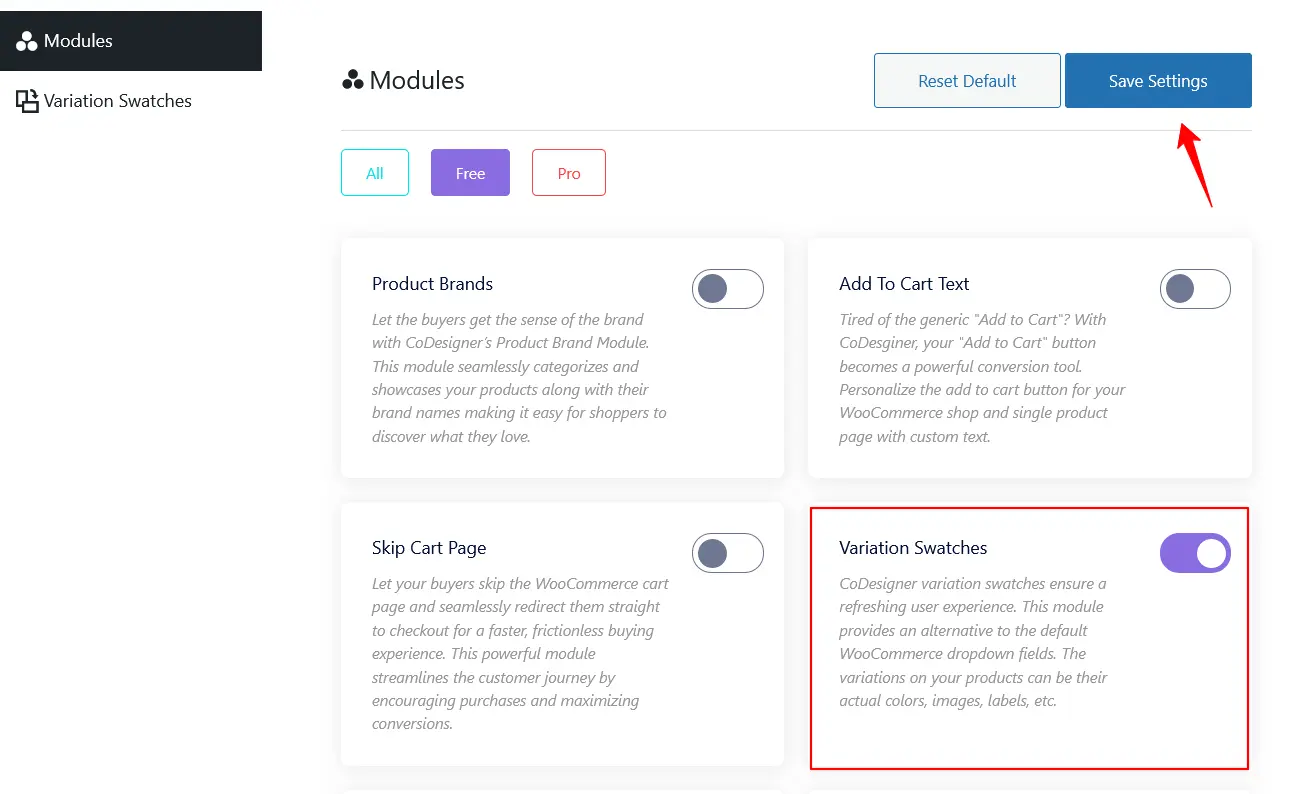
Once the module is enabled, you need to enable other options for variation swatches as well.

If you haven’t created any attributes, follow Step 1 shown above to create attributes.
To add variations for colors and sizes, you need to configure terms to assign value to attributes.
Go back to your product page and generate variations for the product. Open the product with Elementor.
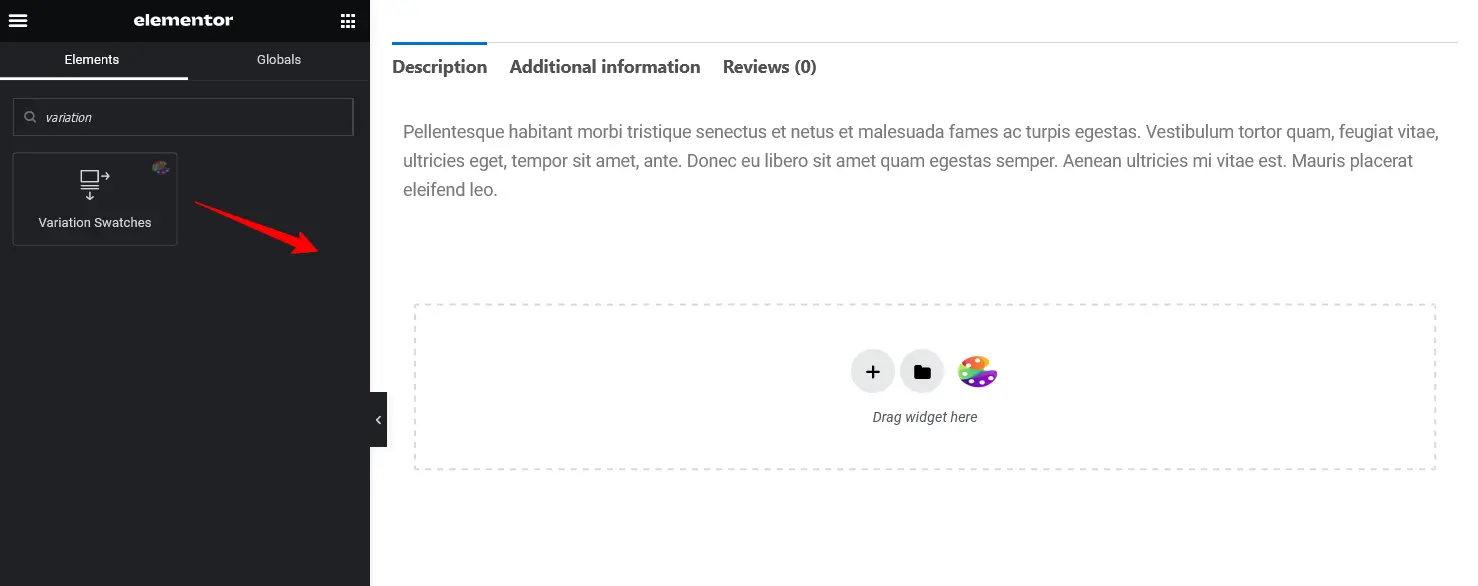
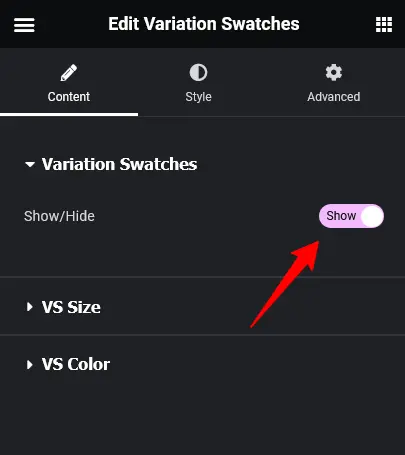
Don’t forget to enable the Variation Swatches toggle from the editor. Finally, when you’re done, click on the Publish or Update button.
Now you can check out the variation swatches live on your WooCommerce store.
WooCommerce Variations Not Showing: Issues, Causes, and Solutions
If your variation swatches aren’t showing up on your WooCommerce store, there may be some common issues that need to be identified and remedied. Let’s dive into them –
Common Issues for WooCommerce Product Variations
When creating WooCommerce product variations, you may encounter some common issues. Which may fail to display WooCommerce variations correctly. If you understand these issues properly, you can effectively resolve the root cause.
Here are a couple common issues for WooCommerce Product Variations and how to solve them –
- Variation Tab is Missing: It’s the most common issue WooCommerce users encounter. This happens in the backend of the Products Data sections. Without this, managing product variation is impossible and eventually, it will decrease your WooCommerce store user experience and conversion rate.
- Proper Display of Variations: When the variations are not added properly, customers won’t be able to add values (like size, color, or style) according to their choice which can frustrate visitors.
- Missing Featured Image or Data: Usually this can happen because the featured image or data may not display correctly on the front-end.
Common Causes of WooCommerce Variations Issues
We’ll show you some common causes of these issues and the possible strategies to get your WooCommerce variations back on track.
- Outdated WordPress Software: The primary reason behind WooCommerce product variations not displaying properly is an outdated CMS software, WooCommerce, and its associated plugins. These can cause fatal issues on your WordPress site. Updating these can also help you prevent such issues, and you can check if there are any updates available under the Updates section of your WordPress dashboard.
- Wrong Variation Settings: If you haven’t configured the settings on WooCommerce product variations, you may find issues in your WooCommerce store. For this, make sure to thoroughly check your variation settings, following the steps outlined above.
Remember, you need to conduct a detailed troubleshooting process. Make sure to disable your plugins or switch themes temporarily to identify the reasons.
Note: When you’re updating your WordPress version, WooCommerce or any other plugins, make sure you have a store backup to prevent any issues when updating.
Best Ways to Fix ‘WooCommerce Variations Not Showing’
We have discussed the issues and causes of WooCommerce variable product variations not showing. Here, we will outline how to resolve these issues.
Step 1: Price for Variation is Missing
Variations in your WooCommerce products won’t display if the prices are missing. To fix this, navigate to the Products Page and click on the Edit button of a specific product.
Go to Product Variation to make sure that the right price is properly assigned.
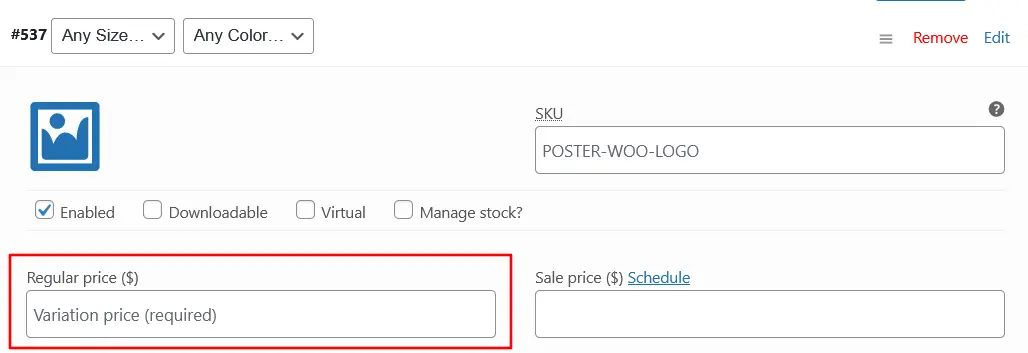
If you’re a developer, you can identify this using an SQL query in the wp_postmeta table, which stores data on WooCommerce products and variations. Variations without pricing would result in a NULL or missing value.
Step 2: Variations Products are Out-Of-Stock
Issues can be generated from anywhere in your online store. In some cases, it can be generated from the variation you created. To detect this issue, go to your Products Page and click on the Edit button.
Open the Variations Tab and check the Stock status.
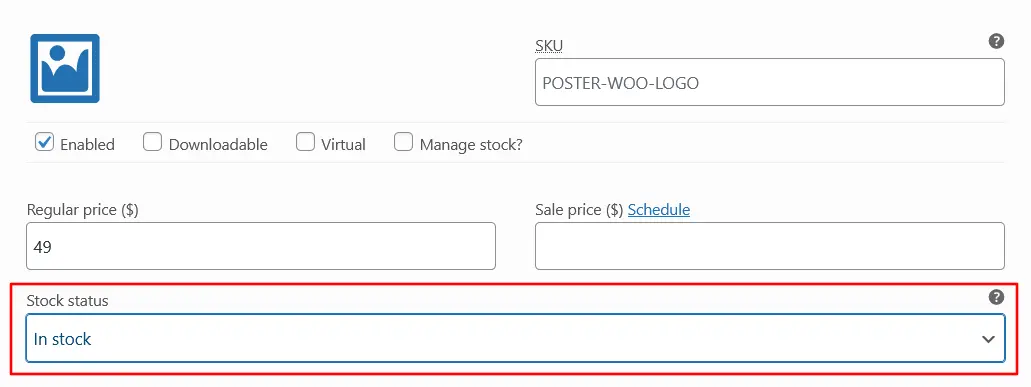
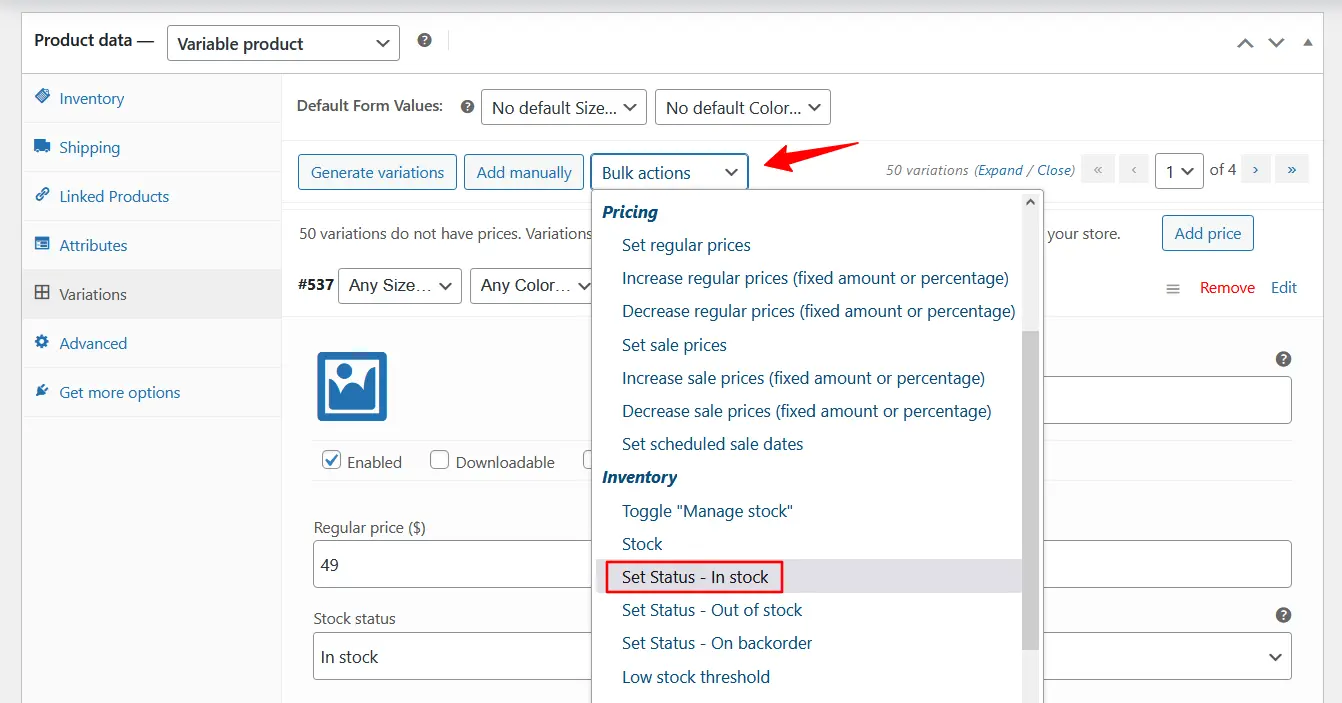
It can be quite time-consuming to review stock individually, so you can simply use the Bulk Actions feature in WooCommerce to update Stock Status quickly for multiple WooCommerce variations.
Step 3: Check the Theme Compatibility
Themes play a major role in providing a sleek display of your online store and product variations. So, the compatibility between WooCommerce and your website themes is a must.
If you’re having issues with a specific theme, you need to troubleshoot with the default theme. Here’s how you can do that –
- Switch to WordPress default theme.
- Monitor if the issue with product variations persists with the default theme.
- If the issue is resolved there might be a compatibility issue with the theme you’re using.
Now, you need to contact your developer with the following details –
- Provide detailed information on the error you’re facing with WooCommerce product variations.
- Check if necessary updates or fixes are available regarding your issue.
Step 4: Perform Plugin Conflict Check
WooCommerce plugins are a double-edged sword. While they offer valuable features and time-saving benefits, conflicts can arise and disrupt your store. To resolve this, do a quick conflict check in your WooCommerce store –
- Deactivate all the plugins except WooCommerce.
- After that, reactivate one by one and test the WooCommerce variations.
- If you find any plugin that causes the issue after activating it, it may indicate a conflict with WoCommerce.
You can also consider checking the site’s health to overview any visible conflict. There are some health check plugins available that can help diagnose conflicts by temporarily disabling plugins and themes to isolate the problem.
This step can help you be aware of any JavaScript errors or conflicts between your site.
Step 5: Use a Regenerate Thumbnails Plugin
Sometimes your store’s products can be missing or not generated for some reason, which can cause issues with the WooCommerce variable product.
You can regenerate thumbnails using ThumbPress to resolve this issue.
Summary
Congratulations! You’ve mastered adding variable products in WooCommerce. This comprehensive guide equipped you to create flexible product options, implement variation swatches for a seamless user experience, and troubleshoot potential issues.
Remember, a final review of your product variations, especially pricing and stock levels, is crucial before making them live on your store. Good luck!
Frequently Asked Questions (FAQ)
A variable product in WooCommerce is a type of product that offers multiple variations. These variations can differ in attributes such as color, Size, price, stock levels, and more.
1. Log in to your WordPress dashboard and go to WooCommerce.
2. Navigate to the product page you are interested in to add variations.
3. Open the product to edit it.
4. Look for the variations tab and generate variations.
5. Finally, save the changes.
1. Go to WooCommerce > Products > Import.
2. Prepare your CSV file with variations and upload your CSV file.
3. Match the CSV columns to WooCommerce fields.
4. Run the import, and WooCommerce will import product variations.
No. You can’t create product variations in WooCommerce without attributes. To add variations you need to create attributes first.
Subscribe to Our Newsletter
Get the latest WordPress tutorials, trends, and resources right in your inbox. No Spamming, Unsubscribe Anytime.

Thank you for subscribing to our newsletter!
Table of Content
- WooCommerce Products and Variable Products
- Create and Add Variable Products in WooCommerce
- Step 1: Create and Set up Attributes for Your Products
- Step 2: Assign Attributes to Single Product
- Step 3: Add Variations to the WooCommerce Products
- Best Product Variations Swatches for WooCommerce (Free Plugin Option)
- WooCommerce Variations Not Showing: Issues, Causes, and Solutions
- Common Issues for WooCommerce Product Variations
- Common Causes of WooCommerce Variations Issues
- Best Ways to Fix 'WooCommerce Variations Not Showing'
- Step 1: Price for Variation is Missing
- Step 2: Variations Products are Out-Of-Stock
- Step 3: Check the Theme Compatibility
- Step 4: Perform Plugin Conflict Check
- Step 5: Use a Regenerate Thumbnails Plugin
- Summary
- Frequently Asked Questions (FAQ)
Get CoDesigner
Build awesome WooCommerce websites with CoDesigner’s 14+ Modules, 94+ Widgets and 150+ Templates.
Get Now


