How to Edit WooCommerce Cart Shortcode: From Basic to Advance

When it comes to creating a standard eCommerce site, there are several alternatives available. However, WooCommerce stands out as an all-in-one solution in building a complete online store. One of its standout features is the ability to add shortcodes, which lets you to develop entire pages dedicated to your WooCommerce store effortlessly.
In this blog, we will cover everything you need to know about the WooCommerce cart shortcode. By the end, you’ll be equipped to create a fully-functional online store tailored to your vision.
Ready to dive in? Let’s get started!
Understanding the Basics of WooCommerce Shortcodes
WooCommerce shortcodes are small snippets of code that perform specific functions. In short, they provide an easy way to add features without needing to touch any PHP code.
Using these shortcodes, you can easily create customized pages for your online store. The cart shortcode can display the shopping cart contents and interface, while the checkout shortcode can create a smooth checkout process.
Also, these shortcodes are highly flexible and can be customized to fit your specific needs. You can place them anywhere on your site and it allows you to design your store layout exactly as you envision it.
These shortcodes are ready to use as soon as you install the plugin and they work seamlessly in both the Gutenberg and Classic Editor.
How to Manually Edit WooCommerce Cart Shortcode
Mastering the WooCommerce cart shortcode can give you greater control over your online store’s cart functionality.
Here’s how you can manually edit your WooCommerce cart shortcode –
Step 1: Add a New Page
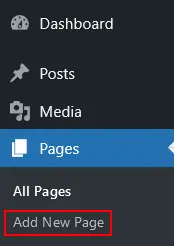
Start by logging in to your WooCommerce site dashboard, then go to Pages > Add New.
Step 2: Add Shortcode Block to Your WooCommerce Cart
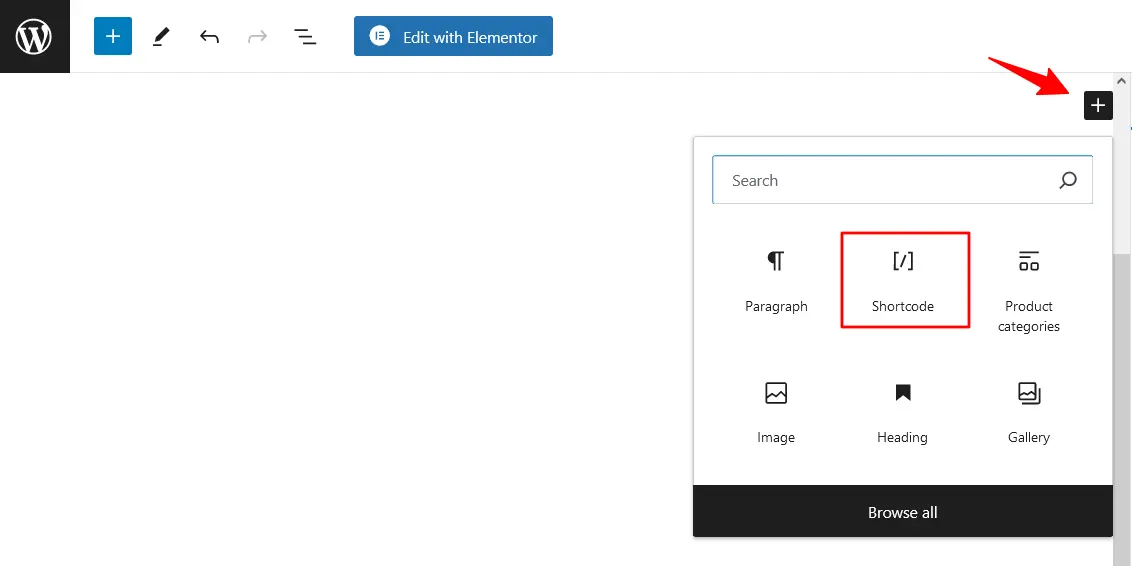
On the WordPress editor page, click on the (+) sign. Search for Shortcode and click on it to add the block.
Step 3: Place Shortcode in the Block
Enter the preferred Shortcode to add it to the Shortcode block you added.

Step 4: Customize New WooCommerce Cart Page
To do this, open the new page with the Gutenberg Editor. Click on the (x) sign on the left of the page. You’ll find necessary blocks, widgets, design elements, and more from here. Then, choose your desired blocks to customize.
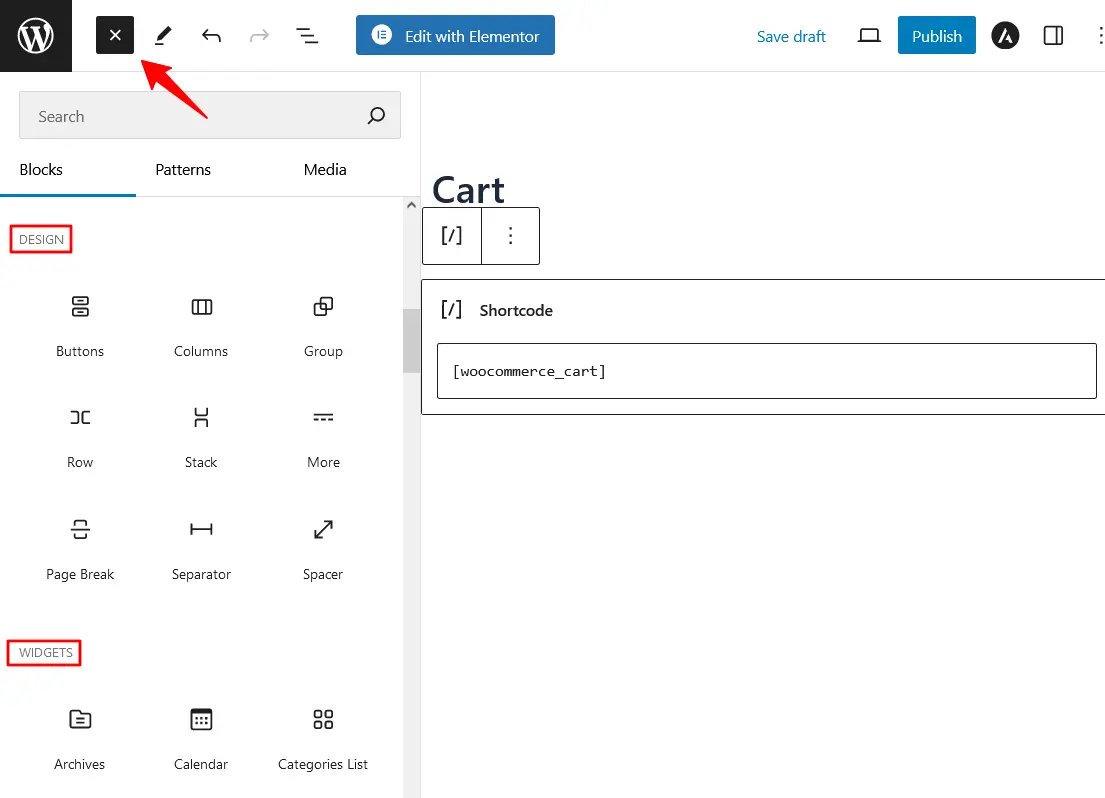
Finally, click Publish to save your changes.
Step 5: Add Custom CSS for Shortcodes
Implement responsive CSS to improve the appearance of your Custom Shortcode on any device. You can ensure this by using media queries to specify different styles for different-sized screens.
@media (max-width: 768px) {
.woocommerce-products {
font-size: smaller; /* Decreases font size on smaller devices */
}
}
Step 6: Create Custom Shortcodes
To create a custom shortcode, add a new PHP function with your theme’s function.php file. Don’t forget to give a unique name that resonates with your shortcode purpose.
Here is a simple structure you can follow –
function display_custom_content() {
// Insert your custom code here
return ‘Content that will be displayed by the shortcode.’;
}
add_shortcode(‘custom_shortcode’, ‘display_custom_content’);
Step 7: Publish and Preview the New Cart Page
Preview it on a new tab and publish it. You can also use the Customize button from the top of that page to make any final adjustments.
Edit WooCommerce Cart Shortcode Using Theme Editor
Now that you know how to edit WooCommerce shortcode manually. Here’s an easier method you can use to edit WooCommerce cart shortcode –
Step 1: Create a Child Theme
Create a child theme to ensure the changes you made are saved when you update your WooCommerce or theme. New changes will automatically override any existing settings, so make sure to turn on the child theme before starting.
Step 2: Copy the Template
Locate the template for the shortcode you want to customize in the WooCommerce plugin folder. Copy the template file you’ve created to your theme folder.
Step 3: Do Necessary Customization
Open the template file in any editor and make the changes you need based on your user preferences. You can modify the appearance and behavior of the shortcode from here.
Step 4: Save and Test Your Changes
Save your customized template file in the child theme folder. After that, make sure everything is working as expected.
Limitations of WooCommerce ShortCodes
- Limited Options for Designs: With WooCommerce shortcodes, customization options for your store are somewhat limited. While they offer basic designs, they don’t allow for extensive modifications to match your online store’s theme perfectly.
- Poor User Experience: When you’re using shortcodes in your WoooCommerce site, it can potentially slow down your website.
- Compatibility: It may not be compatible with all the WordPress themes and plugins. This can lead to broken pages or critical errors on your live page.
Alternatives to WooCommerce Cart Shortcode
We have identified some major limitations of WooCommerce shortcodes. To overcome these, we’ll explore a more effective method using one of the WooCommerce add-ons. Here we will use a free add-on to make the necessary edits –
Step 1: Install and Activate the Required Plugins
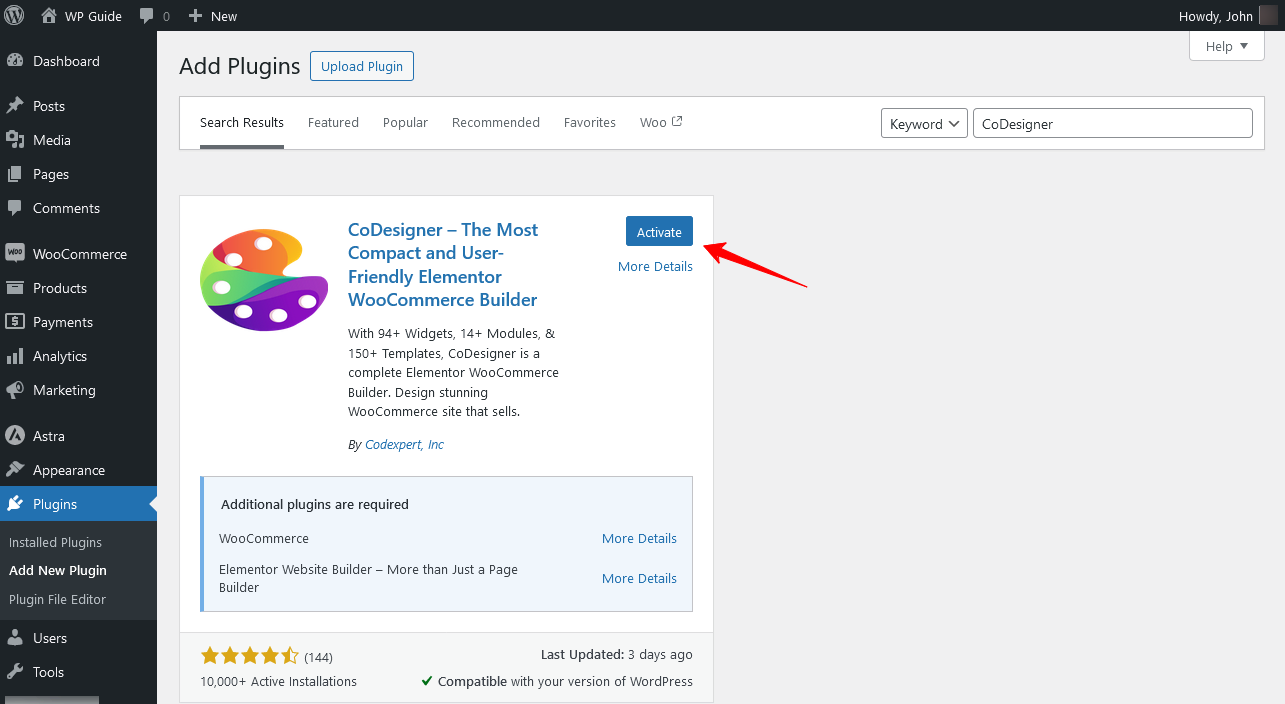
If you’re starting without a WooCommerce shortcode, you have to install and activate CoDesigner within your WooCommerce store.
Step 2: Enable Necessary Widgets
Once you’ve activated the necessary plugins, you have to enable the cart-related widgets. For this, navigate to the CoDesigner > Widgets page from your site dashboard.
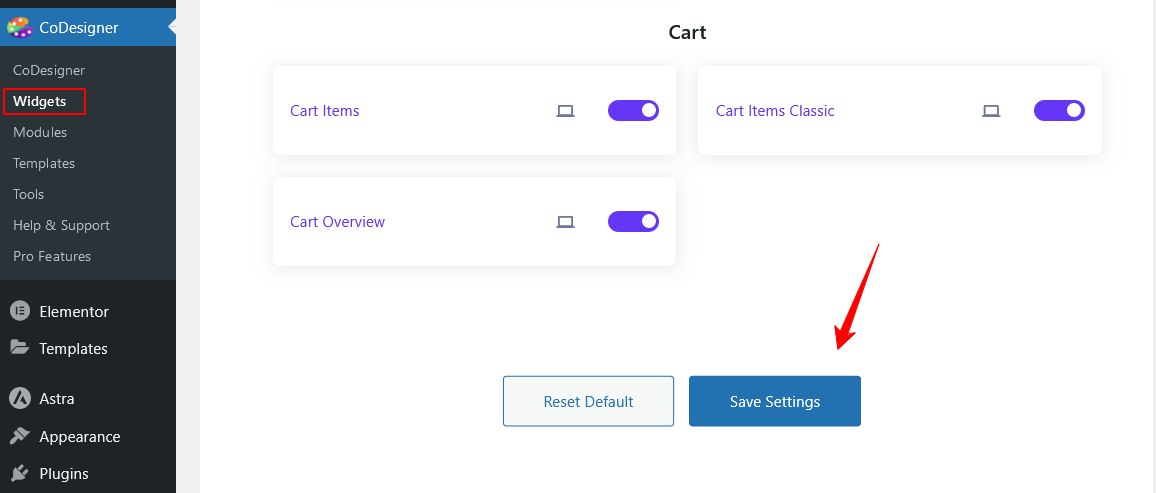
Search for Cart Items, Cart Items Classic, and Cart Overview from the widgets section. Finally, enable those widgets and click on the Save Settings button.
Step 3: Create and Customize WooCommerce Cart Page
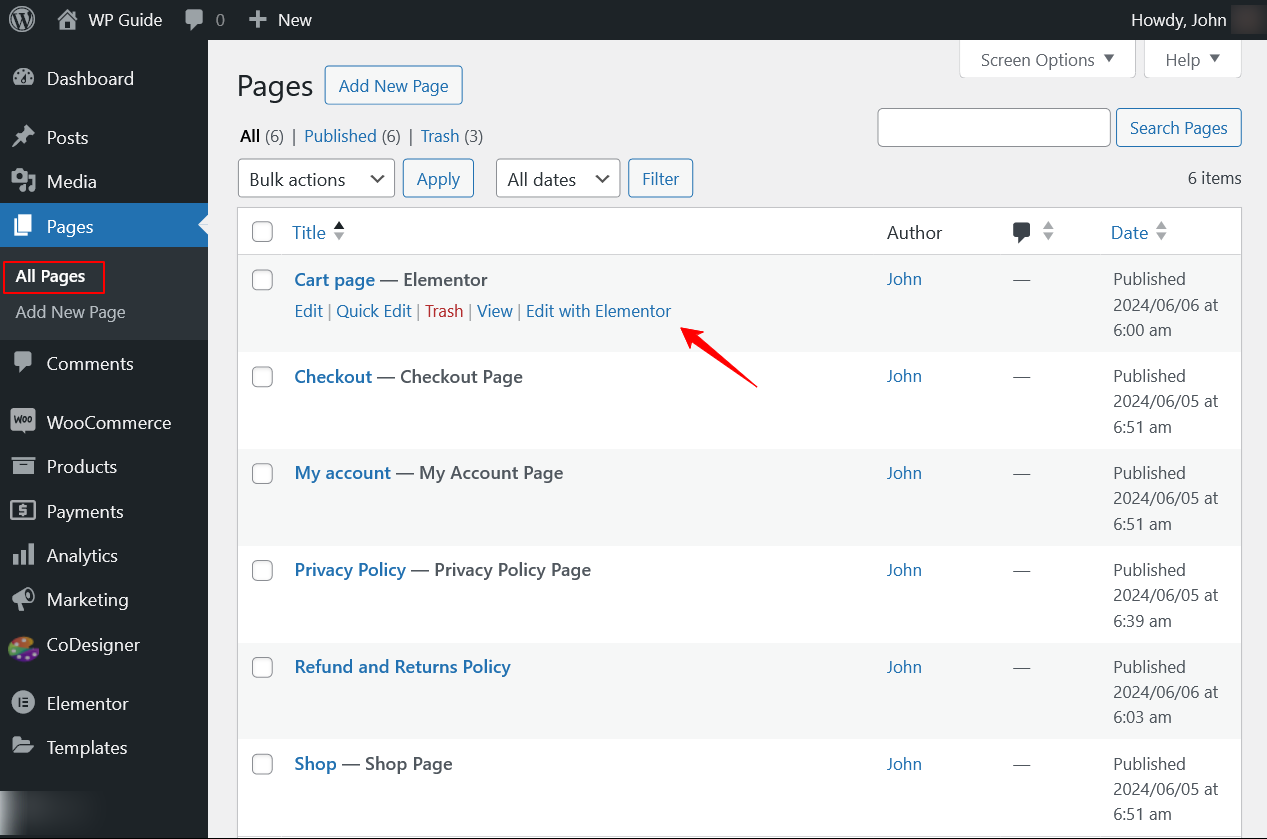
You can customize the WooCommrece cart page which is already available or create a new one. To do this, go to Pages > Add New Page or you can customize the existing cart page from this section as well.
Hover over the existing cart page, click on Edit with Elementor to customize it.
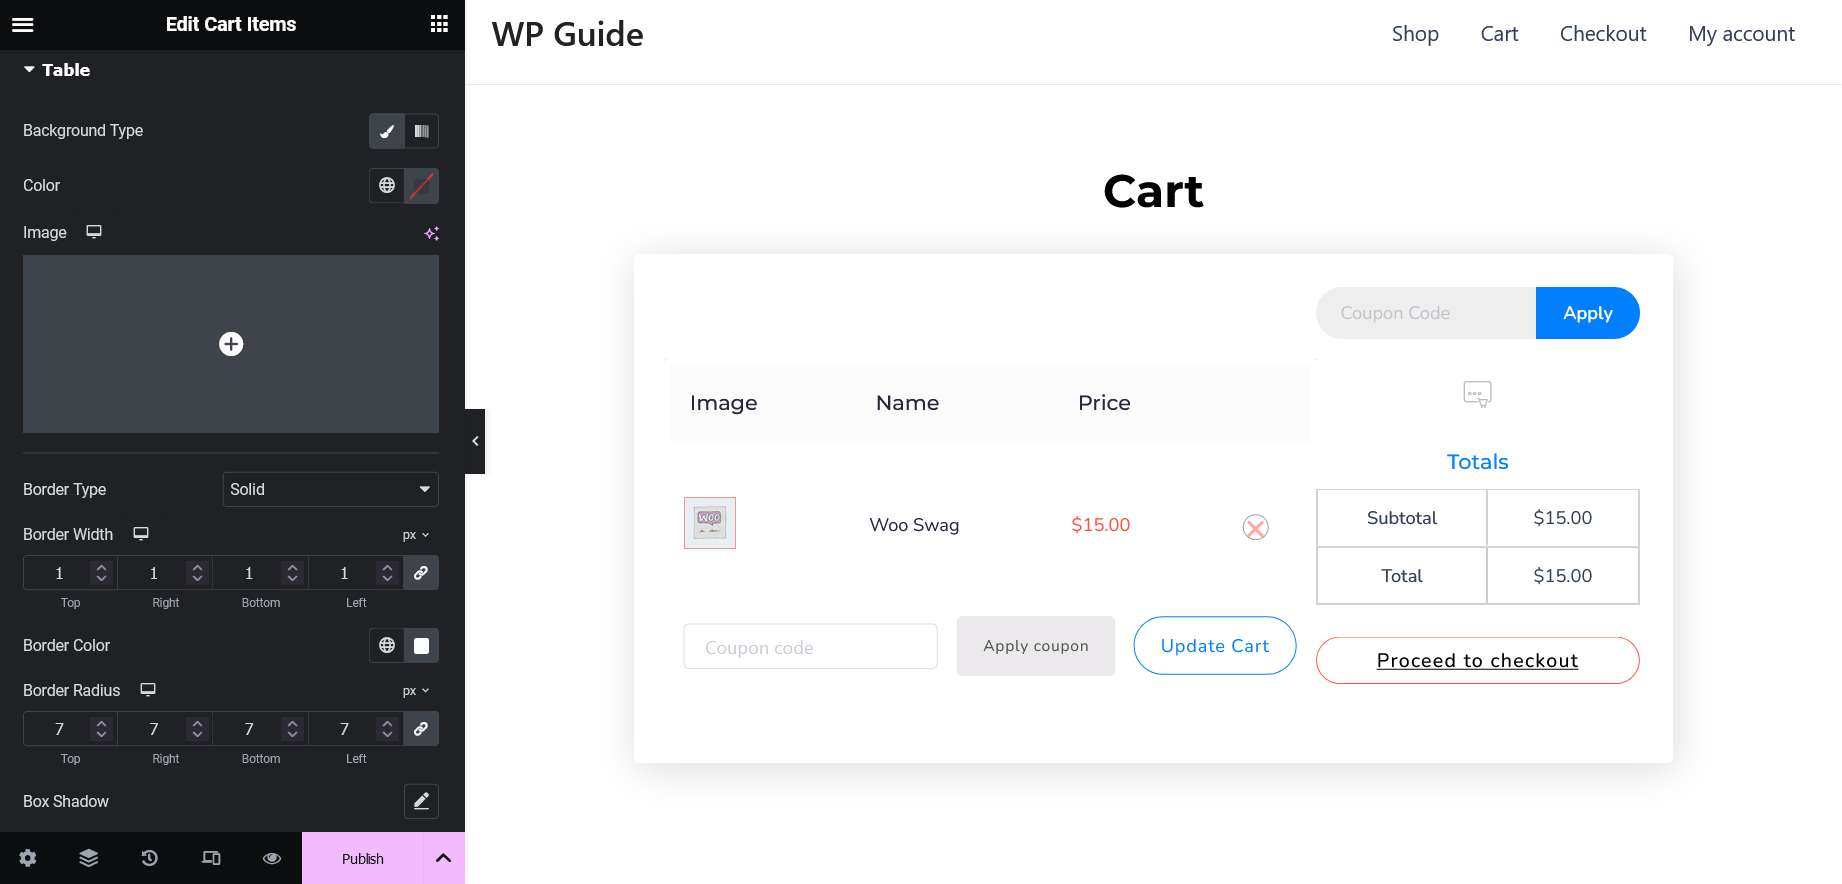
Drag and drop the desired CoDesigner cart widgets to the empty sections.
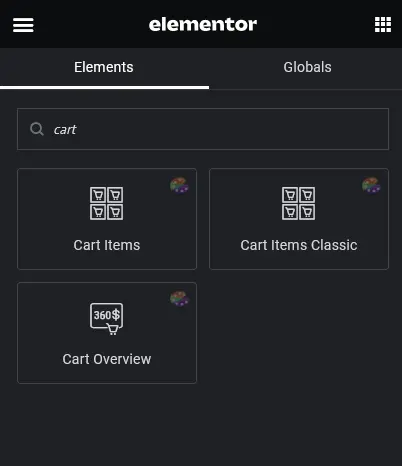
With CoDesigner, you can have complete freedom of customization. You can edit different parts of any of the widgets including Text colors, Typography, Background, and more.
Step 4: Set as Default Cart Page
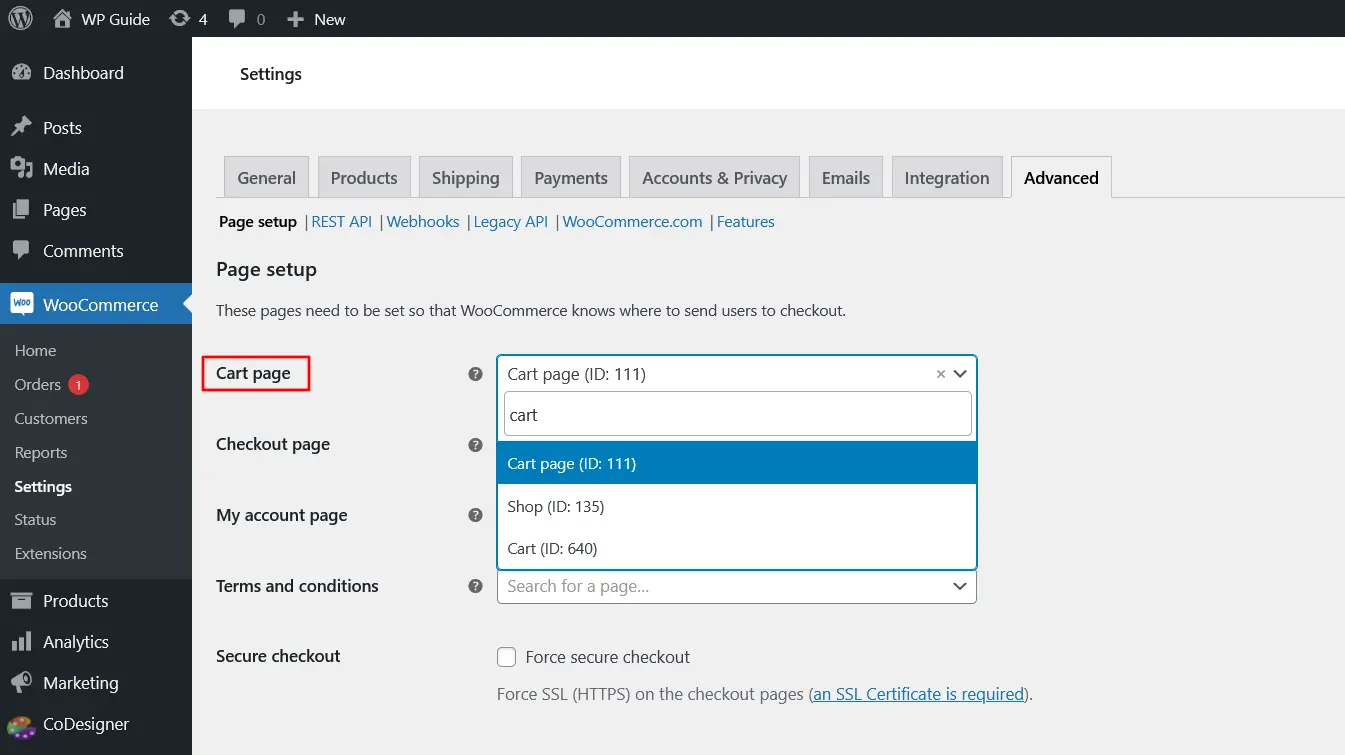
Once you’re happy with the changes, click on the Publish button to save changes and check if any extra customizations need to be made. And finally, set this cart template as the default WooCommerce cart page from Settings > Advanced > Cart Page.
Create WooCommerce Cart Page Using Templates
We already know how to create a cart page without using WooCommerce shortcodes. In this section, we’ll show you how to create a WooCommerce cart page by using pre-made templates.
Step 1: Edit Cart Page with Elementor
Start by creating or opening the cart page in Elementor. Find the CoDesigner icon and click on it.

Step 2: Insert CoDesigner Template
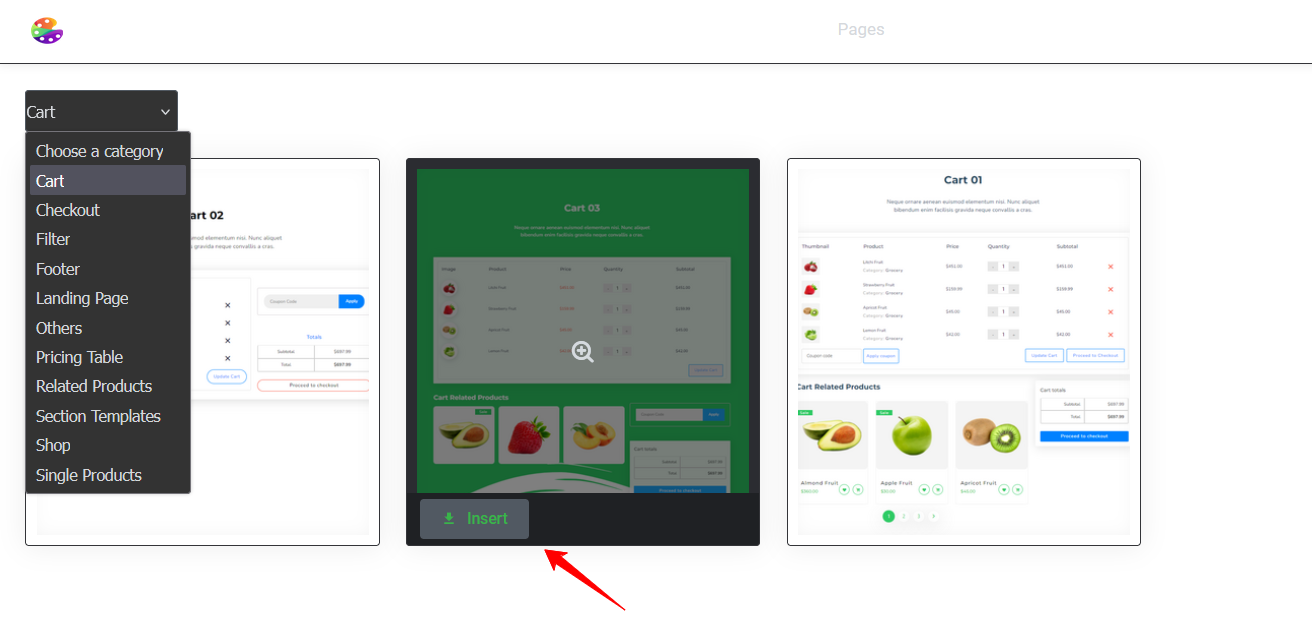
After clicking on the icon, a popup will appear. In the popup, select the blocks and choose the Cart category from the dropdown menu.
Hover over the available templates and click Insert to add the desired template.
When the customizations are complete, click on the Update button from the editor to save changes.
Final Words
Using WooCommerce shortcodes is a great way to customize your pages easily and in a user-friendly manner. However, they do have some limitations when it comes to customization.
For a beautifully customized cart page, consider using CoDesigner and focus on addressing the pain points of your customers and resolve them using advanced methods. This approach will make your customers feel more comfortable and help increase customer retention in no time!
Frequently Asked Questions (FAQs)
How do I edit shortcodes in WooCommerce?
- Add a New page.
- Search Shortcode Block on that page.
- Place the required Shortcode in that Block.
- Customize the new WooCommerce Page using block editor and finally publish it.
How do I add WooCommerce cart shortcode?
To add WooCommerce cart shortcode,
- Go to site dashboard Pages and click on the Add New Page button
- From that page, search Shortcode Block in Your WooCommerce Cart
- Place the required Shortcode in that Block
- Finally, click on the Publish button
How do I edit WooCommerce cart shortcode free?
- Install and activate the WooCommerce addon
- Enable the cart widgets
- Create a new page and open it with Elementor
- Drag the cart widgets on Elementor sections
- Add style to the cart page using Elementor
- Finally, publish the WooCommerce cart page
How do I customize the WooCommerce shortcode?
You can customize this WooCommerce part using actions and filter hooks. You need to add your custom functions to your plugins or theme’s function.php file. This allows you to extend the default functionalities without modifying the core files. But, you need to create a child theme so that future updates won’t replace the changes you made.
Subscribe to Our Newsletter
Get the latest WordPress tutorials, trends, and resources right in your inbox. No Spamming, Unsubscribe Anytime.

Thank you for subscribing to our newsletter!
Table of Content
- Understanding the Basics of WooCommerce Shortcodes
- How to Manually Edit WooCommerce Cart Shortcode
- Step 1: Add a New Page
- Step 2: Add Shortcode Block to Your WooCommerce Cart
- Step 3: Place Shortcode in the Block
- Step 4: Customize New WooCommerce Cart Page
- Step 5: Add Custom CSS for Shortcodes
- Step 6: Create Custom Shortcodes
- Step 7: Publish and Preview the New Cart Page
- Edit WooCommerce Cart Shortcode Using Theme Editor
- Step 1: Create a Child Theme
- Step 2: Copy the Template
- Step 3: Do Necessary Customization
- Step 4: Save and Test Your Changes
- Limitations of WooCommerce ShortCodes
- Alternatives to WooCommerce Cart Shortcode
- Step 1: Install and Activate the Required Plugins
- Step 2: Enable Necessary Widgets
- Step 3: Create and Customize WooCommerce Cart Page
- Step 4: Set as Default Cart Page
- Create WooCommerce Cart Page Using Templates
- Step 1: Edit Cart Page with Elementor
- Step 2: Insert CoDesigner Template
- Final Words
- Frequently Asked Questions (FAQs)


