Image SEO – How to Optimize Images for Search Engines


Have you ever visited a website that loads slowly because of heavy images? It is frustrating, right? Slow-loading images can significantly harm your site’s performance, impact user experience, and even hurt your rankings on Google.
Imagine users trying to engage with your content but leaving because the pages take too long to load. Not only does this drive users away, but it also means you are missing out on valuable traffic and harming your SEO. Google rewards fast-loading sites, so if your images are not optimized, your visibility and conversions could suffer.
The good news is that image optimization is a simple yet effective solution. In this guide, we’ll show you how to optimize your images for SEO, ensuring your site loads quickly, improves user experience, and ranks better on Google. Let’s dive in!
What is Image SEO?
Image SEO, also known as image optimization, is the process of optimizing images on your website to improve their visibility and rankings in search engines like Google.
This process helps search engines understand your images better, increasing the chances that they will appear in image searches and improving your site’s overall visibility. Image SEO involves various techniques such as using descriptive file names, adding alt text, compressing images for faster loading, and selecting the right image formats.
Why is Image Optimization So Important?
Image optimization is vital because it enhances both search engine rankings and user experience. Properly optimized images help websites load faster, improve accessibility, and increase visibility in search results. Here’s why it matters:

- Faster Page Load Times – Unoptimized images slow down your site significantly. The larger the file size of an image, the more time it would take to download, which harms the user experience. Pages with good performance are important to ensure visitor engagement and reduce bounce rates.
- Improved User Experience – Users want web pages to load fast. If your images are large as well as slow loading, visitors can become irritated and leave without interacting with your material. Optimized images enable your site to load quickly, providing a seamless browsing experience.
- Better SEO Rankings – Google uses page load speed as a ranking factor in its search algorithms. Websites with slower load times are ranked lower, which means fewer visitors. Optimizing images helps reduce page load times, improving your SEO and increasing the chances of ranking higher in search results.
- Improved Mobile Performance – As more and more users are accessing sites through mobile devices, it is important that your images are mobile-optimized. Large, uncompressed images slow down load times on mobile networks, offering a poor experience to mobile users. Proper optimization ensures that your site is optimized for all devices.
- Reduced Bandwidth Usage – When images are optimized, they consume less bandwidth, which is especially important for users with limited data or slow internet connections. This helps improve your site’s accessibility, making it more user-friendly for a broader audience.
How to Optimize Images for Your Website: 10 Simple Steps
Optimizing images for your website is one of the easiest and most effective ways to improve its performance, user experience, and SEO. Images are important for visual appeal and engagement, but large unoptimized files can slow down your website and negatively affect your search rankings. Fortunately, with a few simple steps, you can optimize your images to make sure they load quickly without sacrificing quality. Here’s how to optimize images for your website.
1. Choose the Right Image Format for Image SEO

Using the right image format is important to ensure your images load properly, are not blurry, and remain readable and accessible to users. You also need to make sure you are using image formats that Google can efficiently crawl and index. The following are the Google-supported formats:
| A Quick Overview of These Formats | Which Format is Best for SEO? |
| JPEG (JPG) – Best for photos, widely supported, lossy compression. | Best Overall: WebP (great quality with small file sizes). |
| PNG – Best for high-quality images with transparency, larger file sizes. | Best for Photos: JPEG (good balance of quality and file size). |
| WebP – Modern format with superior compression and quality, but not universally supported. | Best for Graphics & Logos: SVG (scalable without losing quality). |
| SVG – Best for vector graphics, logos, and icons, infinitely scalable. | Best for Transparency: PNG (but WebP is a better alternative). |
| GIF – Supports animation but has large file sizes, limited to 256 colors. | Best for Future-Proofing: AVIF (smaller than WebP but not yet fully supported). |
| BMP – Uncompressed, high quality, but large file size (rarely used for web). | Worst for SEO: GIF (large files, slow loading) & BMP (too large for web use). |
| AVIF – A next-gen format with better compression than WebP. |
2. Compress Images Without Losing Quality
Image compression is critical for improving website speed and SEO without sacrificing quality. Compressing images reduces file sizes, resulting in faster load times, better user experience, and lower bandwidth usage.

Lossy vs. Lossless Compression:
- Lossy: Reduces file size by removing non-essential data, slightly impacting quality. Ideal for photographs.
- Lossless: Maintains full image quality while reducing file size. Best for images with sharp edges or transparency.
Compression Tools:
- TinyPNG: Efficiently compresses PNG and JPEG files with minimal quality loss.
- CompressJPEG: Focuses on JPEG files for quick compression.
- Optimizilla: Compresses both PNG and JPEG images with adjustable settings.
Best Practices:
- Compress images to 100 KB or less when possible.
- Use WebP format for superior compression without losing quality.
- Aim for 72 DPI for web images.
By compressing images efficiently, you can speed up your website without sacrificing visual quality.
3. Use Descriptive File Names
Descriptive file names help search engines understand your images and improve SEO. Instead of default names like “IMG_12345.jpg,” use clear, concise names that describe the image content, such as “playful-black-kitten.jpg” or “apple-iphone-16-pink-side-view.jpg.”
Best Practices:
- Be Specific: Use precise names like “brown-cashmere-sweater.jpg” instead of just “sweater.jpg.”
- Use Hyphens: Separate words with hyphens (e.g., “red-apple.jpg”).
- Include Keywords: Add relevant keywords users might search for.
- Avoid Spaces: Use hyphens instead of spaces.
Descriptive, keyword-rich file names boost your image’s chances of appearing in search results and improve overall SEO.
💡 Pro Tip: You can automate this process using the File Renaming on Upload WordPress Plugin, which helps you automatically rename images and files on upload, making your SEO efforts easier and more consistent.
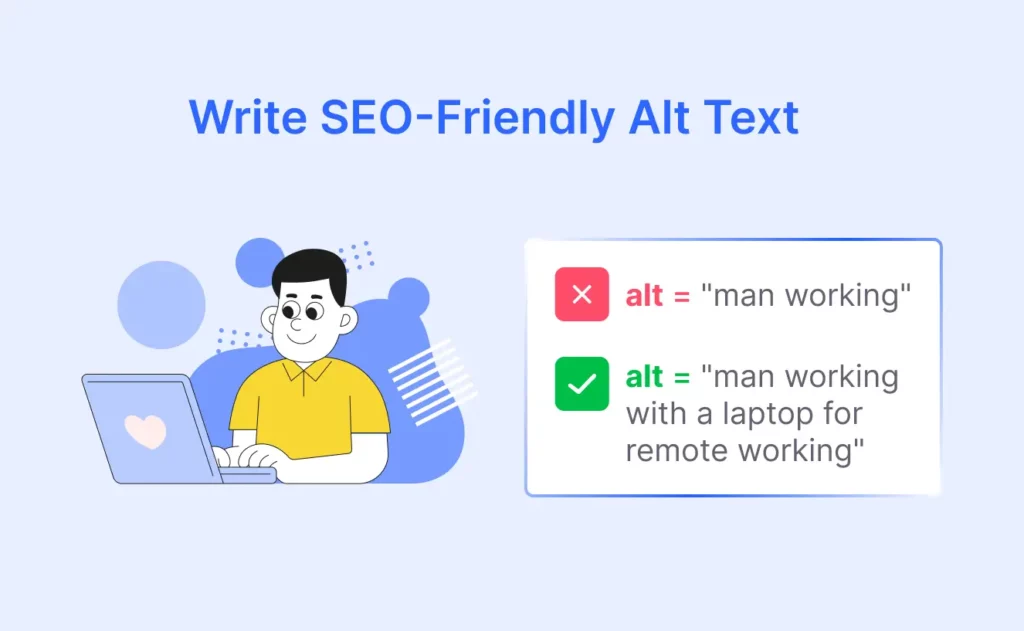
4. Write SEO-Friendly Alt Text
Alt text is required for image SEO because it tells search engines what your images are. It is an HTML attribute that gives a description of an image, making it accessible to users who rely on screen readers and helping Google rank your content better.
Here are some tips for writing SEO-friendly alt text:
- Be Descriptive: Instead of vague terms like “image1.jpg,” describe the image clearly. For example, use “dark-chocolate-banana-bread-muffins.jpg” instead of just “chocolate.”
- Use Keywords Naturally: Include relevant keywords, but avoid keyword stuffing. For example, “blue-t-shirt-for-men.jpg” is more natural than “buy-blue-t-shirt-men-online.jpg.”
- Focus on Accessibility: Alt text helps visually impaired users understand your images, so make it meaningful.
- Avoid Generic Phrases: Skip overusing phrases like “image of” or “picture of.” Go straight to the description.
Don’t forget that Google crawls images using alt text, and well-written alt text will benefit your SEO and user experience too. Just make it brief (under 125 characters) and descriptive for the image content.
5. Use Responsive Images
Responsive images adjust according to the user’s device and screen size so that they load efficiently and display as intended on any device, ranging from mobiles to desktops. This is crucial for user experience and search engine optimization since Google uses mobile-first indexing and prefers mobile-friendly websites in search results.
Key Points for Responsive Images:
- Use srcset and sizes: These attributes specify several image files for various screen widths and resolutions, so the right image is delivered to every device.
- Mobile-First Indexing: Google prefers mobile-friendly sites, so mobile-friendly image optimization is essential for SEO.
- Image Size Optimization: Ensure images are not too large for small screens and not too small for large screens. This will help reduce page load times and improve site performance.
- CSS for Scaling: Use CSS to make images scale automatically based on the viewport, improving the user experience on all devices.
By implementing responsive images, you’ll improve site speed, reduce bounce rates, and provide a seamless experience for users across devices. This is a key element for improving Image SEO and keeping your website competitive.
6. Reduce Image Load Time with Lazy Loading
Lazy loading optimizes page speed by putting off the loading of images until they are needed when the user scrolls. This reduces initial load time, saves bandwidth, and optimizes the user experience on image heavy pages.
How It Works:
- Defers Image Loading: Images are loaded only when they come into the viewport, improving page load time.
- Simple to Implement: Add loading=”lazy” to your tags.
<img src="image.jpg" loading="lazy" alt="Description">Preload Critical Images: Don’t lazy-load images above the fold (visible on page load). Use fetchpriority=”high” or preload for essential images:
<img src="image.jpg" fetchpriority="high" alt="Description">SEO Considerations: Lazy loading doesn’t impact indexing, but only applies it to non-critical images. For WordPress users (version 5.5+), lazy loading is automatic.
Lazy loading enhances page speed, improves UX, and can boost SEO if used correctly, especially for mobile users.
7. Create an Image Sitemaps
Using an image sitemap increases the chances of your images appearing in search results, improving traffic and engagement.
Why Use an Image Sitemap?
- Ensures all images, including those loaded via JavaScript, are indexed.
- Improves rankings in Google Images and visual search.
- Enhances overall SEO by providing structured image data.
How to Create an Image Sitemap:
- List Your Images – Identify all images on your site, including those in subfolders or dynamically loaded.
- Use XML Sitemap Tools – Tools like Yoast, RankMath, Screaming Frog, or XML-Sitemaps.com can generate sitemaps.
- Include Image Details – Add metadata like URL, title, caption, and license for better indexing.
- Submit to Google Search Console – Upload your sitemap via the “Sitemaps” section.
- Keep It Updated – Regularly update to include new images and remove old ones.
8. Add Structured Data for Images
Schema markup (structured data) is a type of code that helps search engines understand the context of your content, including images. By adding ImageObject schema markup, you provide search engines with detailed information about your images, improving their visibility in search results and potentially enabling rich results.
Why Use Structured Data for Images?
- Enhances image visibility in search results.
- Enables rich snippets with extra details like product prices, ratings, and availability.
- Helps images appear in Google Discover and Google Image Badges (e.g., “Product,” “Recipe”).
Ways to Implement Image Structured Data:
- Use Schema Markup (JSON-LD format recommended).
- Include Image URLs in relevant schema types: Product (e.g., eCommerce sites), Recipe (e.g., food blogs), Article (e.g., news sites)
By adding schema markup, your images are more likely to appear in enhanced search results, improving visibility and driving traffic.
9. Enable Browser Caching for Images
Browser caching helps speed up your website by storing images locally in a user’s browser. This reduces load times for repeat visits and decreases server requests.
Why Enable Browser Caching?
- Faster loading times for returning visitors.
- Reduces bandwidth usage and server requests.
- Essential for site-wide images like logos, footers, and icons.
How to Implement Browser Caching:
- Set Expiry Times – Images rarely change, so cache them for long periods (e.g., 365 days).
Use .htaccess Rules – On Apache servers, add:
<IfModule mod_expires.c>
  ExpiresActive On
  ExpiresByType image/jpeg "access plus 1 year"
  ExpiresByType image/png "access plus 1 year"
  ExpiresByType image/gif "access plus 1 year"
</IfModule>- Use a Caching Plugin – If using WordPress, plugins like WP Rocket can automate browser caching.
- Test with Google Lighthouse – Analyze caching efficiency using Lighthouse Viewer in Chrome DevTools.
By enabling browser caching, you enhance user experience and improve site performance.
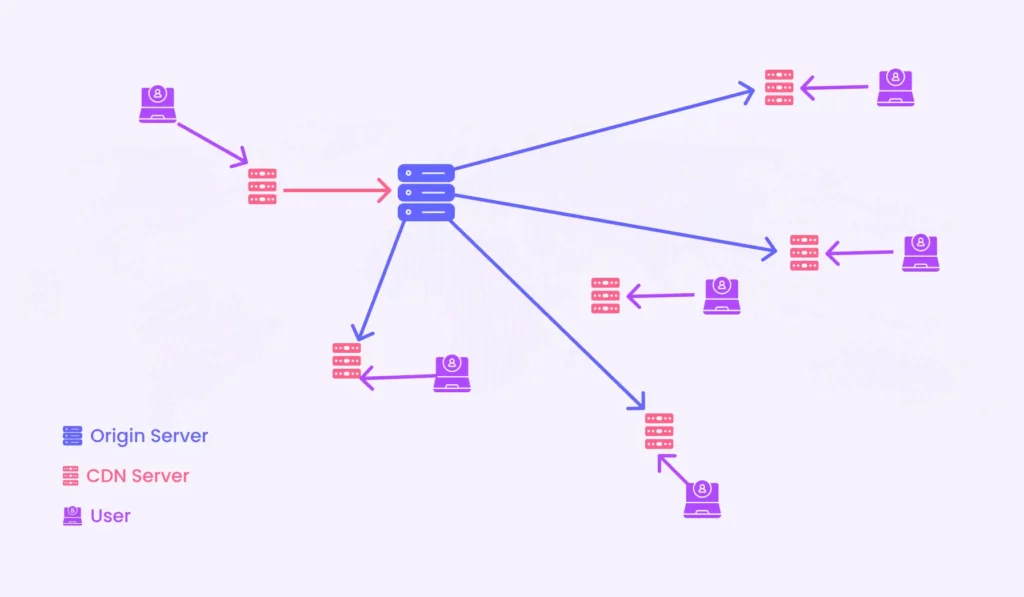
10. Serve Images Via a CDN
A Content Delivery Network (CDN) improves image delivery by storing and serving your images from servers distributed worldwide. This ensures users receive images from the server closest to their location, reducing load times and enhancing site performance.
Benefits of Using a CDN for Images:
- Faster Load Times – Users download images from the nearest server, reducing latency.
- Optimized Image Formats – CDNs can automatically convert images to WebP or other efficient formats based on browser compatibility.
- Reduced Server Load – Offloads image delivery from your main server, improving overall site performance.
- Better Handling of Traffic Spikes – Ensures smooth performance even during high-traffic periods.
- Security Enhancements – Many CDNs offer protection against DDoS attacks and other threats.
How to Serve Images via a CDN:
- Choose a CDN Provider – Popular options include Cloudflare, Amazon CloudFront, ImageKit, and KeyCDN.
- Integrate with Your Website – Many CDNs offer plugins for WordPress, such as Bunny.net or Cloudflare.
- Enable Image Optimization – Set up automatic compression, resizing, and format conversion for faster loading.
- Verify with PageSpeed Insights – Ensure your images meet the “Serve images in next-gen formats” recommendation.
Using a CDN not only speeds up image delivery but also enhances SEO, user experience, and overall site efficiency.
Final Thoughts
Optimizing images on your website is a straightforward way to improve both user experience and SEO. When your site loads faster, visitors stay longer and engage more, which also helps your search rankings.
To get the best results, start by choosing the right file format for each image. Resize and compress images to reduce load times without losing quality. Add clear, descriptive alt text to make your content accessible and more searchable. You can also use modern methods like lazy loading, which delays image loading until needed, and responsive images that adjust to different screen sizes.
These simple steps can make your website smoother, faster, and more effective at attracting and keeping visitors.
Frequently Asked Questions (FAQs)
Q. What is Image Optimization?
Image Optimization is the practice of optimizing your website images so they rank higher in search engine results. This includes using relevant file names, alt text, proper formatting, and ensuring fast loading times.Add image
Q. Why is image optimization important for SEO?
Google values fast-loading websites, and slow load times can hurt your search rankings. Optimized images improve page load speed, which is a key factor in SEO. Faster websites also offer a better user experience, reducing bounce rates and increasing engagement.
Q. How do I compress images without losing quality?
You can use online tools like TinyPNG or Compressor.io to compress images. These tools reduce file size while maintaining image quality. Alternatively, you can use image editing software like Photoshop to manually adjust compression settings.
Q. What is lazy loading, and how does it help?
Lazy loading is a technique where images only load when they are about to appear in the user’s viewport (the visible part of the page). This helps reduce initial page load times by deferring the loading of images that the user may not immediately see.
Q. What is a Content Delivery Network (CDN), and how does it improve image load times?
A CDN is a network of servers located in various regions around the world. When a user accesses your site, images are delivered from the server closest to them, reducing load times and ensuring faster image delivery.
Subscribe to Our Newsletter
Get the latest WordPress tutorials, trends, and resources right in your inbox. No Spamming, Unsubscribe Anytime.

Thank you for subscribing to our newsletter!

Table of Content
- What is Image SEO?
- Why is Image Optimization So Important?
- How to Optimize Images for Your Website: 10 Simple Steps
- 1. Choose the Right Image Format for Image SEO
- 2. Compress Images Without Losing Quality
- 3. Use Descriptive File Names
- 4. Write SEO-Friendly Alt Text
- 5. Use Responsive Images
- 6. Reduce Image Load Time with Lazy Loading
- 7. Create an Image Sitemaps
- 8. Add Structured Data for Images
- 9. Enable Browser Caching for Images
- 10. Serve Images Via a CDN
- Final Thoughts
- Frequently Asked Questions (FAQs)
- Q. What is Image Optimization?
- Q. Why is image optimization important for SEO?
- Q. How do I compress images without losing quality?
- Q. What is lazy loading, and how does it help?
- Q. What is a Content Delivery Network (CDN), and how does it improve image load times?