WooCommerce Order Management – A Complete Guide


If you’re running an e-commerce store, you probably use WooCommerce to manage and track your day-to-day operations. WooCommerce lets you handle everything from the moment customer orders are placed, through processing and shipment, to completion and potential returns.
Manually managing order statuses can be tedious, time-consuming, and frustrating. Organizing everything by hand often leads to input errors, customer miscommunication, and order processing delays.
This article will provide everything you need to know about WooCommerce order management. With the right WooCommerce order management plugin and tips, you can greatly improve your order processing, saving valuable time and resources you could otherwise spend focusing on other aspects of your online shop.
So, if you’re here to learn how to manage orders in WooCommerce, you’re in the right place. Let’s dive right in!
What is WooCommerce Order Management?
WooCommerce order management is a feature that allows e-commerce owners to supervise and control every part of online order processing. The platform has built-in tools to monitor orders from the moment they are placed, manage their processing and shipment, and handle any follow-up WooCommerce order actions such as returns or refunds.
This automated system takes the stress away from manually handling order processes and removes any room for errors. Order management WooCommerce is designed to streamline sales and make the management of online orders straightforward and efficient.

Here are some major tasks and functionalities that can be streamlined using order management Woocommerce –
- Creating Orders — When a customer completes a purchase on your WooCommerce store, the system documents details like the products bought, quantities, pricing, delivery address, and payment specifics.
- Order Handling — Incoming orders can be accessed and managed through the WooCommerce backend by you or other team members. This step may include inspecting the order specifics, confirming payment, and preparing items for dispatch.
- Stock Control — The WooCommerce system includes order management with inventory control by automatically adjusting the stock levels as sales are made.
- Order Monitoring — To keep customers informed about their purchase progress, WooCommerce has features to update customers with order statuses and delivery tracking.
- Completed Orders — Orders that have been processed and are ready to be shipped can be marked as Completed by store personnel.
- Returns and Refunds — WooCommerce lets you manage returns and issue refunds, which helps you effortlessly address customer returns or refund requests and register them in the system.
- Customer Communication — Keep open lines of communication with customers using WooCommerce automated confirmation emails, shipping notifications, and customer service interactions.
- Business Insights — With its built-in reporting and analytics tools, WooCommerce lets you gain valuable insights into sales performance, trends, preferred products, and other critical business metrics.
What are Order Statuses?
As an order progresses, the WooCommerce order management system will help you update the default order statuses. While some of these statuses may update automatically, some statuses may require you to manually change them, either individually or in bulk.
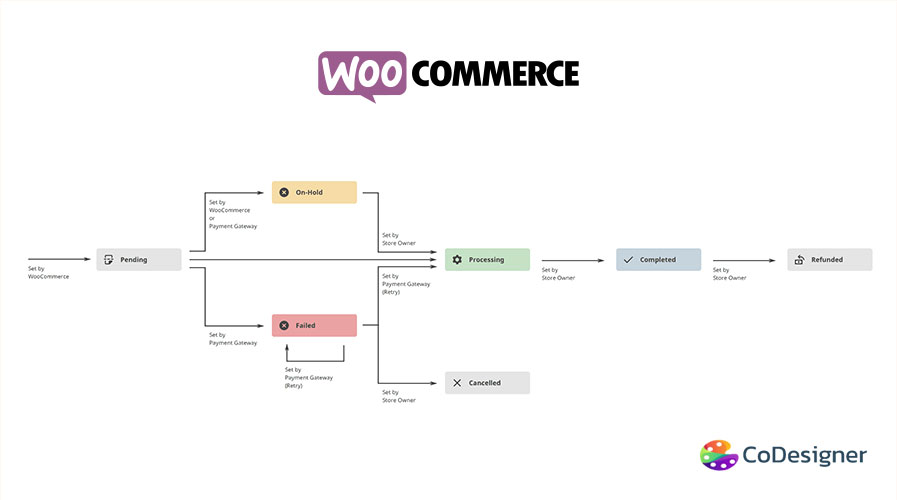
Here are the woocommerce order status manager features to know about –
- Pending Payment (Gray): This status means the order has been placed but the payment is still awaiting confirmation.
- Processing (Green): This status signifies that the payment has been successfully processed and the order is now being packed for delivery. It’s automatically assigned once the payment for an order is complete.
- On Hold (Yellow): This is a status that the store administrator can apply to any order requiring temporary suspension.
- Completed (Blue): This status is typically assigned by the store admin after an order has been successfully delivered to the customer.
- Canceled (Grey): This status denotes that an order has been voided either by the store administrator or the customer, and is manually applied.
- Refunded (Grey): This status is used once a refund has been issued by the store owner, showing that the customer has received their payment back due to a cancellation or return.
- Failed (Red): This status is for orders where the payment was not successfully processed or declined. It is automatically set when the chosen payment method does not go through.
While WooCommerce provides a full set of features for order and inventory management, settings everything up can sometimes feel difficult, especially for thos who are new or those managing solo.
But with EasyCommerce, a WordPress eCommerce plugin you can simplify this process much better for for your customers. It streamlines everything from product setup and order handling to customer communication, everything in a intutive interface.
With EasyCommerce, you can:
- Manage orders and stock with fewer steps.
- Automate routine tasks like email notifications and refunds.
- Track sales performance with simplified reports and more.
How to Change Order Statuses in WooCommerce
Changing order statuses can be automated or manual, depending on certain triggers. Whether it is for individual orders or in bulk, knowing how to update order statuses can help you handle orders easily and efficiently.
Here is a step-by-step guide on how to change and update your order statuses –
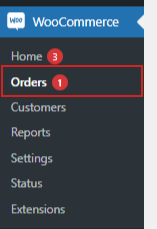
Step 1: Go to WooCommerce Orders
Login to your WordPress dashboard, and navigate to WooCommerce > Orders.
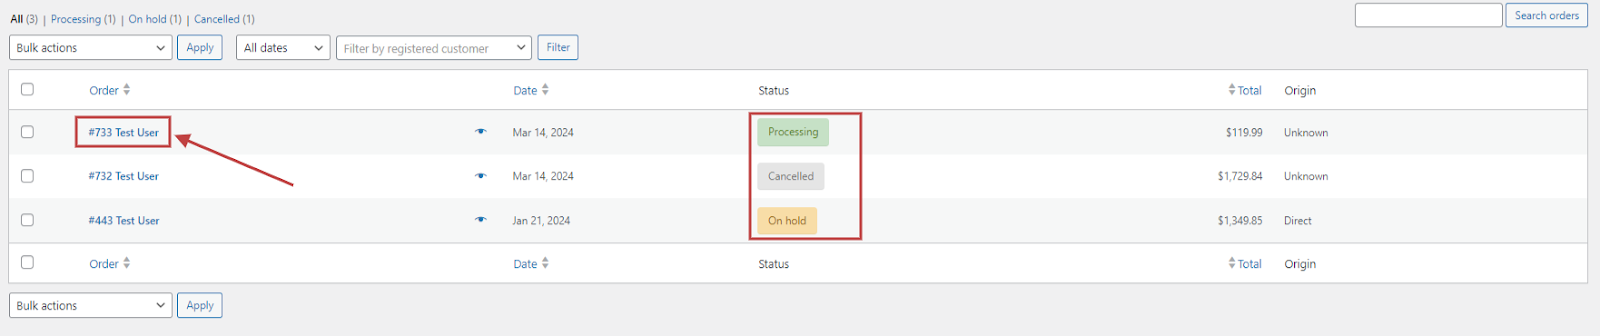
Step 2: Select Order
After being redirected to the WooCommerce orders page, you can change the status by clicking on each order.
Step 3: Change Order Status
Click on an order you want to update, you will be taken to the edit order page. To change the status of an individual order, click on the dropdown menu for statuses and select the new status.
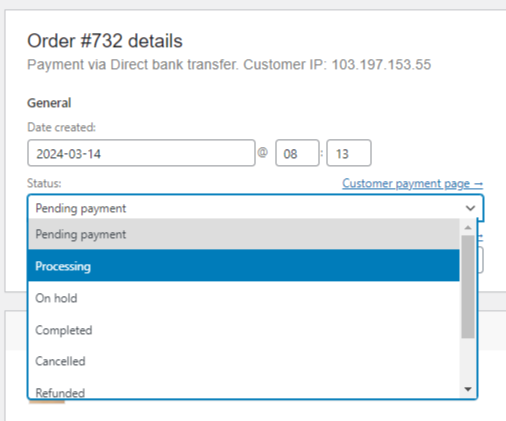
Navigate to Order actions > Update on the right-hand corner of the page to save changes.
Step 4: Change Bulk Order Status
To change the status of multiple orders in bulk, simply return to the WooCommerce Orders page to find a dropdown menu for Bulk Actions. Select “Change status to [new status]” and click the Apply button to save changes.
Step 5: Preview Order
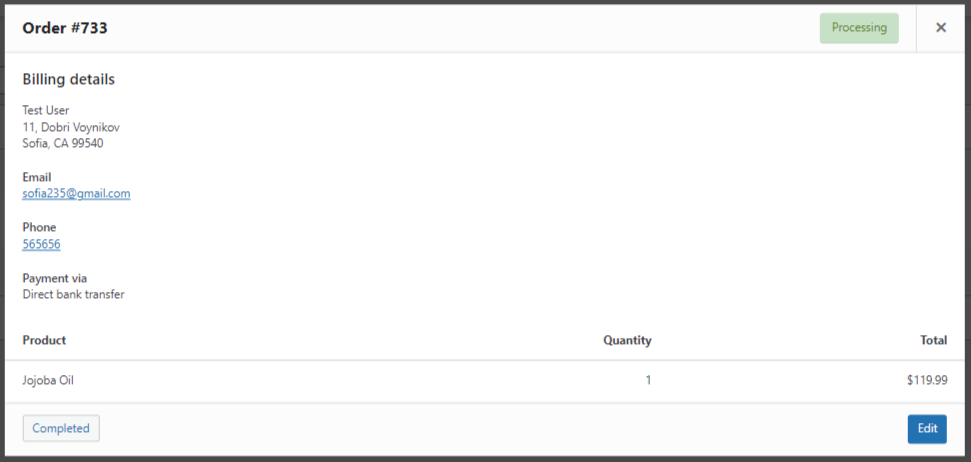
Click on the Preview eye button to open a modal that has the order number, order status, billing details, payment method, shipping details, shipping method, items ordered, and the option to change the order status.
If you’re still struggling to handle statuses, you can use custom order status manager for WooCommerce to make the process more seamless.
Multiple Order Management: A User Guide
If you have a somewhat large e-commerce store, you may need to handle multiple orders at a time. Fortunately, WooCommerce order manager lets you handle multiple orders by filtering columns from the Orders page.
Here’s an order management user guide on how to filter and manage multiple orders –
Step 1: Go to WooCommerce Orders
Login to your WordPress dashboard, and navigate to WooCommerce > Orders.
Step 2: Filter Columns
Click on Select Screen Options from the top-right corner. Choose which columns to show and how many items to display on each page.

Click on the Apply button to refresh the page and apply changes.
Step 3: Filter Orders
Sort orders by ascending or descending order based on Order number, Date, or Total by selecting the respective heading. Click on the Filter button to apply the options.

Note: Refunded amounts for certain orders will not be included in the Total column.
Managing multiple orders can be a slow and repetitive task, and because it’s WooCommerce, there’s always a dedicated plugin out there to make it simpler.
Single Order Management User Guide
Managing a single order can be simple yet comprehensive with the help of WooCommerce order management. You can view and edit order details, order items and totals, custom fields, and order notes from here.
Note: You can only edit orders with the status set to On Hold or Pending Payment.
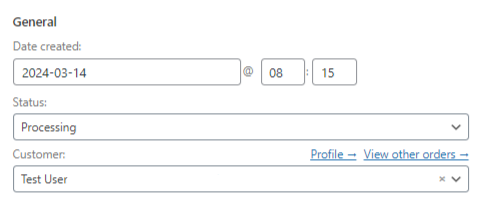
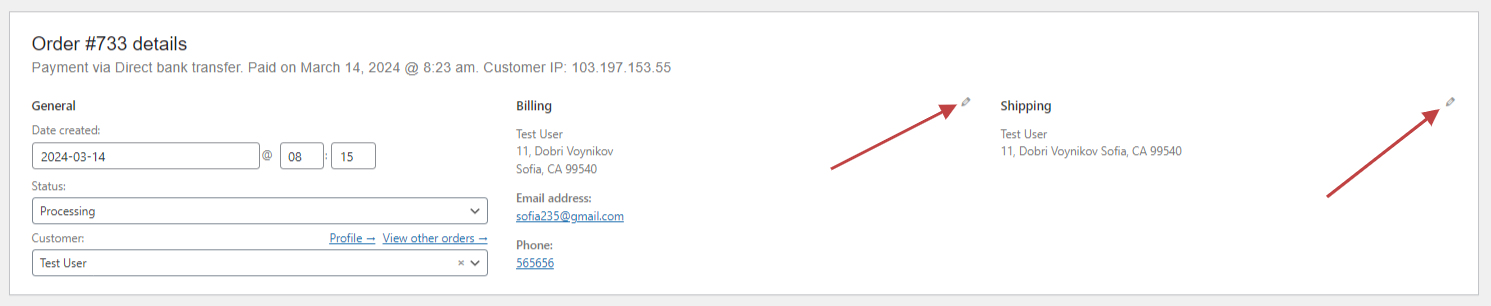
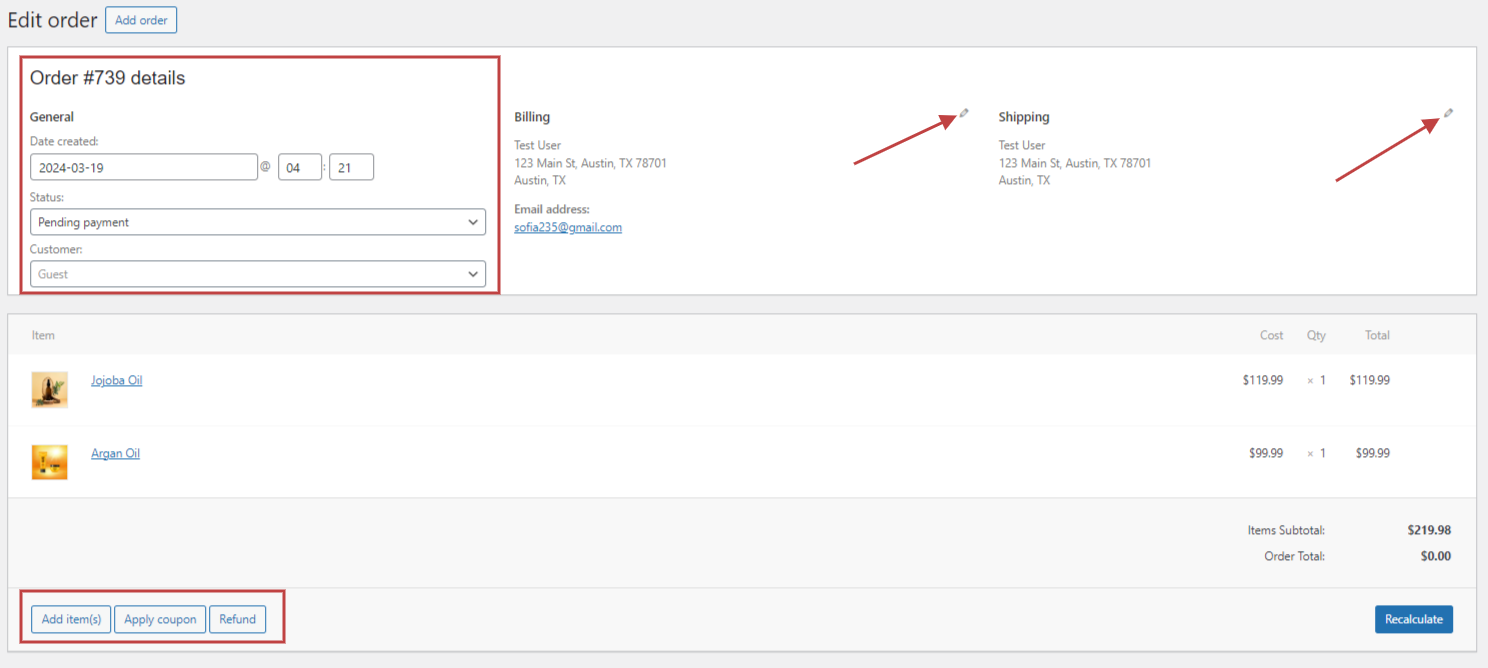
1. Edit Order Details
You can change the billing, shipping, date, time, and customer from this panel. In the General section, use the dropdown date and time selector to pick your preferred option. You can also change the Status and Customer of this order here.
Edit the billing and shipping information, along with the email, phone number, payment method, and customer notes from this column.
2. Order Items & Total Cost
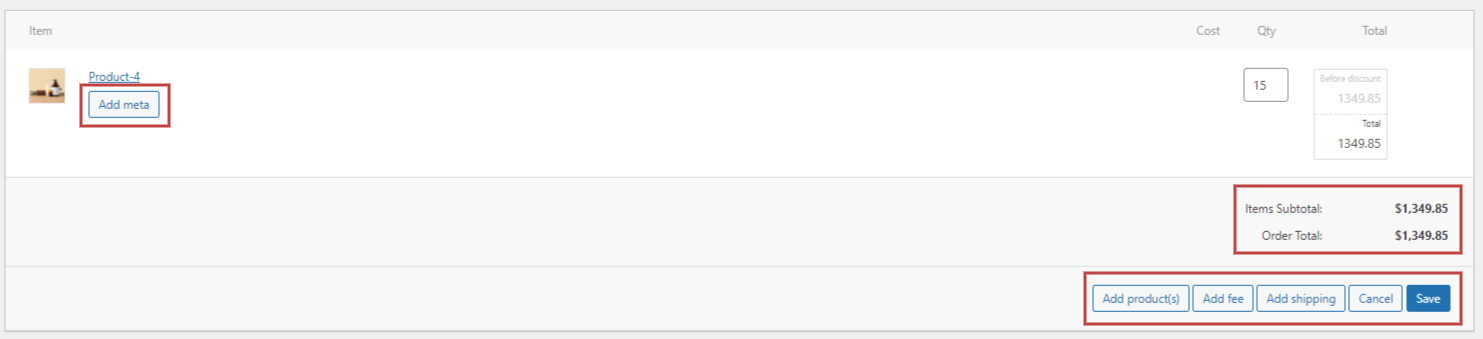
The order items column has the product image, name, single product cost, total cost (including quantity), coupon box, shipping cost, and taxes. You can also add items and meta, change shipping, and refund the order from here.
Note: Check the WooCommerce refunds document for information about Manual and Automatic checkouts.
Just click on the Pencil Icon next to the product line to edit the quantity, total (without tax) Meta, and remove the tax.
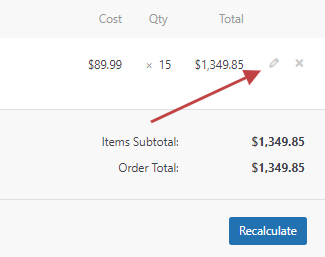
You can also add item(s), add additional fees (for extra services), and add shipping costs.
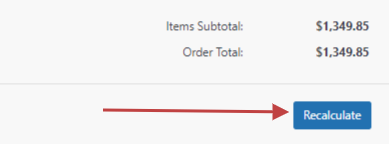
You can add tax fees automatically based on the customer’s country and store base country by clicking on Recalculate. This will also take into account cart and order discounts, payment methods, and any other changes given.
3. Custom Fields
The section below is where you will find Custom Fields. Add custom metafields, and extra Meta data to add to your theme.

4. Order Notes
The order notes panel allows you to add custom notes to an order, display order progress details, and enable payment gateways to use it for debugging.
There are different colors for each type of note i.e. purple notes indicate system status notices, gray means general status updates and private notes, and blue shows notes to the customer.
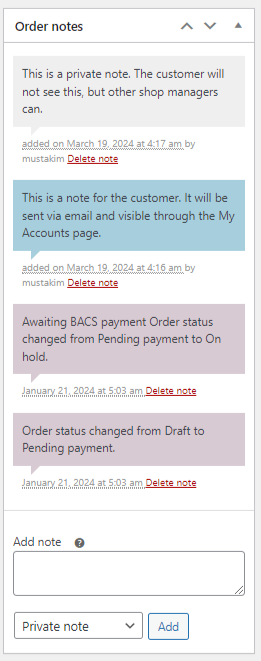
You can add notes from the Order Notes panel, just add the content of the note in the text area, select Private Note or Note to Customer from the dropdown menu, and Add the note.
How to Manually Add an Order?
WooCommerce order management offers you the ability to manually create an order for both registered customers and guests. Here’s a step-by-step guide to manually add an order to WooCommerce –
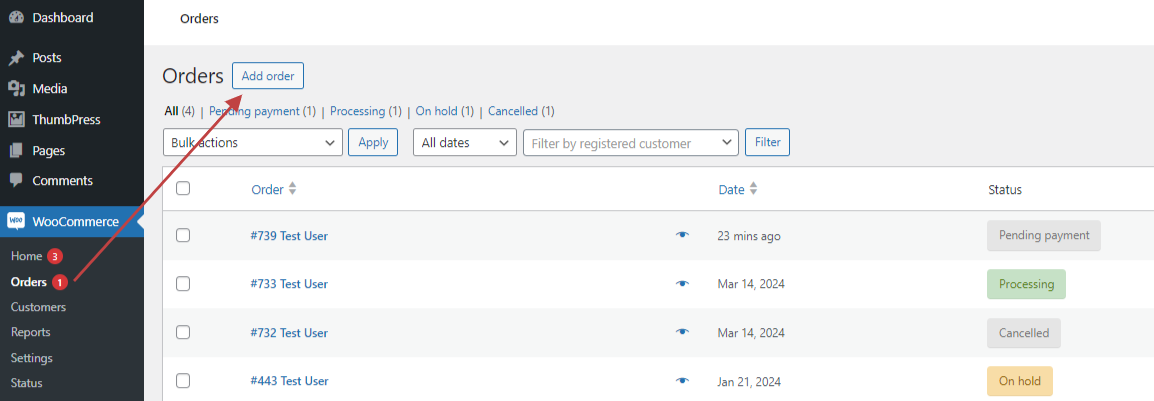
Step 1: Add Order
Navigate to WordPress dashboard > WooCommerce > Orders. Click on the Add Order button at the top of the page, next to Orders. You will be redirected to the single-page order editor.
Step 2: Input Details
Add customer details, products, coupon codes, and charges, and calculate subtotal to create the order.
Note: Follow the steps in How to Manage a Single Order given above.
Step 3: Set a Status
Finally, set an order status for the new custom order and if the payment is still on hold, select “Payment Pending” from the dropdown menu and click the “Update” button to save.

Note: Click on Order Actions and select Email invoice/order details to customer to send the customer introductions on the payment process.
Final Thoughts
Understanding and properly managing WooCommerce orders helps streamline your online store’s operations. Handling your shop’s order effectively greatly improves the customer experience by keeping them informed about their order’s progress, and reducing the likelihood of them reaching out to your support team for updates, thereby saving time for your staff.
If you’re looking to customize your order invoice, use Codexpert’s leading plugin – CoDesigner and its Invoice Builder module to create professional invoices and reinforce your brand identity.
Get CoDesigner now to access a library of widgets and modules to successfully enhance the shopping experience!
Subscribe to Our Newsletter
Get the latest WordPress tutorials, trends, and resources right in your inbox. No Spamming, Unsubscribe Anytime.

Thank you for subscribing to our newsletter!

I'm a seasoned creative content writer with 4+ years of experience in crafting well-researched blogs, web copies, & social media posts in and outside of WordPress. I also enjoy reading fiction, experimenting with different art mediums, and playing with my cats in my spare time.
Table of Content
- What is WooCommerce Order Management?
- What are Order Statuses?
- How to Change Order Statuses in WooCommerce
- Multiple Order Management: A User Guide
- Single Order Management User Guide
- 1. Edit Order Details
- 2. Order Items & Total Cost
- 3. Custom Fields
- 4. Order Notes
- How to Manually Add an Order?
- Final Thoughts